Sewing for my beloved daughter is a pleasure. Many may wonder why do this if you can buy clothes in a store? But the fascinating process where mother and daughter create stunning outfits is difficult to replace with a trip to the store. In this article we will give patterns for sundresses for girls, which can form the basis of parental creativity.
Sundress in Old Russian style
Quite often, matinees are held in kindergartens, in connection with which children need to dress up in the clothes of our ancestors. A sundress pattern for a girl will help mom make such an outfit. The main thing is to choose the right material. To make the look festive, you should choose a light floral fabric. And to achieve greater authenticity, you should take a dense material that is visually similar to canvas.
To make a pattern, you will need to measure the girl's height and chest circumference. Based on these parameters, you need to adjust the drawing shown above to the proportions.
Sewing a sundress will not be a problem. First, you should cut the front and back shelves, and then connect the two parts of the product with side seams. The final stage will be trimming the neckline and hem. It’s most convenient to do this purchased, but if you don’t have it on hand, you can use a piece of fabric and trim the edges with it.

Simple sundress
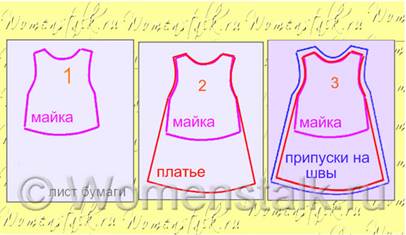
One of the most basic ways to create something new for your daughter is to sew it from two parts. The pattern of a sundress for a girl of this type is shown above. You need to choose a fabric that will suit your daughter’s color type, and most importantly, will not be a brand name. The above image can become a pattern for a warm sundress. In this case, you need to choose a fabric that contains wool.
You can print out the given pattern and use it to create your own clothing design. For example, change the round collar to a V-neck or add a collar. You need to transfer the pattern onto the material using chalk or soap. You can also use special ones. Sewing a sundress is very simple. It is enough to make two side seams and a hem.

Summer sundress
Such clothes are simply irreplaceable for hot weather. The sundress pattern for girls is multi-part. To make the product look presentable, you need to use a plain fabric to make it, which will highlight all the raised seams. You can print the pattern above or you can draw it by hand. Here you should only take into account the height of the girl. The chest circumference can be any; it will be easy to model directly on the child. Once the pattern is transferred to fabric, it needs to be cut out and stitched step by step. The first step is to make the front shelf. We assemble the part onto a drawstring and sew two side strips to it. We sew together all the back parts. Now you need to process the upper edge of the product and stitch the elastic into it. After this, you should sew on a small back strap and straps. The final step is processing the hem. It can be folded or stitched with a zigzag.

Wide sundress
Such clothes will fit perfectly on both a thin girl and a plump child. hides the figure and makes it more fragile. given above. It needs to be scaled and adjusted to the child’s height. Keep in mind that the neck is wide, which means it either needs to be reduced or an elastic band inserted into it. Don’t be afraid to make a mistake, because you can always correct the product by slightly adjusting its style. After cutting out the pattern, you need to transfer it to the fabric. It is advisable to take light material that will drape into folds. And to have more of them, you need to cut the product along an oblique line. When the parts are ready, you should sew the front and back panels on the sides and process the neck and hem. If desired, pockets can be sewn into the side seams.
So, to sew this sundress I used
- thin knitted jersey “strawberry” - it’s difficult for me to count the quantity, because... flaps and trimmings were used, well, approximately 0.4-0.45 m (150 width) will be required for a height of 92-96, if you buy a new one in a store,
- satin red ribbon 12mm wide (it took about 7m), you can calculate it based on the width of the hem (multiply by a factor of 4 or even 5 - this is for decoration at the bottom, plus 0.5m for the bodice)
- red ribbon 25mm wide, 0.6m long for a belt
- elastic band 20 or 25mm wide for the waist - about 40cm long
- elastic bands for the top of the bodice - about 40 cm were used from various leftovers (4 pieces of 10 cm each)
- lace and beads optional, I just had to add any leftovers
- we especially remember about the red threads that will need to be used to sew meters and meters of red ribbon, i.e. take a reel to match.
Pattern calculation is as simple as possible:
Skirt It is a long rectangle (mine spans the entire width of the fabric) with a height = the desired length of the skirt plus seam allowances and a hem turn. In my case, the height of the skirt is 22cm + allowances. 
We sew the rectangle along the side seam and finish it with an overlocker. First process the bottom with an overlocker, then turn it up by 1-2cm (how many allowances were planned), here you can immediately sew the hem, or you can pin it with pins/bait and sew it on at the same time as the tape - this is more difficult, because The entire tape must be laid out manually.
Now about the tape. Of course, it is very difficult to assemble 6-7 m of ribbon onto a thread by hand, in addition, due to the tightening of the thread, satin ribbons give “fabric coming apart” and the appearance of the unraveling ribbon is somehow not very good. So I used the Miracle Gathering Foot with a fold factor of 2 and a pitch of 1.
For those who don’t have such a paw, don’t be upset, but keeping in mind the difficulties described above, take pieces of tape 1-1.5 m long and simply connect the overall picture of their pieces. A little longer, but the view will be better than stretching the entire 6m along the thread. Don't forget to burn the edges of the tape so that they don't fray later.
So, the assembled tape lies ready. We lay it beautifully along the hem (I pinned the kinks with pins). Keep in mind that the assembled tape must be made 10-20 cm more than mathematically calculated, since during the process of laying and stitching it will still be packed thicker than expected. Here's a close-up view 
I lay the tape in zigzags with flips at the transition points from one semicircle to another - fortunately, the tape is almost double-sided. You can come up with your own styling method.)
Bodice pattern It is also a rectangle (2 pieces). Height = bodice height, width = waist circumference/2 + allowance for a loose fit (mine is +10cm).
In total, we get 2 rectangles with a height of 14 cm (plus seam allowances) and a width of 46/2 + 5 = 28 cm for each rectangle (with a waist of 46 cm for a child)
At the upper corners of the rectangle we cut (almost by eye) small (!) semicircles for the armholes. Cut very small ones, because... The seam allowances will also be taken away and the armhole will become larger, so don’t overdo it in the beginning. It’s better to put it on the child and use a pencil to mark the height of the armhole, if necessary. 
Here in the photo are all the details of the bodice - below are just the rectangles of the bodice. On the left are the straps (I already have them ready, because I didn’t immediately think about MK), above are facings for the armholes and rectangles – facings for the top of the bodice.
Let's do the straps first. Their length can also be measured on the child (or calculated knowing the length of the front to the waist and the height of the main part of the bodice), length x2, so that later they can be assembled with an elastic band and it will turn out magnificent. It’s better to make it with reserves, and then cut off the excess. The straps are sewn from simple rectangles, decorated with lace on one side. An elastic band is inserted inside. It is better to sew bows on the finished product.)
When the armhole cutouts have been accurately checked, you can cut out the top facings for them (rectangles 3-4 cm wide and length = the length of the flat upper part of the bodice (again, let me clarify that allowances were made for a loose fit (about 10 cm), in addition, a gathered top is planned, so the top The bodice is slightly larger than the same line along the child’s body. Didn’t it confuse everyone?
In my case, the final length is 14, and the initial one is 22 cm. And facings = 24x4 2 pcs.
And we cut out the armhole facings - you can sew the parts of the bodice on one side, attach them to the paper and trace the armhole line. The width of the facing is also 3-4 cm.
We process the top of the bodice. We add decorations (I have a red ribbon and a piece of lace) + facing 
We sew everything along the top at once. By the way, I don’t process the edges that go inward with an overlocker (in this case), because... the knitwear practically does not fray, and the seam itself does not thicken.
We turn everything inside out and stitch at a distance of 1 cm (to fit the elastic inside)  .
.
We insert an elastic band inside and secure it along the edges so that it does not run away in the future. 
So both edges of the bodice.
Now we sew on the straps - we apply the finished straps (do not confuse right and left, if the straps are different - like mine in semicircles), on top of the facing (the lower edge of which is processed). 
Carefully sew along the strap (above the edge of the bodice with elastic, i.e. without catching it with the stitch) and along the armhole. 
We turn the facing inside out and sew a beautiful stitch over it. We decorate the straps, if necessary. The bodice is ready.
Now I sewed a red ribbon (25mm wide) along the bottom of the bodice, leaving its seam unsewn to insert the elastic. I pinned the bottom of the bodice along with the ribbon to prevent fidgeting.
The prepared skirt must be gathered at the top (here it’s easier with a thread) so that the width of the skirt and the width of the bodice are equal.
We fold the bodice and skirt face to face and sew them together, evenly grabbing the edge of the red ribbon. Perhaps the whole difficulty lies in accuracy, so make larger allowances, and then cut evenly to the edge of the tape so that you can see the edge and dance from it when sewing.
All that remains is to thread the elastic into the waist and manually grab the armhole facing to the side seams and the top facing so that it does not turn away.
The sundress is ready!
Sew with pleasure!
How often does it happen that a handicraft mother’s heart swells at the sight of a fabric with a funny child’s design, asking to become her daughter’s dress? And just as often, many ready-made models leave us indifferent: too many bows, too much Lurex, an unsuccessful combination of colors and other “charms” in which you don’t want to see your beloved daughter at all. In order not to torment yourself with unfulfilled desires, we suggest learning how to create a universal dress pattern for a girl with your own hands. Bonus: pattern of a dress and sundress for different age groups of girls. Having built a basic model, it is then easy to diversify the patterns to create stylish children's dresses and sundresses.
Once you have learned how to correctly create a basic dress pattern, you can delight your daughter with new cute styles of dresses every season, changing the pattern according to the standards of the growing child.
Constructing patterns for creating children's dresses and sundresses
We use a meter, measure the girl and write down the resulting values. Please note that it is very easy to make mistakes with small sizes, so double-check yourself several times.
In our case, we used the sizes for a child approximately 5 years old (the measurements are given as an example - you measure yourself, even if it seems that the ones we gave suit your girl).
- From the cervical vertebra to the hem of the skirt - 56 cm
- From cervical vertebra to waist – 26 cm
- Shoulder length - 9 cm
- Half neck circumference – 13.5 cm
- Half chest circumference – 30 cm
- Sleeve – 36 cm
Now, based on the measurements, we begin to build our pattern. You will need whatman paper or paper of a suitable size.

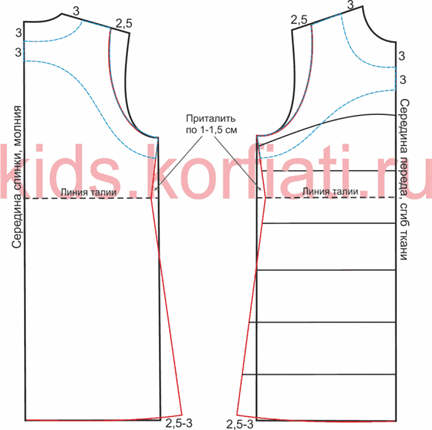
Draw a rectangle ABCD, where AD=BC=56 cm (dress length).
Width: half bust and additional 4 cm (the model will be quite loose. Can be reduced to 2 cm), for all sizes. It turns out: AB=CD=34 cm
Drawing the armhole . Section AG = 16 cm (half chest circumference additional 4 cm for all sizes). In numbers: 30 cm / 3 +6 cm = 16 cm
From point G, lay a line at an angle of 90° to the segment BC - point G? (hence AG=BG?= 16 cm).
We mark the waist line: measure 26 cm from point A, point T (according to our standards - the length of the back). From point T, at an angle of 90°, is a straight line drawn to the right to segment BC - point T? (hence AT=BT?= 26 cm)
GG segment? divide in half, mark point G?. Draw a line from it to the segment DC, mark point H. Intersection point on the segment TT? mark as T?.
We measure out the armhole. Its width is? half chest circumference (in our case from 30 cm) and an additional 2 cm for all sizes. According to the formula: 30 cm / 4 +2 cm = 9.5 cm. From point G? to the right and left to the segment CD, set aside 4.75 cm. Points G? and G?. Draw straight lines from them upward onto segment AB - mark points P and P?
Lifting the shelf: from points B and P? set aside 2 cm upwards. Mark points P? and P?, connect to each other. These are the auxiliary lines of the shoulder and armhole. PG segment? divide equally. Segment P?G? Divide into three equal pieces.
How to make the back of the product.We start with the neck. From point A to the right we measure 5 cm (half the neck circumference according to the measurement and an additional 0.5 cm for all sizes): 13.5 cm / 3 + 0.5 cm = 5 cm. From this point measure up 1.5 cm and connect with point A a slightly concave line (use a template).
Building the shoulder. We mark the slope of the shoulder: from point P downwards, measure 1.5 cm. From the neck of the back, where we marked 1.5 cm, through the slope of the shoulder (the second point is 1.5 cm) we draw a straight line equal to 9 cm, according to our measurements.
Is the back opening built from point G? bisector, 2.5 cm long (a line dividing the angle in half). Do we draw a smooth line from point 9, through half of the segment PG? (where we measured it), through point 2.5, to point G?.
From point T? measure 2 cm to the right. Draw a side seam line: G? - point 2 – segment CD (1 cm short of it).
We are building the bottom for the dress. Divide segment DH in half and connect it to the side seam line at point 1 with a smooth line.
We build in front of the product.Are we calculating? from the half-circumference of the neck and add 1 cm for all sizes: 13.5 cm / 3 +1 cm = 5.5 cm
Do we measure this length from point P? down.
Are we calculating? from the half-circumference of the neck and add 0.5 cm for all sizes: 13.5 cm / 3 + 0.5 cm = 5 cm
Do we measure this length from point P? to the left.
We connect the resulting points 5,5 and 5 with a concave line.
From point P? set aside 3 cm, noting the slope of the shoulder. Then, from the neck of point 5 towards point 3, draw a line of length 9 cm (according to our measurement).
Is the front armhole built from point G? bisector, 2 cm long (a line dividing the angle in half). We draw a smooth line from point 9, through half of the segment P?G?, through point 2, to point G?.
From point T? measure 2 cm to the left. Draw a side seam line: G? - point 2 – segment DC (1 cm short of it).
From point T? We put 2 cm down and connect it to point 2 on the side seam line.
We are building the bottom for the dress. From point C we extend the segment BC by 2 cm. We connect point 2 to point 1 at the bottom (on the side seam line).
We suggest using simple free patterns to consolidate your acquired skills.
Sundress for a fashionista for 3 years:
In addition to the presented models, there are many more patterns on the Internet that you can download to replenish your collection.
Several videos on the topic of the article
We wish you creative success.
Just a few decades ago, absolutely all schoolchildren were required to wear a prescribed uniform, which made life much easier for parents. Buying a dress was not difficult at that time. All stores had a special department where you could choose uniforms of absolutely any size, for both boys and girls.
Today there is no generally accepted style. All that remains is an agreement on the color combination. Light top and dark bottom are a classic. And it is precisely this combination that the administration of any school asks parents to adhere to. In addition to the standard combination of a blouse with a skirt or trousers, girls are allowed to wear sundresses over a light blouse. But today it can be quite difficult to choose a thing of the right size, especially when it comes to clothes for first-graders. Often, little ones entering the school path simply do not correspond to the generally accepted size range of uniforms produced today. And even the smallest models turn out to be great.
Therefore, it will not be amiss to learn how to sew a school The patterns for this item of clothing presented in the article will help craftswomen understand the principle of creating a base pattern and modeling various styles.
Perhaps, you should start working on a new outfit for a little schoolgirl by determining the length of the cut of the material and measurements.
Calculation and taking measurements
To cut and calculate the fabric, you should measure the child’s height, chest, waist, hips, back width, height from shoulder to chest, as well as the length from shoulder to waist and the length of the finished product. For any model, be it a straight silhouette or a version with a fabric width of 150 cm, you will need a cut equal to the length of the finished product + 10 cm for finishing the seams and hemming the bottom. If the width of the material is 110 or 80 cm, its consumption will increase by approximately 20 cm.
What material should you not take?
You should select fabric for a school sundress based on the following requirements for the fabric:

What is the best material to make a sundress from?
The ideal option both in terms of price and quality would be the so-called school fabric, as well as katon and gabardine. But you can use other costume fabrics. Knitted fabrics include diving and jersey. In any case, the patterns of school sundresses discussed in this article are suitable for making a product from any fabric, the only difference will be in the fastener.
In addition to fabric, you will need sewing equipment, matching threads, a 50 cm long zipper or buttons. But, as practice shows, a child will be more comfortable with a zipper clasp.
Building a template
The main pattern of a school sundress for a 7-year-old girl, on the basis of which absolutely all styles are modeled, is constructed in accordance with the measurements taken from the figure. To develop a drawing, you will need to outline a rectangle on paper or construction film. One side is half the chest circumference, the other is the length of the product. Further construction can be divided into several stages:

Perhaps these are all the tricks of constructing the basic pattern for school sundresses. All its changes relate to design and modeling. And this topic is worth talking about separately, because by changing the number of cut elements and their shape, you can achieve amazing results.
Modeling
If you change the base a little, new patterns for school sundresses will come out. For example, in the drawing you can indicate raised seams from the shoulder and to the bottom, the sections of which should be flared towards the hem. The six-piece product will look like a bell and is perfect for a skinny little girl.
You can also make the top cut off, and make the skirt out of a strip of fabric gathered with bows or regular folds. The place where both parts combine can be decorated with a satin ribbon and a bow. In this case, it is best to lower the waist by about 7 cm.
Patterns for school sundresses for girls can be improved. For example, it is not difficult to fit it along the back and thus make a real ladies' sheath dress for the baby.
Also interesting options would be models with a tulip skirt and a peplum at the waist.
Armhole and neck design options
Sewing a school sundress, the pattern of which is so easy to construct, is not at all difficult. The most difficult thing that can lie in wait during assembly is the armhole. They can be made from the main fabric or a selection of lining material, duplicating the main fabric of the product up to the waist line.

Due to the fact that patterns for school sundresses for girls are made without complex calculations and drawings, and the processing of parts is not as difficult as it might seem at the beginning of work, you should try your hand at making a school uniform item yourself.
To make a pattern for children's dresses and sundresses, you don't have to know how to sew dresses for adults or be a sewing master. Many models of dresses and sundresses are sewn very simply, and creating a pattern will take no more than 30 minutes. And a dress sized for little ladies will be special and individual, unlike one bought in a store.
Simple option

The simplest dress is a one-piece dress, which is sewn from any materials. It is suitable for ages from 1 to 3 years. For 3 years, many sew more difficult dresses, but as a summer lightweight option, this style is suitable for 5 years. You can easily find patterns for children's dresses for girls in our material.
The basis for the dress can be downloaded for free on the Internet, after which it can be adjusted to the desired size and added with details - ties, pockets, an additional skirt, buttons. But it’s more interesting to do it yourself, especially since it won’t take much time. Find out how to make this outfit below.
- Prepare paper for the pattern. Find a T-shirt in your daughter’s wardrobe that is not too small for her;
- Next, put the T-shirt on the paper and smooth it out so that there are no unnecessary folds. Trace the outline of the T-shirt, or just the outline of the neckline and armhole. Next, the lines need to be widened towards the bottom and rounded at the bottom. It’s not scary if the pattern turns out to be asymmetrical, since only half of the product will be needed for sewing.


- Choose the length of the dress according to age. Choose the neckline of the dress. Next, measure the circumference of the child’s chest, divide it in half, obtaining a half-circumference. Determine the size of A and B. If there is no child nearby, or you are sewing as a gift for someone, you can refer to the tables that indicate sizes for small children.

- Measure the distances for allowances so that the dress fits freely on the child;
- Divide the pattern in half and cut it, since only one half is useful, you can choose the most successful half if they turn out different.
Summer model
Summer sundresses come in completely different models: from simple ones with ties to complex patterned multi-layered sundresses. Let's look at two sundresses. For a sundress, a child under five years old will not need difficult patterns. You can make a simple sundress with straps.

It’s even easier to sew a sundress that is tightened with a ribbon. And it looks bright and beautiful, suitable for any age of child.


For a teenage girl
It is not much more difficult to sew a sundress for 10 years, but it is unlikely to be possible to do everything by eye, so it is better to take the basic dress pattern as a basis.

It will be a sleeveless bodycon dress with a big bow on the front.
Front and back. The neckline needs to be deepened by 3-4 cm, and a new neckline must be built according to the given parameters. In order for the dress to emphasize the beauty of the figure, it needs to be fitted and widened at the bottom. On the back, at the waist line, retreat 1.5 cm, increase the bottom line by 3 cm. Since the dress has thin straps, the shoulder needs to be reduced by 2.5 cm and a new armhole made. Next, about 3 cm wide, make a facing for the neckline and an armhole facing.
Color transition. The dress will have a color transition, so horizontal lines should be used to mark the color change on the dress. You need to do this on both the front and the back pattern.
Cut the pattern and you can start sewing.

The basis of the outfit

To sew many dresses for your child, you can make a base pattern, which will easily be used to sew any dress in the future. To do this you need to take measurements:
- Lengths: back to waist, total length, shoulder, sleeves;
- Half-girths: neck and chest.
Build a rectangle on graph paper ABCD, AD is the length of the dress, AB and BC are the width = Lom + 4 cm for allowance.
Please note that the seam allowance can be made smaller, then the dress will fit more closely.
From A, retreat 1/3 * Pog + 6 cm and place G. From G, draw a line to BC, mark G1. From A, retreat Dc and mark the melancholy T, draw a line from it to BC and place point T1. Divide GG1 into two equal parts, mark G4 and draw a line from it to DC, mark H and H2. From G4 to the right and left, set aside ½*the width of the armhole (W=¼*Log+2 cm). Install G2 and G3. From G2 and G3, build straight lines upward to AB, place P1 and P. From B and P1, retreat 2 cm, place P2 and P3. Make a segment P2P3. PG2 is divided into two equal sections, and P1G3 is divided similarly into three sections.
