“Pineapple” is considered one of the most common openwork patterns in crocheted needlework. It's all about not only the relative simplicity of knitting it, but also the final result of the process - a “pineapple” pattern made using any of the many patterns turns out to be truly magnificent!
Tags:

Tunisian knitting has many names - Afghan weaving, Victorian knitting, tunnel technique. This method of knitting has been known since ancient times, however, only a few knitters can boast of skills in this technique. This is because knitting with Tunisian motifs is not as popular among needlewomen as, for example, the fillet technique, Irish typesetting or ribbon lace.
Tags:
Sometimes, luxurious women, whose shapes have crossed the XL size line, find it difficult to choose the desired wardrobe item that suits all their requirements for femininity and visual attractiveness. So, in addition to an attractive design, clothing should visually refine the female silhouette, while simultaneously hiding minor figure imperfections.

Tags:

The tunic is that item of women’s wardrobe whose relevance will never be lost. In short, a tunic is an elongated blouse, usually reaching mid-thigh. Its main secret is a loose cut, thanks to which the advantages of the figure are emphasized, and minor flaws, on the contrary, are neatly hidden.
Tags:
The “fillet” technique has gained unprecedented popularity among needlewomen, not only in terms of creating interior decor items (decorative napkins, tablecloths, window curtains), but also as a basis for knitting exquisite clothing models - sweaters, boleros, tunics, cardigans. 
Tags:

Competition entry No. 9 – Knitted dress and blouse for a girl (Burova Elena)
Hello! I decided to take part in the competition. Here are my works.
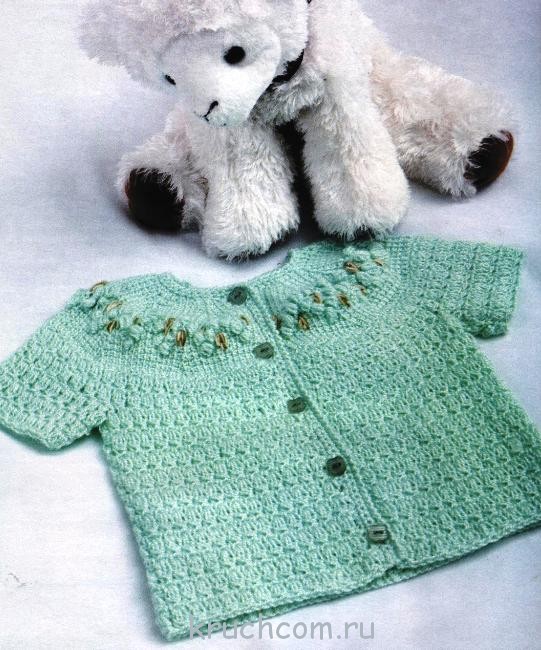
A knitted blouse for a little baby is knitted with soft yarn in a light green color.
MATERIALS 100 g of fine yarn (100% acrylic) light green, 5 buttons and embroidery thread in green and beige tones. HOOK No. 3 and long hook No. 3.
TYPES OF HINGES: V. p., art. b/n, art. s/n.
Art. "crawfish step": elm, like Art. b/n, but from left to right. Yoke: according to scheme 1. Fantasy patterns: according to schemes 2 and 3. Tunisian elm: according to the drawing and description.
KNITTING DENSITY 10 cm = 21 P.
A beautiful delicate blouse is crocheted with openwork patterns.

Competition entry No. 23 – Bolero jacket made from motifs
I love handicrafts. Things made with your own hands have a special energy. You wear them with special pleasure. Such a thing always has its own story - it is not just a wardrobe item.
I spied the design of such a sweater from one model of the rather expensive Desigual brand.

Jacket-bolero
Knitted from 100% cotton. (I took about 10 skeins)
Hook No. 2.5

Approximately 52 hexagonal shaped motifs were used in the work.
Please note that the fastenings for the motifs are different. Vertically, the motifs are attached to the arch, horizontally - end-to-end by the petal, and on the shoulders - also under the arch in all directions.
In order for the knitting to be definitely continuous, you need to start from the lower left rear motif, if you look at the product. Here I drew an arrow 
Now let's get back to the diagram. Explanations:
1. If you knit the first (lower left) motif according to the pattern, then after knitting the second row, you find yourself in the gap between the petals. And in order to move to the next row you need to tie as much as half of the petal, and we don’t need this extra thickening. So I suggest a little trick. You start the first motive with a chain of 10 airs. loops (marked in black on the diagram) plus 6 for the center. Close 6 loops in a circle, knit 3 air. loops, attach to the fourth loop of the chain. You get two chains together that replace two columns. Then leave the remaining chain of 6 loops dangling on the right and knit the first row according to the pattern (yellow arrow). For the last arch of the first row, knit 5 loops and close them into the last loop of the dangling chain (pink arrow). You find yourself in the middle of the petal, from where it will be convenient to move to the last row.
2. In the last row of the first motif, knit two ears along the blue arrow. Having closed the chain of the last ear in the middle of the petal, move on to the next motif. The transition chain is marked in dark blue. For the transition chain, knit 9 chains. loops - half of the arch of the first and second motifs (in the diagram - like the letter P between the motifs) plus 15 loops and plus 6 loops for the center. Knit the first row of the second motif as in the first motif - three air. fasten the loops into the fourth loop of the chain, then follow the yellow arrow, for the last arch of the first row, knit 5 loops and fasten them into the sixth loop of the chain (pink arrow). Next, again leave the chain on the right and tie the petals with columns along the yellow arrow. You knit half of the last petal like this - after knitting all the stitches, knit one loop (pink arrow) and attach it to the second loop of the chain. Next, knit 4 loops and fasten along the green arrow into the fifth loop of the arch of the previous motif. In this case, your motives will be connected by the 9th air. loops (letter P). Then knit along the blue arrow, fasten the ear along the green arrow, then again along the blue one. Then move on to the next motive. So you knit 8 motifs.
3. Knit the last row of the eighth motif along the orange arrow. Having knitted the second ear, knit 4 air. loops and fasten to the middle of the letter P. Then again 4 loops, half an ear, fastening to the previous ear (green arrow). And so, following the orange arrow, you knit the upper part of the motifs to the first motif. Knit to the point where the orange arrow ends. Next, follow the bright red arrow to the second row of motifs. Please note that the number of loops in the transition chain between rows will be less than along between motifs, since the fastening between the rows will be end-to-end. Here for the transition chain you dial 15 air. loops and knit as before. Only in the last row do you knit one ear along the burgundy arrow, not forgetting to attach it to the bottom motifs (green arrow). Then again transition to the next motive (bright red arrow - transition chain). You knit in the same way as the first row, only in the second row you also knit the fastenings to the lower motifs (green arrows). Only in the fourth motif of the second row the fastenings will be different (marked with blue arrows) - under the arch. In the fifth, the fastening motif is the same as in the fourth. The remaining three motives are like the first three.
4. Return along the purple arrow, not forgetting to tie the fastenings.
5. Next, you knit two rows of four motifs each, and in the fourth motif, in both cases, you knit fastenings under the arch. Then knit two more rows of 8 motifs (in the fourth and fifth motifs, fastening under the arch).
6. Turn the knitting 90 degrees and follow the brown arrow (in the diagram on the left) to finish the left edge..
Uhhh... so tired. I hope I explained it clearly. (I save all comments from YULIA. NGraf) 

Girls, why don’t the Japanese have such schemes like Russian ones, everything is from right to left or are they all left-handed? 
To make the motif more like an asterisk, three air. There is no need to knit the loops that are needed for connection. Instead, you need to knit three air. loops in the middle of the petal (indicated below by burgundy arrows) When you return, knitting the upper part of the motifs along the red arrow, at the junction you knit a chain of 8 chain stitches. loops (their number may be different, you need to see how many loops are needed so that the fabric lies flat and does not tighten anywhere), then close 4 more loops in a circle (red arrow to the center between the motifs), then 16 loops (8-there, 8- back) along the purple arrow, then 16 - along the green and 16 - along the blue and at the end 8 - along the red. We received this type of cross. Continue knitting, not forgetting to attach to the ears of this cross in the right places.
In principle, this cross can be knitted from any junction of motifs. I hope it helped.
http://club.osinka.ru/topic-20021?&start=1665
(I save all comments from YULIA. NGraf)
Cambalina, your motive can be connected inseparably, but.... Firstly, it is large, and secondly, it is very openwork. It has many arches made of air. loops And if you knit continuously, then the transition chain will be very long and many loops will need to be climbed, which means that some arches will be thickened and will be conspicuous. And the product itself will lose its tenderness and delicacy. And if, God forbid, you make a mistake, then you will have to dissolve a lot. Therefore, I advise you to knit the motifs separately, but without the last row, and then knit them in the last row without interruption. You will kill three birds with one stone - firstly, there is no need to sew, secondly, you will tie everything with one thread and, thirdly, you will also hide the ends. If you want, I will draw you a wiring diagram. 
The black arrow indicates the beginning. Knit three sides, fasten the last arch of the third side with two double crochets to the desired place of the next motif. Next, knit the second motif, attaching it to the first. The attachment points are indicated by green dashes. The principle of fastening is half an arch, fastening to the previous motif, half an arch, double crochets to the current motif, etc. Kind of like a zigzag. Knit along the purple arrow. You knit the upper part of this row of motifs along the orange arrow simply in arches, without attaching them anywhere. Move on to the second row of motifs. The diagram is drawn for a flat canvas, so half-motifs are shown in the second row. If you need a round canvas, then there will be no half-motif with the number 1, but on the left in the second row there will be a whole motif. Knit along the orange arrows, to the place marked with a red asterisk, in this place you knit air. loop half of the arch and fasten along the red arrow, do this three times and end up again in this place from where you started, then knit the fastening to the lower motif and further along the arrow. This “feint” is needed so that there are no holes in the corners. You tie the half-motif on the right with single crochets. If you have a round canvas, then the second and all even rows will be shifted to the left. Well, further along the arrows. When you have knitted everything, turn the fabric 90 degrees and tie the left side - in the case of a flat fabric, or wrap the fabric so that the right side is on top of the left and tie the left side, attaching to the right - in the case of a round fabric. Good luck. 

It seems to me that this tunic is not knitted entirely, but is cut from knitted fabric. Moreover, the armhole is lowered, but not framed. Here I drew an arrow 
Here's a side view  here the side seam is visible. Something tells me you won't cut the knitted fabric.
And if you want the tunic to fit your figure, then you need to change the hook number. Those. Let's say you knitted on the hips with number 3, the next row should be knitted with number 2.5, and at the waist line - with number 2 or 2.25. Need to try. Tie the motifs with different hooks and measure the length of the motif. Well, do the math.
And to knit the armhole honestly, make a pattern for the armhole line and the cuff line of the sleeve and apply it to the knitted fabric. And you knit motifs according to the pattern, somewhere half, somewhere without a quarter, somewhere without an eye. 
Here are very approximate lines for the armhole - in red and the sleeve cap - in blue. 

You knit the first motif from ear to eye along the blue arrow. Having knitted half of the upper right ear of the first motive, go to the next motive, for this you dial 18 air. loops plus 6 loops for the center. The transition chain is marked in dark blue in the diagram. Knit the last row of the motif along the blue arrow, not forgetting to attach to the previous motif in the places marked with green dashes. Having knitted half of the upper right ear of the second motif, move on to the next motif. And so on until the desired length. You return, finishing the top quarter along the orange arrow. Having knitted half of the upper left ear of the first motif, move on to the next row of motifs. The transition chain is marked in yellow. Knit the second row of motifs like the first, not forgetting to knit the fastenings. You knit along the pink arrow (although it’s a little hard to see, here I stratified with the color), and return along the burgundy one.


Here she is 
A bit small, really. Copy it to your computer and enlarge it. The ascent chain is indicated in black. Knit the last row along the blue arrows; bolder blue ones indicate the transition chain. Return by following the red arrows. Go to the second row, the transition chain is highlighted in bolder red. Return by following the purple arrows. The attachment points are indicated in green. True, I haven’t seen the product, so I doubt that the motifs are attached in the middle of the side; it seems to me that they should only be attached to the ears. But in the middle I drew fastenings just in case. 


Explanations:
The first motif is lower left. The ascent chain is indicated in black. Knit the motif, knit the last row of the motif (in your case it is a picot binding) following the blue arrows to point 1. That is. The lower part of the motif turns out to be tied, but the upper part is not. At point 1, go to the next motif, for this you knit 3 air. loops (half the “peak” of this motif) plus 15 air. loops (transition chain) plus air. loops for the central circle (most likely there are 4 of them). Total 22 loops. The transition chain is highlighted in blue. Knit the second motif, weaving a transition chain into it or climbing along it if necessary. Knit the last row along the blue arrows to point 2. Etc. to the required length. The last motif in the row is knitted completely. And following the orange arrow, you begin to knit the last row of all already connected motifs. At point 3, go to the second row of motifs. Again, cast on 22 loops for the transition chain (marked in orange) and knit the motif. The green arrow indicates the place of attachment to the bottom row of motifs. Knit to point 4, here you need to knit a “snowflake”. Dial 2 air. loops - half picot plus 25 air. loops plus 4 loops - central. Total 31 loops. Knit the “snowflake” according to the red arrows, not forgetting to knit the fastenings marked with green arrows. Having knitted the “snowflake” completely, you find yourself in the place where you started knitting it and continue to knit the last row of the motif to point 5. Then again move on to the next motif. Knit, not forgetting to knit fastenings, to point 6. Here again you knit a “snowflake”, etc. Having knitted to the required length, you return, finishing the last row of motifs, following the purple arrow. And so on until the desired height. When you have knitted the entire fabric, turn the knitting 90 degrees and knit the left side. Something like this. 

I chose a motif of 6 central stitches and 18 double crochets around it. It is clear that you can choose your own number of loops and stitches. On the left, the red line indicates the lifting loops. We knit along the blue arrow, for the transition we dial 3 air. loops plus 6 center. loops We knit the motifs marked with numbers 1, 2, 3 and 4 completely, returning to the same place where we started knitting this motif. Then follow the blue arrow again. Please note that due to the specific location, the motifs are knitted not by half, but a little more, and in some places a little less. The number of columns for this “more” and “less” will need to be calculated empirically. Having knitted the required length, we return along the red arrow. In the place where the arrow leads to the center of the motifs, we knit 5 air. loops plus 4 central loops, then we knit around these 4 loops 7 “petals” of 10 air. loops each, then another 5 air. loops and we find ourselves in the place where we started knitting the connecting motif. In the diagram, this motif (asterisk) is indicated by orange dashes. Next we knit along the red arrow, not forgetting to attach to the star in the places indicated by green dashes. Let's move on to the second row. We knit along the purple arrow, return along the brown one. I think this diagram will be useful to someone.
Girls, I came up with another pattern for knitting a stole from the previous post. It seems to me simpler. I even wanted to delete the previous post, but then I thought that what is simple for me will seem difficult to someone and vice versa. Therefore, let there be two schemes. Some will like one, some the other. 
Start of knitting - 4 air. close the loops in a circle, 5 air. loops, knit along the blue arrow, i.e. we knit the entire circle and return back to the 5th air. loops. Then, following the red arrow, we knit the entire circle again and back. Then on the blue one. Here we knit two circles in succession (first half of one, then the whole second, then again half of the first) and come back again. Next is an orange arrow, a purple one, then follow the brown arrow to the next motif. Next follow the red, blue, orange, purple and brown arrows. We knitted the required length, we return along the pink arrow, then along the yellow, lilac, pink again. Returning to the very first motive, we move to the second row along the green arrow. Further according to the drawing. Where the circle is already knitted, we attach to it and return to the center; where it is not knitted, we knit it and return to the center again. Please note that when knitting circles, you must remember to attach to the previous circle. Something like this . I hope it's clear. 

Lifting loops are marked in black. Knit the last row of the motif (single crochet with picot) along the orange arrow. Having reached the transition point, knit an incomplete picot - 2 air. loops plus 14 air. transition loops plus 6 air. loops for center. mug. Knit the entire motif, the last row - again along the orange arrow, not forgetting to attach to the previous motif (attachment points are indicated in green). Knit the required number of motifs in length. Return along the blue arrow. Move to the second row. Be careful in the second row there are a lot of attachment points. And then follow the arrows of different colors. I specifically designated three rows of motifs so that you can imagine that the knitting is not even, there will be a shift in motifs. When you have knitted the required number of motifs in height, close the left edge of the motifs along the burgundy arrow. If you need to close the canvas into a pipe, at the moment of return (burgundy arrow) attach to the rightmost motives of the canvas. Good luck 


The lifting loops in the first motif are indicated in blue. We knit along the green arrow. As we knit, we knit the “ear” - we knit 5 air. loops, circle of 4 air. loops (I saw that in the photo of the bag there is a circle in this place), a post with 4 crochets, attached to the right place and then carefully return to 5 air. loops. The mounting points are indicated in blue. To move to the next motive, dial 17 air. loops plus 6 loops for the circle. If necessary, as we knit, we climb up the already knitted transition loops. Knit to the desired length. We return along the red arrow. We knit the second row of motifs along the purple arrow, returning along the orange one. Don’t forget to knit the “ears” and fastenings in the required places.


Explanations
1. Knit a motif, in the last row you knit 10 arches
2. Knit 5 air. loops (two - half of the 11th arch, one - a connecting loop and two more - half of the arch of the next motif) plus 15 air. loops and plus 5 air. loops for the central circle. Total 25 loops.
3. Knit the second motive. When you knit the penultimate row, a chain of 25 air. loops should be reduced to 8 loops. Here you need to knit three double crochets with one top. You knit two instep stitches, one unfinished double crochet, and knit all this fun through the third loop of eight, one loop, then 2 chain crochets. loops, attached to the arch of the first motif, 2 air. loops, 3 double crochets with one top, 2 air. loops and again fastening to the arch of the first motif, 2 air. loops and further according to the diagram.
4. Knit 8 more arches, and then see point 2. .
5. Knit, repeating steps 2 to 4, to the length you need along the blue arrow.
6. Return, tying the upper parts of the motifs, along the orange arrow
7. Go to the next row along the red arrow, return along the brown one.
Green dashes indicate places where motifs are attached.
Good luck.
SINCERELY , I.E. NATALIA GRAF.
A do-it-yourself crocheted sweater is always original. There will definitely not be a second one like this. The models are openwork, delicate and very feminine. You can crochet not only women’s blouses; it can also be used to create elements of children’s and men’s wardrobes. Let's look at some of them.
Crochet tunic for overweight ladies on one shoulder
Women with curvy figures usually find it difficult to find suitable clothes in the store. Either the color is wrong or it doesn’t fit well. The ideal option is to knit the clothes yourself. Overflights are excluded. This tunic model is made from motifs in two colors. Can be worn on one shoulder.
Description
For size 50-52 we need to prepare: 200 g each of cotton yarn “Iris” in blue and blue colors, hook No. 2.5
We start knitting a tunic for overweight ladies with a hexagon motif. We dial a chain of 10 v. p. blue color, close it into a ring and then knit in a circle as the diagram shows.
There should be 19 hexagons.
Now let's move on to pentahedrons. We need 3 of them. We dial a chain of 10 v. n. blue, close it in a circle and knit according to this pattern
The assembly of motifs into a one-piece product for obese women is done according to the drawing
The tunic is tied according to the following scheme:
The product is ready. As it turns out, knitting a tunic is not at all difficult, which is quite suitable for beginners.
Women's cardigan jacket: video master class
Elegant jackets for obese women
The jackets are designed in a strict classic style. They are devoid of pretentiousness and excesses. Jackets of this model are suitable for women of any age.
Description
The number of loops of this product is calculated for the following measurements: OG 120 cm, product length 64 cm, internal sleeve length 47 cm.
To knit jackets for plus size ladies you need to prepare: 500-600 g of beige Novita Bambu yarn (which contains 68% bamboo, 32% cotton), as well as hook number 3, 8 buttons.
Before we start knitting jackets, we need to make a pattern for each part according to our measurements. We start knitting from the back. We collect a chain of 172 vp. and continue knitting with the main pattern according to cx 1.
At a height of 39 cm, we decrease 1.5 repeats on both sides and continue knitting along cx 2. We check all decreases and additions of the part with the pattern.
At an armhole height of 25 cm, perform the 8th row of the pattern and cut the thread. We perform the other side in the same way, but we do not cut the thread, but knit the 8th row of the pattern along the entire edge of the part (first one shoulder, and then the other).
Please note that the pattern diagram shows 4 values for the same segment; they correspond to different clothing sizes. We are interested in the largest values, because jackets are intended for overweight ladies.
To knit the left front, cast on 84 stitches. p. and knit with the main pattern. We make decreases according to cx. 2. At an armhole height of 25 cm, perform the 8th row of the pattern and cut the thread. The front edge of the part is tied with the main pattern, rows 1-3. Make the right shelf symmetrically.
For the sleeve we dial 76 in. p. and knit, as diagram 3 shows
We make decreases according to cx. 2 and pattern
We assemble all the parts into the finished product. Art. s n. tie the collar and tie the edges of the jacket, leaving holes for the buttons.
Crocheted raglan for children
This raglan for children is suitable for the age of 3 months. Knitting is simple and perfect for beginners.
To knit a raglan for children you need to prepare: 100 g of blue yarn of medium thickness, which contains 40% wool, 60% acrylic; a little white, blue, black yarn (for applique), 4 blue buttons and 1 black bead.
Description
We start knitting raglan for children from the back. We dial 37 v. p. and knit 3 cm with an elastic band according to the drawing in diagram 1.
Then we continue knitting according to cx. 2.
We perform the front in the same way as the back, following the diagrams.
To knit sleeves, raise 27 stitches along the edges of the armholes and place the front shoulder strap on the back shoulder strap. We continue to knit raglan for children according to cx. 2.
Trim the neck according to cx. 1. Using a white thread, tie the edges of the front, neckline and shoulder straps in this way: *1 dc in the loop, skip 1 stitch, repeat from *.
According to diagram 3, make an applique and decorate the raglan for children with it.
Knitted children's jacket with raglan ears: video mk
Stylish women's sweaters with a round yoke for beginners
A white jacket with a round yoke and pineapples will always highlight the advantages of your figure, and a patterned border will add tenderness to the look.
Size of sweater with round yoke and pineapples 44-46
We will need: white viscose yarn, hook No. 1.5
Description
We start knitting from the neck. We dial the number of loops so that 12 motifs fit.
Next we knit according to diagram 1, after which we collect 24 arches for the yoke and close them into a ring. Then we continue knitting in the round along cx1a. At a height of approximately 19 cm, we divide the product into 3 parts (front, back, sleeves) so that each of them gets 3 motifs. We continue to knit the front and back in the round according to cx. 1st century We perform sleeves according to diagram 1b, and decreases and increases according to diagram. 1 year The border of the lower edge of the sleeves is made according to cx. 1c
The white jacket with pineapples is ready. Its simple knitting pattern is suitable for beginners.
Women's blouse made of square motifs for beginners
Schemes and descriptions of a sweater made from square motifs are given for clothing sizes 44-46, 48-50.
For work we need to prepare: olive and light green yarn 150g each (composition: 55% cotton, 25% polyamide, 20% silk), hook No. 3.5 (4.5).
To knit square light green motifs, we cast on a chain of 6 vp, close it into a ring and knit according to the pattern. The edge is tied with olive thread.
There should be 46 square motifs. They must be placed on a flat surface according to the pattern and tied together.
The jacket made from square motifs is ready.
Crochet openwork blouse: video mk for beginners
Unusual summer crochet top on one shoulder
This original women's jacket is suitable for everyday wear and for parties. It is easy to make, so it is suitable for beginner needlewomen.
Product size – S
For work we will need: white microfiber yarn 250g, hook number 2.
We begin work by making patterns. We will then consult them during knitting.
For the back we dial 90 vp. and knit according to the pattern to a height of 45 cm. Then we retreat 12 cm on one side, and on the other, leave 5 cm for the armhole. We continue to knit one shoulder, making the appropriate decreases. Finish the work at a height of 17 cm.
The front of the product is done in the same way.
For the sleeve, we cast on a chain of 24 vp, close it and knit in circular rows of 44 cm, as the diagram shows.
To give the blouse a more elegant look, its edges can be tied with shiny thread. An openwork trim or border will add tenderness and charm to the product.
Lovely sweaters and blouses from Japanese magazines
On the Internet it is extremely rare to find a translation of the description into Russian. Perhaps because the Japanese provide many detailed diagrams for their products, and everything is clear without description.
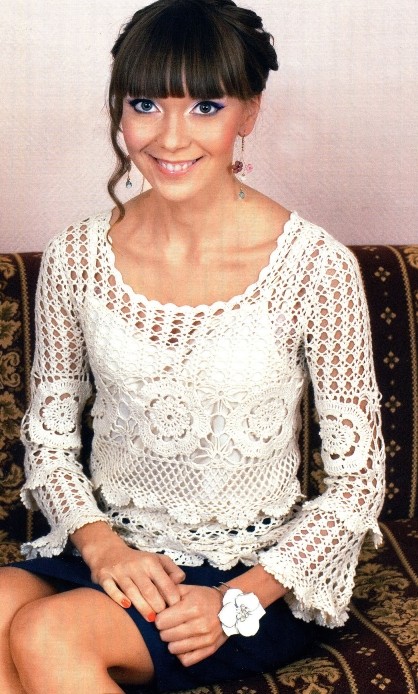
A charming white blouse that can be worn on one shoulder
Blouse with yoke from Japanese magazines
To knit such a blouse with a yoke needs to be prepared approximately 300g cotton yarn. The border is made separately and then sewn on.
Asian top from Japanese magazines with round yoke
It is best to knit a sweater from Alpaca Baby Lux yarn in 2 threads. ¾ sleeves and a frill trim add elegance to the product.
Openwork blouse from Japanese magazines
Two types of border decorate this product. It is tied along the bottom, neckline, front and sleeves.
Women's blouse from Japanese magazines
The blouse is made of square motifs. There are half-motifs as curves on the sides. The bottom of the product is decorated with a border. The neckline is tied with a braid through which a string is passed
Delicate blouse from Japanese magazines
The product is made of snow-white yarn. Its bottom and shelves are decorated with floral trim.
Baby surprise jacket: video master class
Men's crocheted sweater
You can crochet not only women’s or children’s clothing; it can also be used to create men’s wardrobe items.
Element: diagram 6-1. Knitted from the center in the round. In this option, you will need 5 full elements, 2 incomplete elements (halves) and 1 incomplete element (without 1 sector of the oblique mesh). Full item size: diameter 20 cm.
Main pattern: Scheme 6-2, rows 2 to 7 are repeated. The diagram shows circular rows. On the pattern it is indicated by the number 2.
Flower element: scheme 6-3. Knitted from the center in the round!
Oblique mesh pattern: pattern 6-4, 2nd and 3rd rows repeated.
Description of knitting a blouse:
Dimensions, knitting direction, arrangement of elements and patterns are indicated on the pattern (Fig. 6-1). First, knit the bottom of the blouse from bottom to top. Then you knit the elements and arrange them according to the pattern, forming the bodice.
Back. Before.
Knit in the round in one piece without seams. Knit 260 V.
p., close it in a ring and knit in a circle with the main pattern according to pattern 6-2 (13 repeats). You close each row with. With. and knit 3 in. p. to a new row. Place the lifting line to the new row along the side seam. After 22 cm from the set edge, divide the canvas into 2 even parts (front and back).
First, mark 3.5 medium rapports on each part that will remain outside the work. Between these left repeats, knit one fragment of 3 repeats of the main pattern. Knit in straight and reverse rows according to pattern 6-2 to a height of 8 cm (it is advisable to finish working on the fragment with the 13th row of the pattern). Having knitted 2 identical fragments along the side seams, you finish working on the bottom of the blouse. Then knit 2 incomplete elements (6 leaves - half an element) according to pattern 6-1. How to knit an incomplete element is indicated by the red dividing line in the diagram. Sew them on the fragments that are knitted on the side seams. Next, knit 1 full element according to pattern 6-1 and sew it in the middle on the back. Then knit an incomplete element according to pattern 6-1 (without
one sector of the oblique mesh), from the 3rd row do not knit one sector, knit in straight and reverse rows. How to knit an incomplete element is indicated by the gray dividing line in the diagram. The cape-shaped cutout is used to design the neckline, so you sew this incomplete element at the front. Next, for each shoulder (back and front), knit 1 full element and sew them on as indicated on the pattern (Fig. 6-1). Do not forget to connect the elements at the shoulder seams, do not sew along the side seams (these are the cuts for the armholes).
Assembly:
Tie the edge of the neckline along the contour with a “oblique mesh” pattern according to the pattern of 6-4 circular rows. Knit 3 rows with blue yarn, 2 rows with red yarn. Tie the edges of the armholes along the contour with a “bias mesh” pattern according to the pattern of 6-4 circular rows. Knit 1 row with blue yarn, 1 row with red yarn.
Knit the flower according to pattern 6-3 from 2 tiers. Knit one flower with blue yarn, 1 flower with red yarn. Place one flower on top of another and sew it onto the blouse.
Blouse knitting patterns:

Openwork summer blouses can serve as both an independent element of clothing and an integral part of a fashionable ensemble. If you throw such a sweater over an ordinary T-shirt, you will get a very interesting look. A crocheted openwork blouse with sleeves or a top type can be knitted from linen, cotton or mixed yarn. Look at the proposed selection of models and choose something new for yourself for the summer.
Summer openwork sweater for women
Size: 42-44 (European).
We will need:
- yarn, 100% cotton (100g per 450m) – 200g;
- hook No.2.
Description
The blouse is crocheted. Openwork Japanese motifs need to be connected using the given diagrams.
First we knit Japanese motifs - 15 pieces of Grafico No1 charts, then -
15 pieces of Grafico No. 2 diagrams.
We continue the Japanese motifs by knitting 20 pieces of Grafico charts No. 3, then 14 middle charts of Grafico No. 6. Knit the middle of the sleeve at the neck following chart No. 4 (1 piece) and chart No. 5 (1 piece).
Attach the bases of the diagram elements according to the indicated pattern at points Z. Make the lower part of the blouse and cuff according to the Barrado diagram. Crochet a summer blouse around the neck using a Bico pattern.
Beautiful openwork crochet blouse: video MK
Black summer blouse
Using the proposed description, knitting the pattern can be done for sizes: a) 34-36; b) 38-40; c) 42-44; d) 46-48; e) 50-52.
We will need:
- yarn containing 93% acrylic, 7% elastane (50g per 144m) – 250; 250; 300; 300; 350g;
- hook No. 3.5.
Pattern: crochet according to the pattern.
Abbreviations used:
- VP – air p.;
- RLS – double crochet;
- CH – column s/nac.
Density: 6 crochet pattern motifs No. 3.5 equal 15cm, 12r. equal to 10cm.
How to knit a summer blouse
Back
On the base chain of a) 86 p.; b) 91p.; c) 101p.; d) 111p.; e) 121p. Crochet No. 3.5 with a CH 2 cm high (3 p.).
Continue knitting with openwork patterns of the pattern. We get a) 17 mot.; b) 18 motor; c) 20 motor; d) 22 motor; e) 24 mot.
At a height of a) 55.5 cm (66 rubles); b) 56.5 cm (68 rub.); c) 57.5cm (RUR 69); d) 58.5 cm (70 rub.); e) 59.5 cm (71 rubles) from the CH row, form a neck, stopping in the center a) 9 mot.; b); c); d); e) 10 mot. We continue further knitting of each part of the sweater for women separately.
Before
This detail of a sweater for women is made according to the previous description up to the height of the armholes. At this stage we have a) 13 cars left; b) 14 motor; c) 16 motives; d) 18 motives; e) 20 motives.
At a height of a) 50cm (60r.); b) 51cm (62r.); c) 52cm (63r.); d) 53cm (64r.); e) 54 cm (65 rub.) from the row of CH, form a neck, stopping in the center a) 9 motifs; b); c); d); e) 10 motives. We continue further knitting of each part of the sweater for women separately.
At a height of a) 57 cm (68 rub.); b) 58cm (70r.); c) 59cm (71r.); d) 60cm (72r.); e) 61cm (73r.) from the CH row stop a) 2 motors; b) 2 motor; c) 3 motor; d) 4 motor; e) 5 shoulder motifs.
We finish the second part in the same way.
Assembly
We make seams on the sides and shoulders. Crochet No. 3.5 around the neck 2p. SN. Do 2p around the armholes. RLS.
Crochet women's summer blouse: video master class
Openwork sweater for women
This summer blouse can be knitted in any size option: S; M; L; XL.
We will need:
- yarn containing 50% cotton, 50% acrylic (50g per 140m) – 250; 250; 300; 300g;
- hook No. 3 for sizes S; M;
- hook No. 3.5 for sizes L; XL.
Abbreviations used:
- VP – air loop;
- RLS – double crochet;
- PBN (SS) – half double crochet (connecting stitch);
- PSN – half-column s/nak.;
- CH – double crochet.
Patterns:
- rosette: made with a No. 3 or No. 3.5 crochet hook according to the pattern being crocheted. We form a ring, then knit:
1 cr.: 14 columns. b/n in the ring. Closed cr. 1 PBN (SS) in the 1st st. b/n beginning of cr.;
2 cr.: 3 VP (replace the 1st table. s/n), 1 table. s/n in the 1st st. without n., then 2nd st. s/n in each of the following. With. without n. Close cr. 1 PBN (SS) in the 3rd VP began the cr. (=28 CH);
3 cr.: 5 VP, skip the first 2 p., * one dc in the next one. p., 2 VP, skip 1p.* – repeat from * to *. Close cr. one PBN (SS) in the 3rd VP began the cr. (=14 arches from 2p.);
4 cr.: 1 VP, 3 s. b/n in the 1st arch, *one s-k without n. in the next units table. s/n, 3 sc in the next. arch* – repeat from * to *. Close cr. 1 PBN (SS) in the 3rd VP began the cr. (=56 stlb.b/nak.);
5 cr.: 5 VP, skip the first 2 p., * one dc in the next one. p., 2 VP, skip 1p.* – repeat from * to *. Close cr. 1 PBN (SS) in the 3rd VP began the cr. (=28 arches from 2p.);
6 cr.: 1 VP, 2 s. b/n in the 1st arch, *1 st without n. in the next table. s/n, 2 s. b/nak. in the next arch* – repeat from * to *. Close cr. 1 PBN (SS) in the 3rd VP began the cr. (=84 stlb.b/nak.);
7 cr.: 1 VP, 1 s-k without n. in the 1st p., * 6 VP, skip 5 p., one st without n. in the next p.* - repeat from * to *, finish cr. 6 VP, one PBN (SS) in the 1st s.b/nak. the beginning of the cr. (=14 arches from 6p.);
8 cr.: 1 VP, then in each arch of 6 p. knit 1 s-k without n., one half table. s/n, 6 CH, one half-table. s/n and one s. without n. Close cr. 1 pbn (ss) in the 1st sc at the beginning of the cr. and stop. - “Arch” pattern: done with crochet No. 3 from pattern No. 1;
- “Grid” pattern: done with crochet no.3. The number of loops is a multiple of 3+1p. Description:
1p.: 5 VP (replace the 1st table. s/n and the 1st arch from 2p.), through the first 3p. move on to the next step, * 1 table. s/n in the next p., 2 VP, skip 2p.* – repeat from * to *, finish 1 table. s/n in the last paragraph;
2 rub. and every word p.: 5 VP, through the first 3 p. move on to the next p., 1 dc in the 2nd dc, * 2 ch, 1 dc in the next one. CH*, repeat from * and to *; - phantom pattern: made with crochet number 3 on a number of loops that is a multiple of 16+1p. in odd p. Continuation of the “Grid” pattern. Description:
1st: 1 VP, 1 s. without n. in the 1st p., * 3 VP, skip 3 p., 1 s. without n. in the next p.* repeat from * and to *;
2nd row: 3 VP (replaces the 1st table. s/n), skipping the 1st st.b/nak., * in the next. st-k without n. knit 3 table. s/n, 3 VP and 1 s. without n., 3 VP, 1 table. s/n in the next st.b/nak., 3 VP, in the next. st.b/nak. knit one post. b/n, 3 table. s/n, 1 table. s/n in the next st.b/nak.* – repeat from *and to *;
3p.: 1 VP, 1 st-k without n. to the 1st table. s/n, 3 VP, 1 st-k without n. in the next arch of 3 p., * 3 VP, 1 st without n. in the next table. s/n, 3 VP, omission of 1 arch, 1 st.b/nak. in the next arch* – repeat from * and to *, finish p. 3 VP, 1 single crochet in the last stitch;
4 rows: knit again from the 2nd row; - Step: Crochet No.3.
Density:
- 1 crochet rosette No.3 = 12cm in diameter;
- 1 crochet rosette No. 3.5 = 13 cm in diameter;
- “Grid” pattern: 10 motifs for 10 rubles. will give 10cm by 10cm;
- phantom pattern: 1 motif is 5 cm wide, 13 r. equal to 10 cm in height.
Description
Knitting the back of a blouse for women
We knit 4 openwork rosettes (hook No. 3 for sizes S; M, hook No. 3.5 for sizes L; XL.) and gradually assemble them - see instructions for pattern No. 1. Then, following the instructions of pattern No. 1, with crochet No. 3 we knit an arch of 8 VP and 3p. arches of 6 VP. In the words R. we knit:
S: 1 VP, 3 s. without n. in the 1st arch, 1 s. without n. in the next RLS, 3 stb. b/n. in the next arch, 1 st. b/n. in the next single crochet, *4 tbsp. in the next arch, 1 st. b/n. in the next pillar. b/n, 3 st.b/n. in the next arch, one pillar. b/n in sl. pillar. b/n* – knit 11 times from * to *. Finish 2 st.b/n. in the last arch. Total 109 RLS;
M: 1 VP, 3 columns. b/n in the 1st arch, 1 st.b/n. in the next pillar. b/n, *4 st.b/n. in the next arch, 1 st. b/n. in the next st.b/nak.*, – knit 23 times from * to *. Finish 2 st.b/n. in the last arch. Total 121 RLS;
L: 1 VP, 3 st. b/nak. in the 1st arch, 1 column. b/n. in the next pillar. b/n, 4 columns. b/n. in the next arch, 1 st. b/n. in the next pillar. b/n, *5 columns. b/n. in the next arch, 1 column. b/n in the next st.b/n., 4 stlb. b/n. next arch, 1 single crochet in the next. With. without crochet * – knit 11 times from * to *. Finish 3 st.b/nak. in the last arch. Total 133 RLS;
XL: 1 VP, 5 st. b/n. in the 1st arch, 1 column. b/n. in the next Art. b/n., *5 st.b/n. next arch, 1 st.b/n. next single crochet *, – knit 23 times from * to *. Finish 4 stitches. b/nak. in the last arch. Total 148 RLS.
We continue knitting sweaters for women, making an openwork mesh according to the instructions in the diagram. Let's do 36; 40; 44; 49 motives. Having knitted 8p. (8cm) “Mesh”, then we will knit a fantasy summer sweater. pattern. For 1st r. the algorithm is like this:
S: 1 VP, 1 st. b/nak. in the 1st p., 3 VP, skip 2 p., 1 column. b/n in the next p., 3 VP, skip 2 p., 1 column. b/n in the next p., * 3 VP, skip 3 p., 1 single crochet in the next. p.*, repeat from * to * and when 7 p. remain. on the left knit: 3 VP, skip 2 p., 1 st. b/n in the next p., 3 VP, 1 single crochet in the last one. p. (=113 p.=7 motives);
M: 1 VP, 1 stlb. b/n. in the 1st p., 3 VP, skip 3 p., 1 st. b/n. RLS next. p., 3 VP, skip 3 p., 1 RLS in next. p., * 3 VP, skip 2 p., 1 RLS in next. p., 3 VP, skip 3 p., 1 single crochet in the next. p., 3 VP, skip 3 p., 1 single crochet in the next. p.*, repeat from * to * and when 7 p. remain. knit on the left: 3 ch, skip 2 stitches, 1 single crochet in the next row. p., 3 VP, 1 single crochet in the last one. p. (=129 p.=8 motives);
L: 1 VP, 1 column. b/n in the 1st p., *3 VP, skip 2 p., 1 st.b/n. next p., 3 VP, skip 3 p., 1 st.b/nak. next p., 3 VP, skip 3 p., 1 single crochet in the next. p.* repeat from * to * (=145p.=9 motives);
XL: 1 ch, 1 single crochet in the 1st stitch, 3 ch, skip 3 stitches, 1 stitch. b/n in the next p., *3 VP, skip 2 p., 1 st. b/nak. next p., 3 VP, skip 3 p., 1 st. b/nak. next p., 3 VP, skip 3 p., 1 column. b/n in the next p.* repeat from * to * (=161p.=10 motives).
Knitting armholes
At height 8; 9; 9; 10cm (9; 11; 11: 13r.) from the beginning of the forfeit. We decrease the pattern on both sides in every 2nd r. according to the instructions in diagram No.2:
S: once in 8 p.;
M: once in 8 p., once in 4 p.;
L: once in 8 p., 2 times in 4 p.;
XL: once in 8 stitches, 3 times in 4 stitches.
Neck
We start knitting the neckline at height 27; 29; thirty; 32cm (33; 37; 39; 43r.) from the beginning of the forfeit. pattern. We leave the central ones 39; 47; 47; 55p. and continue each openwork part separately, decreasing from the neck side 3 times by 4 stitches. in each 2r.
Shoulders
At level 32; 34; 35; 37cm (39; 43; 45; 49r.) from the beginning of the forfeit. pattern we stop.
Before
We knit as a back to the neck.
Neck
at an altitude of 20; 22; 2325 (23;2; 293.) from the beginning of the phantom. pattern. We leave the central ones 31; 39; 39; 47p. and continue each openwork part separately, decreasing from the neck side 4 times by 4 stitches. in each 2r.
Assembly and finishing
We sew the shoulders. We make seams on the sides. Along the edge of the rollout and armholes we knit 1 r. crayfish step.
Openwork crocheted blouse: video MK


