Summer is in full swing and I want to update your wardrobe by adding original accessories that will attract attention and be useful every day. DIY bags are what you need if you want your accessory to be not only beautiful, comfortable and functional, but also one of a kind!
Today we will learn how to make simple bags with our own hands at home. To work, you may need special tools, like a sewing machine, old or new fabrics, small sewing accessories and, of course, fantasy!
How to sew a shopping bag with your own hands
the simplest shopping bag, which will be a great alternative to disposable plastic bags, can be easily sewn from an old piece of material. To do this, you absolutely do not need to have the talents of a seamstress, but just be able to handle a sewing machine.
For work you will need:
- 2 rectangular pieces of colored fabric of desired sizes
Ready-made dense fabric ribbon about 1 meter long and 2 centimeters wide
Sewing machine
- Scissors

Let's get to work:
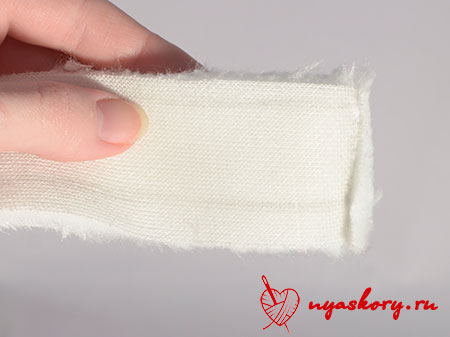
1) Using a zigzag stitch, finish the top edge of the fabric and sew on the right side tape edge as shown in the photo.

2) Then fold the edge inward about 2 centimeters and stitch it two lines while holding the tape.

3) Don't forget to attach second part of the tape so that you get a handle.

4) Do the same with the second piece of cloth. You got two halves future bag.

5) Fold both halves together right sides in and sew the edges zigzag or plain stitch.

6) Turn the bag inside out.

DIY summer bag from T-shirts
A great idea is to use old unnecessary things for something useful. If you have some lying around old t-shirts, which you have not worn for a long time, and there is no desire to send them to rags, try turning them into lightweight summer bags

For work you will need:
- Old T-shirt
pins
Sewing machine
- Scissors

Let's get to work:
1) Cut off everything from the shirt unnecessary tags and labels.

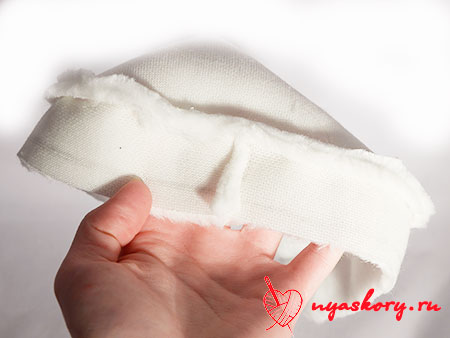
2) Turn it inside out and fold across as shown in the photo.

3) Fold the bottom edges up and secure with pins. It will inside pockets future bag.

4) Sew the bottom edge on a typewriter, and also make middle vertical seam on both sides to make 2 pockets on each side.

5) Turn the bag right side out.

DIY bag made of fabric (video)
DIY clutch bag
An interesting idea for making a bag from tea cardboard box. It would seem: how else can you use the box after the tea is over? It turns out that it turns out very stylish and unusual. small bag for small items like cosmetics or keys.

For work you will need:
- 2 identical tea boxes or any other rectangular boxes
Piece of satin fabric
1 big bead
Thick chain with fasteners
- Scissors

Let's get to work:
1) Take one of the boxes, open it completely and cut off the edges, as shown in the photo, to get a pattern consisting of five parts: three rectangles (one below the other) and two small rectangles on the sides. This will be the inside of the future clutch - its lining. The edges must be cut off so that the lining fits into the main box. On the sides, a small rectangle should be cut off at the side parts of the pattern in order to make it more convenient to fasten the chain.
2) Attach the pattern to the fabric and cut the material along the contours, leaving approximately by 1 centimeter from each side.
3) Cut out the blank for the future lining. Make cuts in the corners.
4) Attach the fabric to the cardboard and glue the edges with glue.

5) Insert the lining inside the whole box.
6) Put the lining on the glue.
7) Before gluing the lining, glue the elastic on the top of the box lace loop, with which the clutch will close.

8) Use glue to decorate the box rhinestones.

9) Attach the chain to both sides of the box, after making holes with an awl or other sharp object. It's better to choose chains with side mounts, which are specifically designed for such products.

10) On the front side, sew or glue a bead that will serve as decoration and at the same time clutch clasp. Clutch out of the box is ready!

Updated handmade leather bag
Each of us in the wardrobe, most likely, there is some old leather bag, which you no longer want to wear, but it's a pity to throw it away. To solve the problem, you can upgrade the old bag, repainting it in new unexpected colors. Use the advice of this master class to get a new original thing.

For work you will need:
- Old leather bag
Paper tape
Acrylic paints
tassel
Ruler and pen
- Leather polish

Let's get to work:
1) Make sure the surface of your bag is clean and dry. Using a ruler, measure at the top of the bag 2 centimeters by making marks with a pen. You can make the stripes any other width you want. It is necessary to measure equal segments with a ruler in order for future strips to turn out the same and equal.

2) Stick strips of adhesive tape, guided by the marks. You can also stick tape on the inside to The paint didn't accidentally get where it shouldn't..

3) Leaving the strip unglued, paint it with white paint. It is better to apply several coats of paint to make sure there are no streaks. Let the paint dry well.

4) Make as many stripes as you can, at regular intervals to get a striped pattern. You should be careful not to stick the adhesive tape in the place where the paint has not yet dried, otherwise you can ruin the strip.

5) After all the strips are dry, paint the handles white.

6) After drying, apply on top green paint. The white background is important so as not to lose color. It is better to make several layers so that the paint lies well and there are no streaks.

7) After all layers of paint are dry, apply to the bag special varnish for leather to give it a finished look.

8) Lovely new and very stylish striped leather bag ready!

How to decorate a bag with your own hands
Decorating bags with your own hands to update them and make them more attractive is a great idea for the summer season. One of the options for decorating a rag bag is to use a variety of felt flowers that will make any handbag bright and very noticeable.

For work you will need:
- Rag bag
Multi-colored pieces of felt
paper and pencil
- Scissors
Let's get to work:
1) Draw on a piece of paper flower of desired shape depending on the size of your bag. It is better if the flowers are small - about 5 centimeters in diameter, then the decoration will look much better. Cut out the pattern, apply it to the felt and circle the flower with a pencil.

2) Cut out many flowers from sheets of felt of different colors.

3) In the center of the flower, drop glue and glue two flowers together to make the flowers look fuller.

4) Start gluing pairs of flowers to the surface of the bag. Can also be used for this purpose needle and thread to sew the flowers to the fabric, then there is less chance that they fall off over time.

Bag decorated a piece of fur from an old collar, looks very rich and expensive. See for yourself:


When cutting fur, you should be extremely careful and use a knife, not scissors so as not to damage the hairs.

From very small scraps of fur, you can make these bag decorations in the form of fluffy balls:

Another option for decorating a bag is to use ordinary bright scarf, which can be tied in different ways on the handle:

Looks good as decorations fabric flowers:


Another popular option for decorating bags is laying out beads:


DIY shopping bag
You probably remember the original Soviet-era shopping bags in which the products were worn. We suggest you make a not quite familiar, but very comfortable and original shopping bag, which will look very stylish. This bag is very easy to sew from old shirt.

For work you will need:
- Old stretch t-shirt
Sewing machine
Ruler and pencil
- Scissors
Let's get to work:
1) From an old stretchy T-shirt, cut semi-circular top. In order for both sides to be the same, fold the T-shirt in half, mark the cut line with a pencil, as shown in the photo.

2) You can make several blanks from different T-shirts.

3) From the wrong side, sew the edge on a typewriter, this will be the bottom of the future string bag.

4) Process the wrong side zigzag stitch so that the fabric does not fray during use.

5) Using a ruler and pencil, apply straight lines of broken lines on one side, as well as a large line in the center at the top - these will be the handles.

6) Use scissors to make cuts along the drawn lines, including the other side. Be careful with the edges so as not to damage the seam.

7) The original bag with slots is ready!

DIY beach bag
Very popular bags for going to the beach or pool which you can make by hand. We want to offer you a very interesting option for tailoring a beach bag, which in fact is not only an accessory in which you can carry everything you need for a holiday, but also bedding with pillow. You can sew such an original beach bag from two towels.

For work you will need:
- Two medium-sized bath towels
A small pillow, slightly narrower than a towel
Pieces of cotton fabric
pins
Buttons and loops
Sewing machine
- Scissors
Let's get to work:
1) Prepare a small rectangular pillow which would have been slightly narrower than the towels.

2) Lay the pillow on a towel and fold it together with the edge forward so that it forms original pillow pocket. Pin the edges with pins and sew them. From below, leave a little margin in order to sew a second towel, cut off all excess.

3) The second towel must be sheathed on the sides long strip of colored cotton fabric. To do this, you need to cut a rectangle out of the fabric with a length equal to the length of the towel and a width of about 10 centimeters. You can sew several pieces of material, or you can use the same fabric.

4) Fold the edges of the strip to a width 1 centimeter and go through the workpiece with an iron.

5) Sew the trim to the edge of the towel with a sewing machine. Then sew both parts together - pillow and towel. When folded it will look like this:

6) It remains to add important details. Prepare two square pieces of cotton fabric to make front and back pocket. Pin the pocket with pins in the right places and then sew on three sides, leaving one side intact. The edge of this side should be pre-processed on a typewriter so that the fabric does not crumble.

7) From the remaining piece of the first towel, sew two wide handles. To do this, cut out two wide strips of the desired width, taking into account the fact that you will fold them in half. Fold in the edges and stitch along the entire length.

8) Pin the handles to the bag in the right places with pins, check if Are you satisfied with their location?, then unfold the product and sew the handles with a sewing machine.

9) Sew on two bright buttons in the place where the bag will close.

10) On the lid, sew the corresponding buttons loops.

11) The beach bag-mat is ready!

A small handmade bag from a book
Want to recycle old books? Don't rush! You can use their hard covers to make original small bags with handles or handmade clutches.

For work you will need:
- Old book
Lining fabric
Bamboo handles (optional)
paper and pencil
Every girl wants to have stylish and beautiful things and accessories in her wardrobe. Often, ladies manage to buy a bag they like, but it goes out of fashion very quickly. Then you have to go shopping in search of a new model that will help you be stylish and fashionable.
Only a few prefer not to spend extra money, but to decorate a slightly outdated product on their own. We will tell you how to create a stylish and original item from an ordinary accessory, similar to a photo in a fashion magazine.
Adding colors 
Brightness can be added in different ways:
- applications;
- decoupage method;
- beadwork or cross stitch;
- the use of rhinestones, sequins or buttons.
The work will not take much time, but the result will be a stylish and original accessory that will favorably distinguish a woman from the crowd. Bright details will help to individualize the image and give it freshness.
Important! Don't be afraid to experiment. Each of the options can be used on bags made of different materials.
An unusual result is worth trying to decorate the product yourself. You can decorate both a black bag and a product of any other color.
 Drawings on the bag
For this method of decorating, you need to stock up on high-quality resistant acrylic paints so that the product can later be washed.
Textile models of linen bags or jeans are suitable for decoration.. If a girl is inexperienced in painting on fabrics, it is better to pick up something hard so that the fabric does not “move” during the process.
You can use special stencils that are simply transferred to the prepared canvas. And then they are painted in random order. First, a sketch is drawn, and only then it is painted with colored paints.
Decoupage 
A fashionable trend today in decorating various things. it a great opportunity to give new life to a leather bag or leatherette product. The result will undoubtedly make the girl noticeable and add style to the image.
- To start the surface is cleaned of dirt and dust, degrease.
- Elements for decoration are cut out of napkins for decoupage.
- Special glue is applied in a neat even layer on each element and glued them to predetermined locations.
- Thereafter the product must be dried within 5 hours.
- After the specified time, the accessory cover with a special varnish and allow it to dry completely.
- Reapplication of varnish must be repeated after 8-9 hours.
The result will please any fashionista, the bag will look like a new original model.
Application 
Appliqué decoration is a great way to decorate textile accessories.. It's always a win-win. which will help to make an original and unusual product.
To create beautiful jewelry you can choose pieces of leather or multi-colored felt. They create, for example, voluminous flowers or other motifs. With the help of special glue, parts of the future picture are glued to the canvas.
Important! An excellent decoration option for creating a romantic look will be small flower buds made of satin or velvet. A small bead can be placed in the center.
Different types of embroidery 
Handicraft women know how to really beautifully decorate any bag with embroidery. You can make a beautiful ornament using different techniques:
- cross stitch;
- beads.
Cross-stitching is a rather lengthy process that requires certain skills.. If a woman has a lot of free time, you can safely proceed to such decoration. We can say with confidence that the result will be worth spending so much time on decorating.
AT  Ribbon embroidery is a great alternative to the long process of embroidering with thick threads.. The ornament is voluminous, bright and beautiful. The bag will acquire a unique style and originality. With the help of multi-colored satin ribbons, you can create unforgettable motifs on bags from different materials.
Beadwork is another worthy option for decorating a product.. Small beads allow you to create unique shiny ornaments. Such a bag will be a worthy addition not only to a casual look, but also suitable for an evening outfit.
Buttons, rhinestones and sequins 
- Button decoration is well suited for textile models of bags or jeans. Them You can sew in random order or create a pre-designed pattern.
- Rhinestones and sequins can perfectly decorate any type of bag, give it a gloss and stylish shine. Handbags decorated with shiny stones look chic even with evening looks.
Important! When creating decorations on bags from rhinestones and sequins, you need to have some idea of \u200b\u200bthe pattern or geometric pattern in your head.
So the decoration will look harmonious and will not look like a simple heap of shiny elements.
 Working on the details
To decorate or slightly update an outdated and out-of-fashion bag, it is not necessary to put a lot of effort and spend too much time on it. You can only slightly decorate the handles of the product or pin a beautiful brooch to the bag.
How to decorate a pen
The most popular option for decorating bag handles is a scarf or scarf with a print. He folds it into a tube, and carefully wraps the handle of the accessory with it. Beautiful knots are tied at the ends. Or you can just tie a beautiful bow on the side of the handle.
Fringe use 
To decorate with fringe from leather ribbons or fabric threads, you need to turn the product inside out. Then make the necessary holes with a hole punch, retreating approximately the same distance. A braid is threaded into the holes and secured with neat knots. At the end of the process, you only need to turn the bag inside out.
Accessories for decoration
Buttons, zippers, locks and other accessories can be a great way to decorate a bag for a casual combination. They are collected in a certain ornament or placed on the product in random order.
You can create unusual applications using zippers of different colors. The flight of fantasy of the hostess of a thing can be almost endless.
Useful tips for decorating bags 
- Important don't be afraid to experiment and boldly go for all the ideas you come up with. After all, the old bag has already gone out of fashion and, most likely, a woman will never take it with her again, will not complement the stylish combination of clothes with this handbag. And if you give it freshness and originality, it will still serve for a long time.
- Designers recommend boldly decorating your outdated bags in various ways. Moreover, today this style is very relevant.
- Layering and unusual prints are in fashion, so the bag will look like a designer work.
In recent years, exclusive handmade accessories have been in great demand. High-quality manual work looks original and stylish, and costs a lot of money accordingly. That is why, it is worth learning needlework and trying to decorate the bag yourself.
Leather bag: how to upgrade?
Bags made from natural materials are in great demand, and if there are handmade elements on a leather bag, then such a bag attracts even more attention. You can decorate a leather bag with applications from the same leather as the accessory is made, or decorate it with a textured leather or suede clasp that differs in color. So gray or brown decorative elements will look advantageous on a black leather bag.

Decorated bag with buttons
You can decorate a black leather bag, for example, by decorating flower appliqués. To get started, make a template by drawing a whole flower on cardboard or neat petals for a voluminous decor. Then transfer the pattern to a previously prepared piece of leather and cut out the pattern with sharp scissors.

Using special glue, glue the resulting decoration onto the bag; the flower can be embroidered with beads or sequins. This way of decorating will update your favorite accessory, a bag decorated with flowers will even hide defects that have appeared in the form of scratches or scuffs.

The bag decorated with chains, spikes and rivets looks very stylish. Such items can be purchased at absolutely any needlework store. Such accessories are not expensive, and a bag decorated in this way looks like a real designer bag.

Evening models of handbags - clutches, can be decorated with both multi-colored and plain rhinestones. You can purchase ready-made applications and stick them on the bag with an iron. If you decide to show your imagination and come up with a pattern yourself, then first draw a sketch and carefully lay out the rhinestones and iron it with an iron.

Important: To begin with, it is recommended to lay out the entire pattern without gluing. Evaluate how the decor will look and, if necessary, correct something. Only after you are convinced that the pattern is as intended, turn on the iron. Otherwise, the glued rhinestones cannot be completely torn off, and the bag will be damaged.
Options for decorating with purchased fittings are presented below in the photo.

Leather bag decorated with rhinestones and buttons
A suede or leather handbag can be decorated with natural fur. You can sew fur stripes around the perimeter of the bag, or you can decorate only pockets with natural fur. If you think that a completely fur accessory is too provocative, then you can make a fur keychain from unnecessary fur and attach it to the handle of your bag. You can also make a fur brooch and pin it anywhere.

Bag decorated with spikes
denim bag lovers
Popular denim bags can be decorated in the most unusual way. Can be decorated with voluminous appliqués made of matching denim, felt or leather. You can sew on flowers or some abstract ornament, you can even decorate a bag with a cute muzzle of some animal.

Embroidered or painted denim bags look exclusive and expensive. For contrasting embroidery, wool or acrylic threads are used. In order for the embroidered patterns to be even and neat, it is necessary to mark the outlines of the pattern with crayon or a pen. Large embroidered elements look most advantageous. To make the drawing look complete, you can sew on large beads or small beads, it is possible to decorate even with ordinary buttons. Examples of work are shown in the photo.


To apply painting on denim, you need to purchase specialized waterproof acrylic paints. Beginning creators are advised to use stencils, so there is less chance of spoiling a denim accessory. It is not necessary to apply paint with brushes, you can use a regular sponge for washing dishes. It is advisable to pull the jeans tight and fasten so that the fabric does not move. After the paints have completely dried, the bag must be ironed through a plain cotton fabric. Acrylic painting is suitable for decorating not only denim, but also cotton and linen.

How else can you decorate a bag?
How to decorate a bag with your own hands if you do not know how to embroider, sew or draw. You can pick up original accessories that will update the look of the bag and add zest to your image.
You can decorate the bag with a stylish branded scarf. You can choose a bright scarf or scarf, in such a simple way your bag will sparkle with new colors, and the image will turn out to be stylish. Scarves can be constantly changed depending on the color scheme of the outfit, or just choose a scarf according to your mood.

You can buy special adhesive stickers. Stickers can be in the form of emblems of famous brands or in the form of letters and numbers. This idea will update the old bag and help hide minor defects.
You can use another simple way to decorate - attach a keychain or brooch. Such decorations can be changed or completely unfastened as unnecessary.

As you can see, painting an old or just a boring bag is not so difficult. It is enough to show imagination and stock up on decorative elements. Upgrade your favorite accessory and highlight your personality. In addition, handicraft has always been appreciated, which is why sewn and decorated bags with your own hands are not only beautiful, but also profitable.
A stylish and original image, which is carefully created by every fashionista, is emphasized by the chosen wardrobe; unusual and exclusive accessories are its unique highlight. Functional little things that no one can do without include bags and handbags, of various types, styles and sizes, with a spectacular and aesthetic design and practical use.
A bag sewn and made by one's own hands can not be inferior in quality and appearance to many designer models from popular brands and world-famous brands that are on everyone's lips.

After reviewing the photos of do-it-yourself handbags presented in the article, you can choose the model you like and make it yourself using improvised materials and special tools.

Choice of bag style and materials needed
Modern changeable fashion is constantly changing and dictates the rules for selecting accessories for a wardrobe that matches a certain style chosen by a person as the basis of his own image.

There is a certain classification of handbags, focusing on it, you can simplify the choice of model, for further self-tailoring, with the choice of material and additional and high-quality accessories:

Beach roomy bag. Great for a summer getaway, beach visit, family picnic or other fun beach themed event.


Small evening bag. It is used for visiting various festive holidays, going to the theater or cinema, exhibitions or corporate parties and cafes.

Children's accessory with handles. Such bags are small in size, they can have bright colors or an original print with recognizable characters from fairy tales and cartoons.

Casual shoulder bags. Perfectly combined with urban or casual style of clothing, practical and reliable, sewn from wear-resistant and high-quality materials.

Stylish bags for laptops. Used to carry personal laptops, they have an original cut with a durable strap and a compartment for the charger.

For independent tailoring of a bag of any kind, you need to choose the material, and you can use the fabric of old jeans, jackets and jackets with an interesting pattern, or purchase a new cut.

Separately, you will need threads with needles and additional accessories, such as a variety of fasteners, various rivets or zippers that can be purchased at sewing or specialized stores.

Materials for tailoring an exclusive bag
Having chosen a pattern that matches the model of the future bag, you need to decide on the materials necessary for hand-tailoring a practical and attractive accessory.

Before sewing a bag, it is necessary to choose a material, the use of which may require a special approach, purchase it in the right quantity or prepare it for further use:

Genuine leather, suede or their substitutes. Using used materials, they should be carefully inspected for wear and damage, eliminating all shortcomings.

Thick cotton or soft denim. You should not choose a fabric that is too rough and thick for sewing, which cannot be processed when sewing on a sewing machine or manually.


Durable wool, coarse linen or beautiful felt. Solid fabrics can be purchased as a new cut or the bag can be cut according to the selected pattern from out-of-fashion, different items of clothing.

To tailor an original handbag with a unique design, you need to carefully consider its design, select all the decorations and functional accessories, and you can draw up a preliminary project.

Observing all the stages of work, it will be possible to create a skillful masterpiece without having special or special skills in sewing or working with leather, fabric and other materials, fittings and accessories.

Step-by-step activities for sewing a bag with your own hands
All procedures for such needlework can be divided into preparatory, main and final stages of work, each of them requires a responsible and careful approach, special care in implementation.

The standard stages of self-tailoring of any bag include such procedures that are interconnected, and they must be carried out in strict sequence:

Choice of pattern and pattern. The model is selected based on your own preferences, the pattern should be detailed, informative and contain all the necessary dimensions of individual, functional elements of the bag.

Preparation of materials. If it is planned to use used materials, old things must be washed and smoothed to simplify cutting procedures; when using purchased cuts, they must be purchased in advance at the store.

Purchase of accessories. To make a functional accessory, you will definitely need fasteners in the form of snap or magnetic buttons, zippers of different lengths for decorating the inner and outer pockets of the bag.

Cut the bag according to the pattern. It is carried out using pre-prepared patterns of individual elements of the finished product and a slate pencil, the trace of which must be washed off after sewing, sewing scissors for cutting.

Sewing individual pieces. To simplify the stitching procedure, you can pre-sweep individual elements, and then, using a sewing machine or manually sew them, following a strict sequence.

Reliable fittings. Produced according to the recommendations of the masters, buttons and fasteners are fixed firmly and securely or glued to the fabric with a glue gun, zippers are sewn by hand or machine.

Decorating and finishing the bag. The decor may differ from the design of the model and is the embodiment of our own solutions that allow you to decorate the bag with unusual installations of beads, fabric flowers and bows, and special accessories.


Upon completion of all stages of work, the handmade bag will be ready for functional use; before wearing, it is recommended to wash it by hand or machine.

An exclusive accessory will become a real wardrobe decoration and will allow you to create unusual ensembles with outerwear or other accessories, feeling confident in yourself and your own stylish appearance.

DIY bag photo


Greetings to all gathered now on the blog! Today I will tell you about how to decorate your life and the lives of others with the help of such a simple item as a bag with your own hands.
A lot of shops sell bags, handbags, clutches, etc., etc. But it's so cool to make something like that yourself, to feel the process of creating a product, right? Many will agree with me, I think. Therefore, today we will make a bunch of handbags, cute and funny)
How to sew a bag with your own hands
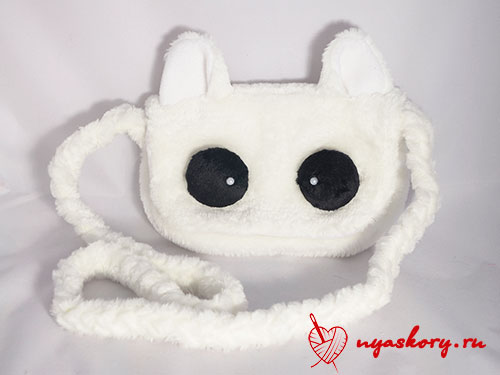
First of all, I suggest you sew a cute fluffy handbag that you can give to a little girl or girl.
List of materials:
- artificial fur (for the outer part of the bag);
- fleece (for lining and for covering buttons);
- threads in the color of the fabric;
- two round buttons;
- two small white rhinestones or half beads;
- synthetic winterizer;
- pattern paper;
- needle;
- glue second;
- pencil;
- pins (for pinning patterns);
- scissors.
Patterns of the future bag you can download here: ear and the foundation. Let's deal with them.
What kind of patterns are here:
- one-piece bag pattern (lid + back) - the entire area of \u200b\u200bthe pattern;
- the front of the bag is everything that is below the side insert;
- side insert width - we will sew the side part into the bag, this is its width. The length is the length of the contour of the front (without a straight top).
As for the side insert: it should consist of two equal parts, the direction of the pile of which will be directed against each other. But that's just for fur! From fleece, simply cut one strip of the required width, you can ignore the direction of the pile.
How to sew a bag: a detailed master class
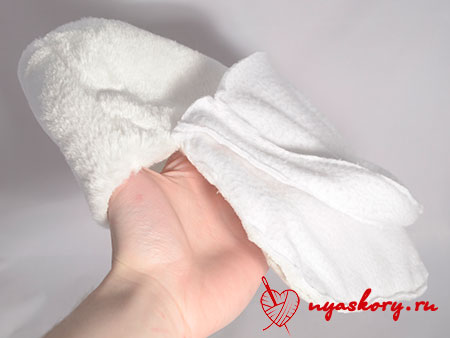
First of all, we will work with the side of our product.
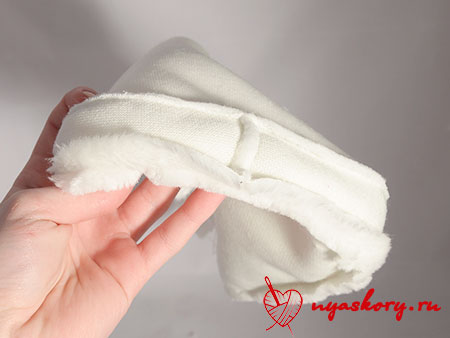
Take two pieces of fur side piece and sew them along the edge. Sew them so that the pile of pieces is directed towards each other.
Why do I suggest doing this? I answer: the fur has a long pile, which should go in one direction. And this can be achieved just by stitching two pieces
Trim off any excess. And sew the side part to the front of our future bag.

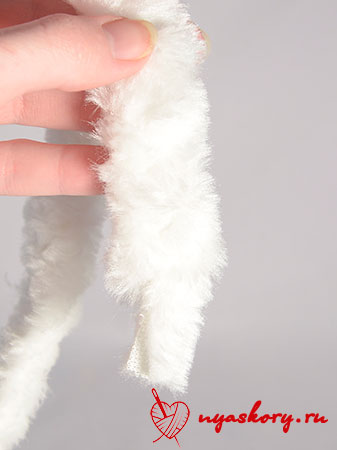
And now we sew the back of the bag! Already the lid is planned

Trim the edges of the seam allowances. See why:
By the way, here is the back view of the bag:

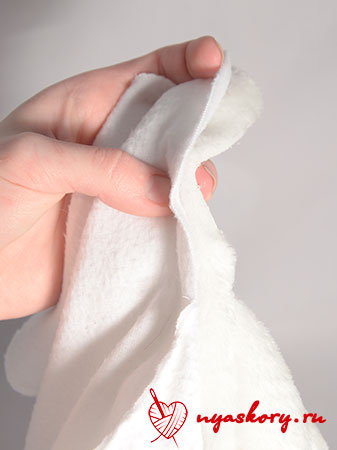
Sew a fleece "handbag" in the same way. This will be the lining - the inside of the bag.

How to sew a lining to a bag? First, attach the fleece and fur parts with the right side inward.

In this photo, it seems to be clearer
And just sew the covers of both parts.

Screw the inside into the bag.

Sew the remaining edges with a blind stitch.

To decorate our bag, I suggest you cut out these ears:

This is how you should get them:

Now let's make a strap for the bag. To do this, cut three strips of fur of such a length that it would be convenient for you to then put on a strap of them on your shoulder. Weave a pigtail out of them (fix at the end and at the beginning so that it does not come apart).

Remember we left holes for fasteners? Now you need to insert them into them and carefully sew the resulting pigtail with a hidden seam.

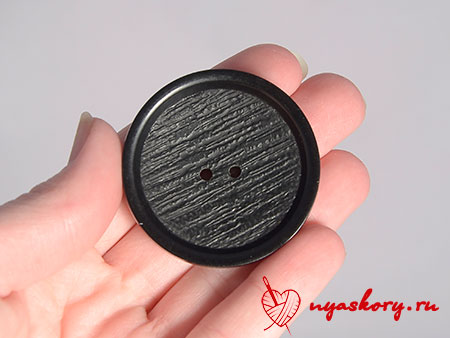
But our bag doesn't have bindings yet! There are several options here: you can sew in a zipper (which is better to do earlier), you can use Velcro and buttons.
I decided to stick with the last option.
Cut two black circles larger than the button from the black fleece and take the button.
Put a little padding polyester on the button.

And in a fleece circle, along the edge of which walk with a running stitch without fastening:
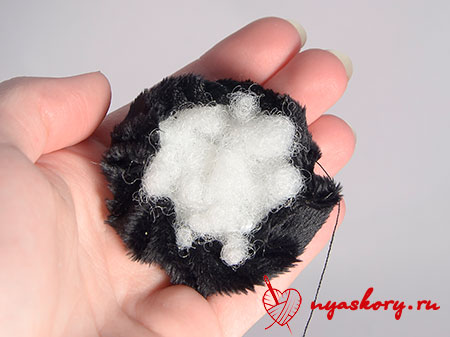
Put them together.

And pull the thread.

The button for attaching the bag to the back should look something like this:

Glue a small rhinestone highlight on the front.

Now attach the clasp to the lid of the bag to see where you will need to make a notch for the eyelet.

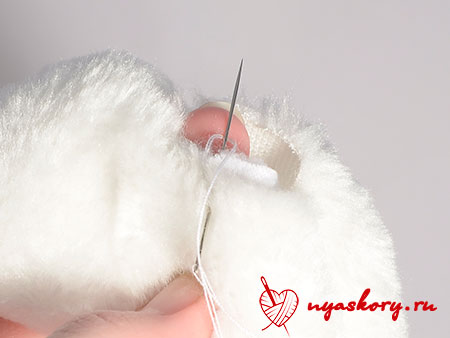
Draw a line down the center of where the button should be. Make a cut along the drawn line.
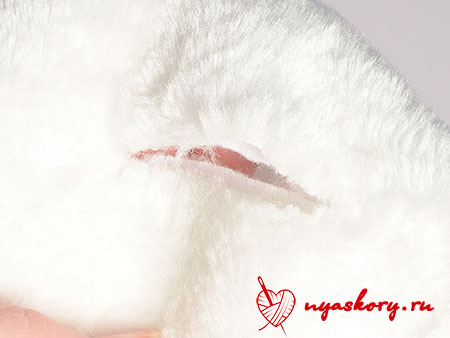
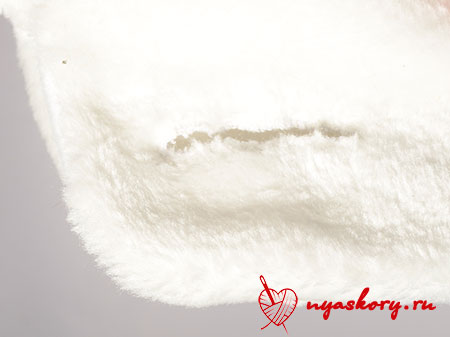
To keep the cut nice and neat, sew it with a buttonhole stitch so that each stitch fits as closely as possible to the previous one.
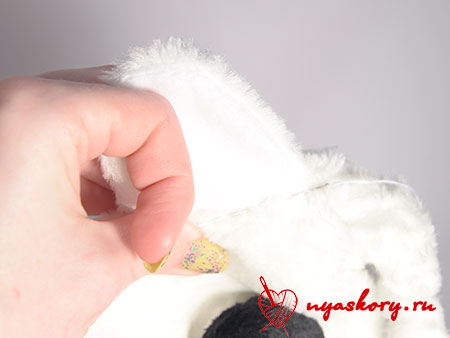
This is what the bag will look like after the lining:
Sew on the button eyes to the bag:

Now, back to the ears! Fold and hem their edges.

And sew them where you would like them to be.
Ta-dam! The bag is ready. It turned out to be a cute kitty)
DIY leather bags
Leather is one of the most interesting and durable materials for sewing bags. Therefore, I present to your attention several master classes from this material.
Bag - cat
For this simple but very cute model (somewhat reminiscent of the previous one), you will need leatherette, scissors, an awl, thread and a thick needle.
This can be worn by both a young girl and a small child.

The simplest leather bag
No, you definitely need to get one. You will need leather, scissors, a strap, tape, a marker and (optionally) a special tool for cutting several holes in a row (you can do without an awl). All you really need to do is cut out the circle, poke holes, thread the ribbon through, and attach the strap. Everything)

The envelope
Reminds me of a cat bag.

Chanterelle
Pretty model)) Prepare leather or thick leatherette, braid and rivets for her. Chanterelle can not be sewn, it is enough to glue along the edges and hide these places under the braid.

DIY jeans bags
However, the following models can be made from both jeans and old jeans.
Network
For her, cut the jeans into strips and weave the fabric, as in the photo. Sew it already with a bag (folding a piece of cloth in half) and sew on the handles.

Simple denim bag
There is a denim leg - go ahead to the production of the bag! You will also need a buckle, a leather strap, scissors and thread with a needle.

Delicate denim bag
Here you will need two trousers, scissors, thread with a needle and a zipper.

DIY bags made of fabric
Rectangular
For her, take a few pieces of cotton fabric, a zipper and accessories.

clutch
An interesting idea is to use thick pieces of processed cardboard for lining. I would recommend taking Fix Price plastic boards or juice packaging as a dense base.
Present such a handbag to your mother - she will definitely be delighted))

Clutch in a semicircle
Cut out two round pieces of cotton fabric and a circle of synthetic winterizer from the fabric. Fold them into a "sandwich" and sew several times at right angles. Sew around the edge with bias tape. Fold the workpiece in half and sew a zipper into the bag. Decorate.

Handbag
Cotton fabric, lining, clasps and floral decorations come in handy here. A young lady, say, 17 years old, will definitely appreciate such a gift.

Sportswear bag
For it, prepare a dense fabric, braid, scissors, pins, fasteners, zippers and threads. In addition to sportswear, you can also put hiking things in this bag.

Mini handbag
According to the scheme described below, you can make both a completely miniature accessory and a larger item.

Alteration of old things
For the first of the two photo workshops, you will need a long soft cloth bag, and for the second, an old T-shirt.


Photo of handmade bags
I want to show you how you can get a lot of bright and unusual products using the same patterns.
Sandwich bag
Cute bag made of fleece. She is quite simple! And such a design can be introduced into a cat bag.

panda bag
Cute panda design

Simple and elegant bag
The handbag is quite simple and is made according to similar patterns from the very first pattern.

Knitted bag
Although this bag is knitted, its design can be implemented and sewn from fabric.

Leather bag

Octopussy bag
The bag, again, is knitted. But it is very similar to the first one (at the beginning of the article). Only you need to add tentacles to it and remove the ears.

By the way, I bought fleece for the eyes of the "cat" bag here. You won't find one like this in a store.
This article comes to an end. I hope you enjoyed looking at all the handbags and took note of something interesting for yourself. See you soon!
P.S. Subscribe to updates!
Sincerely, Anastasia Skoreva