The 2016 brand of the year is an unusual accessory called a choker. This jewelry has firmly entered the youth culture because of its eccentricity: a choker is significantly different from a necklace, a necklace, despite one location - the neck. If the task of the first is to emphasize the neckline, highlight the chest line, then the choker fits snugly around the neck, creating the effect of a tattoo. Hence the second name of the tattoo choker.
Young people fell in love with the choker for its style and eccentricity, the ability to emphasize individuality, and even the fact that you can make a choker around your neck with your own hands. It is performed mainly in black from:
- fishing line
- spandex
- thin threads
- fabrics
- beads
- lace
The choker is experiencing a second wave of popularity, having returned from the 90s. Simplicity and accessibility, the ability to make it yourself from improvised materials - makes the choker tattoo a favorite among the accessories of 2016. Increasingly, it can be seen on the neck of stars, actresses, show business people.
Accessory choker around the neck
The literal translation of the word "choker" from English means "strangler". This is due to the fact that the accessory fits snugly around the neck, and has nothing to do with its purpose and use. The right size choker is a guarantee of a successful appearance and comfort. To order a choker around the neck, having reduced its size, means to get discomfort when wearing, mechanical friction and pressure marks. Buying a larger size jewelry means losing the effect of a tattoo that occurs with a tight neck girth.

The surprising fact is that a choker tattoo is appropriate to wear for both women and men. Women's neck chokers are distinguished by a variety of colors, a large choice of material and interpretation of execution. Men's chokers around the neck are predominantly black in color, made with restraint, without excess details.
How to make a choker around your neck with your own hands?
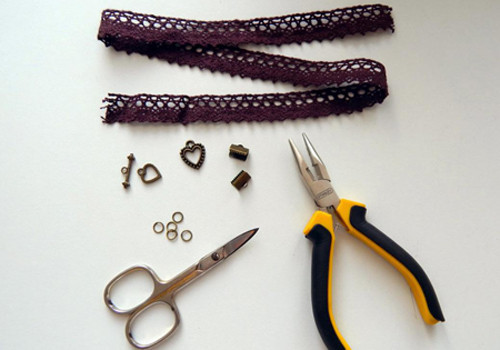
To complete your jewelry collection with a trendy, modern accessory, make your own neck choker. Minimal financial costs and a little free time will make you the owner of an outstanding piece of jewelry made in a single copy.
The materials for making a choker are different:
- fishing line
- the cloth
- lace
- beads
- headphone wire
- cords
How to weave a choker from fishing line?
Neck chokers made of fishing line are easy to make. The fishing line material is affordable and very budgetary, and you may already have it at home. You will need:
- fishing line
- office clips
- decor with beads (performed on request)
Step-by-step description of how to weave a tattoo choker from fishing line:
- We measure the girth of the neck and multiply by two
- Cut the same length of line
- We fold the fishing line in half, fix it with clips on a hard surface (cardboard, hard book cover)
- Tighten the line to prevent knots from appearing. Take one end of the fishing line, throw it on the second in order to form a loop
- We repeat the steps in reverse order: we take the second end, throw it on the first, we get a loop
- We work until the end of the length of the fishing line, if desired, decorate with beads
- Close the circle, singe the ends with fire (lighter, candle), achieving fusion of the ends and fixing the choker into a solid jewelry
After spending a little free time, you will get a modern handmade choker necklace. The knowledge gained on how to weave a tattoo choker around the neck will be needed when making a similar bracelet on the wrist.

How to weave a choker from headphones?
The popularity of headphone chokers is explained by the fact that the thickness of the wire makes it easy to weave the accessory, and its softness will not cause discomfort when worn around the neck. Earphones, stationery clips and a hardcover book are all you need to make a tattoo choker.
- We measure the required length of the headphone wire (neck circumference, doubled). With the help of an office clip, we fix it on a hard book cover
- Place the second wire under the first, forming a loop. Tighten the wire to form a knot
- Place the first wire under the second. In the resulting loop, tighten the knot from the first wire
- Weave according to the scheme until the end of the wire length
- Tie the ends in a knot or use choker fittings


How to make a ribbon choker
Even a beginner can make a choker from a ribbon. A few minutes of free time, detailed instructions, simple, cheap and affordable materials - these are the main advantages in making a ribbon choker necklace.
Prepare the necessary materials:
- velvet or satin ribbon, lace. The choice of color is yours. It can be black, colored or white ribbons.
- you need to buy a ready-made clamp in the store, or use a used one. Also, a clerical pin is perfect for these purposes.
- to make a hole in the tape, you will need a seam ripper, it can be replaced with scissors for manicure or an awl
- ribbon choker decor. It can be beads, lace. Also, jewelry is hung on a choker necklace, it can be a pendant, a medallion, a decorative stone.

Sequence of work:
- We measure the girth of the neck, add 1.5 - 2 cm additionally from both ends. If you chose a bow as a clip, you need to add 10-15 cm
- Cut off the required length. Fold the tape in half, find the middle. We pierce a hole with an awl or a thick needle, on which we later hang a pendant or medallion
- The last stage in the work is the fastening of the clamp. We fasten the finished clip, bought in the store in advance, or we stab a pin. One option is to tie a beautiful bow at the end.

In less than five minutes - a modern decoration of a choker made of ribbons around the neck is ready!
How to wear a choker around your neck, photo
Depending on the quality and type of material, a choker around the neck will perfectly complement the everyday look with an original look. A variety of color solutions fell in love with both teenagers and more mature fashionistas and fashionistas. In addition, the increase in the number of informal subcultures contributes to the spread of the choker.

Made of fishing line, leather laces, tattoo chokers go well with jeans, shirts and bright hair color. However, there is the use of lace fabrics, woven from choker threads, decorated with beads, silk ribbons. Such an accessory has a very festive and solemn look, makes the image complete, unique and original.

Video: Do-it-yourself choker in 10 minutes
The choker is an ornament around the neck, which will emphasize the beauty of any fashionista. This accessory has not gone out of fashion for quite a long time because of its versatility. It can be worn with evening dress and jeans. Women and girls of any age can afford to wear it, you just have to choose the right model. Only now such jewelry is not found on sale as often as we would like. Therefore, you can learn how to make it yourself.
The main thing in the article
What can a choker be made of?
Line choker. The trend is black, white fishing line will look like an elegant decoration, especially with the addition of beads.
Choker made of small rubber bands. Special sets of tiny rubber bands of different colors are sold, they come with a hook and detailed instructions that will help you weave them together.
Headphone choker. For some reason, the headphones fail, but it's a pity to throw them away, then you can use them for completely different purposes. Only the wires should have a good look, shabby specimens will not work.
Choker from satin ribbons. A choker made of satin ribbons will turn out to be openwork and romantic, where each loop will stand out, it can still be decorated with a beautiful pendant.
Beaded choker. This option is suitable for festive toilets, by the way, it is not so easy to make a beaded choker, it can consist of many rows, have beads of different colors in its “composition”, and have a wide variety of shapes.
Thread choker. Wizards who know the technique of crocheting can also try to knit a choker. A lace choker made of threads will look especially appropriate with a woolen dress.
Lace choker. Thin and elegant jewelry will suit very young girls, larger and massive laces will suit older women, but all options will look very elegant.

How easy is it to make a choker at home?
Translated from English, choker means “strangler”, as it fits snugly around the neck, but does not cause discomfort. This type of jewelry also looks like an openwork collar.
For the first time, chokers appeared in the settlements of the American Indians and served as protection against evil spirits, of course, then they were made from natural materials. Then the fashion for the choker overtook Europe.
In the 90s, this decoration made a splash. It was worn by the fair sex of different ages. The choker also came with a bracelet. An accessory such as a choker is either at the peak of its popularity, or the fashion for it subsides a bit. In any case, the choker is also in trend now.
The technique for making a choker is not complicated, you just need to decide what materials you will make it from.

How to make a velvet choker: step by step instructions
- Take a velvet ribbon about 50 cm in size, it can be purchased at any sewing store.
- The main decoration of such a choker will be the end caps that will fix the ends of the ribbon without sewing and gluing. Ask around for these accessories in the same specialized stores as for the velvet ribbon.
- Now everything is simple: using pliers, bend the end caps on the edges of the tape.
- Tie the choker nicely in a bow at the back of your neck. , this is the whole essence of just such an ornament, wear it with your hair pinned up.
- If you want a velvet choker to decorate your neck more in front, measure a piece of ribbon that strictly fits around the circumference of your neck, decorate with a pendant and attach clasps (they are similar to trailers, only attached to each other).

How to make a beautiful satin ribbon choker?
- Cut a satin ribbon half a meter long, then cut it in half again.
- Place the connecting ring in the center of these segments, grease the edges of the tape with textile glue and, forming loops, fix the ring between the pieces of tape.

The loops on the edges of the tape should fit snugly around the ring, it should not hang out.
- When the glue dries, you can easily wear the choker, tying it around your neck, and combining it with almost any outfit.

How to make a beaded choker: options with a photo
Here are the options for making a beaded choker with patterns for weaving them.

 A few simple beaded cords can be turned into an elegant choker necklace.


How to make a lace choker: a master class
- The model of this choker is not so simple in execution, but the finished product will justify all the efforts expended.
- Measure the circumference of the neck well so that the choker fits snugly to it.
- Make blanks for the flower, cut out six long petals and two round centers from felt fabric. Lay out the petals so that the lower tier protrudes slightly and is longer than the upper one, pin the blanks with pins.
- Take one petal of the upper and lower layers, fasten with stitches along the fold line and tighten the thread a little, a wrinkle should form.

- Do not break the thread, then continue the same algorithm with the rest of the elements.
- Tightly gather all the petals into a flower, sew one circle on top. Decorate the middle of the flower with beads, beads, sequins.
- Weave a red ribbon into the black lace. Along the way, sew on a black braid, one centimeter wide, thereby fixing the red ribbon. Beautifully decorate the cut by sewing black braid along the entire width of the cut.

- Measure a third of the length from the beginning of the choker and sew a second circle from the inside in that place, sew a flower to it from the front side. For decoration, attach a black chain to the choker.

How to make a choker: simple and clear schemes
Below is leather choker detailed description diagram .
You will need:
- Genuine, soft leather;
- Cord, the length of which will correspond to the girth of the neck, 5 mm thick;
- Scissors, needles of different thickness;
- Beads and rivets for clothes;
- Locks, carnations, a chain for decoration;
- Nippers, pliers.

- On the skin from the inside, make markings, cut out two strips of one and a half centimeters. The length will be equal to the girth of the neck minus 2 cm, then it will be supplemented by a clasp.
- Fold one piece of leather in half and fold in the center.
- From the center on both sides, mark the places where the rivets will be attached, retreating from each other by 1.0 cm.
- Now attach the rivets as shown in the photo.


- After attaching all the rivets, sew both parts of the skin together, sheathing with beads along the way.
- Pass the cord prepared in advance between the leather flaps, so it will look more voluminous and keep its shape better.
- Continue beading the seams, having reached the middle, instead of the usual bead, sew a large one, then the pendant will be attached to it.

- Next, attach the clasp, just pinch the edges with pliers so as not to scratch, you can put a piece of cloth under the pliers.
- In the center of the choker, where a large bead is sewn, attach the pendant.

How to make a choker out of fishing line?
- Prepare the necessary materials and follow the diagram below, it is quite simple in its execution. From the materials you will need only fishing line, scissors, adhesive tape.

- Bend a piece of fishing line in half and fix it with tape, or use a clerical clip.

- Start weaving a choker, guided by the scheme.


- When the product reaches the desired length, tie the ends into a knot, a fastener is not needed here. The fishing line stretches very well, so the product can be worn over the head.
 Or this option:

How to make a choker with your own hands from floss threads?

- Take floss threads of different colors , they must be combined with each other or create a contrast.
- Weave them into a braid , fasten the edges with thread so as not to fall apart. You can make a choker from one braid, or you can weave several, only the length of the lower pigtail should be slightly less than the next, so they will form into a beautiful and even semicircle. Or weave one long braid, and then fold it in half.
- To the edge of the lower pigtail and on the sides of subsequent attach a large chain . Attach a carabiner to the connecting rings . The decoration will be tied with ribbons, tie the ends of the ribbons to the carabiner and wrap them around the ends of the braids. That's it, the floss thread choker is ready.
Here's another build floss thread choker .

- Even the most discreet look can be complemented by a bright and massive necklace. The simplest dress can be combined with a memorable accessory, and your look will be simply irresistible. A thread necklace is a type of jewelry that is difficult to find on store shelves, but you can create it yourself, and no one else will have such an accessory, it will be unique.
- As planned, the choker should turn out to be massive, so wind floss threads on a plank or other base to make a thick thread.
- Tie the thread from one end, cut it from the other.
- Braid the simplest braid of these threads. Strongly do not tighten, it should turn out to be of medium thickness. Cut off the excess ends of the threads.
- Sew a pigtail to a metal chain the longer it is, the longer the choker will be.
- Attach ribbons to the ends of the chain on which the decoration will be tied.
- To sew large beads on the bottom side of the pigtail , place the largest in the center.
- Experiment with the width of the braid and the colors of the threads, you can also add a similar bracelet to such a choker.
How to make a choker out of headphones?
Everything ingenious is simple. Tie the cord from under the headphones several times around the neck and tie in front of the bow. Make beautiful ends. Or you can attach a clasp to the cord and hang a pendant on it.
 Or you can weave a choker from headphones using the double knot technique.

How to weave a choker from rubber bands for weaving around the neck?
A choker is an ornament that can be made from many materials, even silicone rubber bands. It is worth remembering that such an accessory is suitable only for very young girls. You just need to purchase a large set of rubber bands in a needlework store, they come with fasteners and a special hook for connecting them, but you can also tie them on your fingers, and this method will be considered. This method of weaving is called "fishtail". Look carefully at the photo, how to properly connect the elastic bands to each other.

- Take one rubber band and twist it between your index and middle fingers. Repeat with two more rubber bands.
- Then remove the loop of the lower elastic band from the index finger and fix it over the two upper elastic bands. Do the same with the other loop, a knot should form over the two rubber bands.
- Wind another rubber band on top of your fingers and repeat the action, so the chain will gradually “grow”.
- When the choker is the desired length, remove the two remaining elastic bands from the fingers, remove them, and thread the hook-clasp through the remaining loop.
How to make a fabric choker?
For work, take:
- wide lace;
- a long black ribbon, 1.5-2.0 cm wide;
- beads;
- scissors;
- needle and thread.

- Beautifully decorate the edges of the black ribbon, make them curly.
- Fasten the ribbon with lace from the wrong side with pins, moving from the center to the edges. Then sew on a basting or sew by hand.
- Decorate the product with beads.
- Hanging long ends of the ribbon will give the choker a special romance.

How to make a lace choker: photo ideas
The most beautiful choker can be made even from laces, here are photo ideas for inspiration for creativity.
Long cord with metal tips and decorative flower.


A short cord with a pendant, you can leave two additions, or you can wrap the cord in one layer.

 A lace choker threaded through a large bead.
 Metal frame with a cord around the neck, which is tied with a bow.
 Decorating a leather choker with lace tassels.

Video: how to make a choker around your neck
A choker can be made from a variety of improvised materials, and look stunning at the same time. Try different choker options in your performance to have bright and different decorations for any outfit.
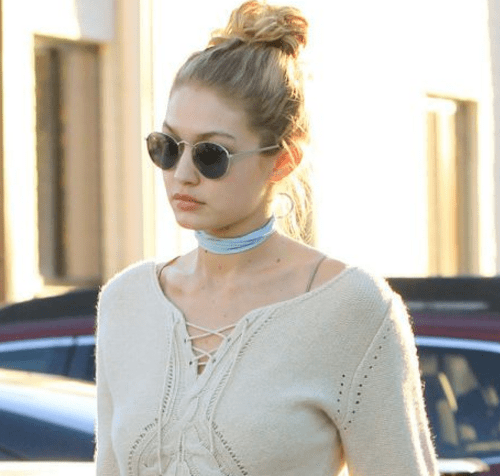
Looking at the trendy images of modern stars or fashion bloggers, it is easy to see that long beads or large necklaces have become the main accessory for the neck. Practically each of their outfits is complemented by a spectacular decoration that wraps around the neck like a bracelet: a choker. Thanks to him, even the most simple, familiar and classic images look sharper and become memorable.
What is a choker
Fashionistas from the nineties, already so relatively distant, this accessory is well known. True, then it was called differently: velvet. Although the decoration appeared even earlier, back in the Middle Ages, and it adorned the thin necks of court ladies.
The choker got its name due to the analogy with a snake wrapped around the neck and strangling it, which is a direct translation of the word choker. Fashion is cyclical, and every season something from past fashion eras returns to it. So the same velvet again takes the first position among the most trendy women's jewelry. And among all types of products, the feminine lace choker is in the lead.
What can be made
The materials from which they are made can be very different: mesh, spandex, satin or velvet ribbons, knitted braid, lace, plastic, fishing line, metal, leather or suede. Such a neck bracelet is decorated with rhinestones, stones, beads, a brooch, various pendants and other pendants. The lace neck choker is a real favorite as it goes with just about anything and is easy to DIY.

They are also made from threads for knitting or macrame, crocheted or weaved using the tatting technique. The style of jewelry can be very diverse: from abstraction and hi-tech to ethnics. Regardless of what such a neck accessory is made of, you need to wear it only on a bare neck. That is, putting it on over a turtleneck is a clear bad manners.
What are chokers
The edgy and trendy accessory is presented in several varieties, so that every woman who is trying to look fresh and stylish will find her own option.
Choker velvet. It looks rich and, despite associations with the nineties, original. The beauty of the decoration made of velvet ribbon is that:
- the choice of colors is huge, from black, berry shades, bright colors to pastels;
- it is not difficult to make such a choker on your own, especially if the choice fell on a ready-made and processed ribbon.
A choker tattoo is a rather unusual and bold accessory model. From the name it is clear that it should fit very tightly to the neck and look like a real tattoo. Therefore, it is most often made of thin materials: fishing line, spandex thread, wires from headphones (the thinner the better). It is also decorated with ribbons, rhinestones and beads.

A choker with a pendant is a separate type of accessory. It is made from any material: leather, fishing line, velvet, lace, rapeseed or satin ribbon, and so on. The main distinguishing feature is the suspension, and quite a large size. It can be a brooch or a cameo, which will add aristocracy and elegance to the decoration. The pendant is attached to the ribbon thanks to a special ring, which can be bought at a needlework store. How to make a lace choker will be described below.
But not only women wear chokers. Surely you have often seen pendants with fang, bone and similar brutal things around the neck of the strong half of humanity. This is the men's choker.
What to wear with stylish jewelry
In order for the choker to emphasize the dignity of its mistress, be appropriate and decorate the image, complement it and make it original, it is necessary to wear it with the right clothes. Incorrectly selected width of the accessory may not decorate the female neck, but make it short, and the image as a whole - unpresentable. If you are the owner of a not too long neck, choose narrow, elegant options for the accessory. Well, for those who have it swan, more massive options or several worn chokers at once will do.

The most important thing to remember: this decoration is not worn with closed blouses and turtleneck sweaters, turtlenecks. Only with clothes with a cutout, in which the neck is as open and exposed as possible. Velvet options are suitable for a loose dress or shirt with an open collar. To the leather jacket - a more aggressive option with rivets or even spikes.
Any chokers look especially good with clothes, in particular dresses, with a V-neck. Complete summer looks with shorts and casual T-shirts with chokers made of satin ribbons, cotton thin lace, crocheted or woven using the tatting technique.
Lace Choker
A lace choker goes well with dresses or depending on how richly decorated it is, you can create both an evening and everyday look. Made in black or other dark colors, it looks somewhat dramatic, fatal. But if you complement the image with pastel shades, it will give it a gentle, girlish romanticism. A black lace choker will also appeal to lovers of the gothic style.

For gentle ladies, it is best to choose thin options for the accessory, and for older ladies, you can choose jewelry from a wide and more embossed ribbon. For example, lace will perfectly complement a girl's look for both spring and summer.
Making your own fashion accessory
Handmade items are becoming more and more popular. And jewelry is no exception. Here is a small tutorial on how to make a lace choker with your own hands:
- take a lace ribbon of the selected width and color;
- cut the required length, according to the volume of the neck + 2-3 cm;
- process the cut edge;
- sew lace to the base tape (so that the finished choker does not sag);
- put a ring with a pendant on the ribbon;
- sew on a clasp (can be bought at any needlework store).
Your trendy lace choker is ready! It remains to choose the appropriate outfit and conquer men's hearts.
Hello! Today I want to talk about such a fashionable neck accessory as a choker. These necklaces first appeared hundreds of years ago, but today (as in the 90s) they are again popular and even acquired some kind of new breath.
I think the popularity of all kinds of pendants and chokers today is due to the general mix of styles, the diversity of subcultures and the penetration of all this subcultural fashion into our everyday wardrobe. You don’t even have to worry about what to wear a choker with - in 2018, you can shamelessly combine everything with everything, while looking stylish and expensive.
In the 90s and 00s, the most popular decorations for the neck and arm were Tattoo chokers. They are very thin and look like a tattoo, which is why they got their name. This cute girl in the photo is just a symbol of the 90s!
Tattoo choker can be woven by yourself from fishing line or elastomeric thread for beads. The scheme of the tattoo choker is very simple, as it is woven with macrame knots of just two threads.

But today there are many other options for neck chokers that you can make with your own hands. The number of them can be limited only by your imagination and available materials. For example, in this photo - lace chokers, all very beautiful and unusual.

Such decorations can be made at home from improvised materials. All you need is a lace ribbon and a pair of fasteners! It turns out very cheap, but - handmade!
In general, what I like most about chokers is that they can be made from almost any material: leather cord, waxed, suede, velvet and lace ribbons ... And a pendant will help to make your choker special, one and only in its kind. As you can see, it completely changes the whole look of the decoration:

I myself have not yet worn chokers, although I really wanted to, but it always seemed that this jewelry was not for me and I could not find a suitable look or dress. Now I want to offer you as many as 10 do-it-yourself choker options that you can make at home without much effort and expense! There is a lace, leather, and black beaded tattoo choker, so take your pick!
Watch how to make a choker with your own hands in my video:
I hope you liked today's post and now you will make yourself a couple of interesting chokers around your neck! Subscribe to my channel, there are a lot of interesting master classes and ideas!
Needlework is gaining popularity, and various forms of jewelry weaving are at its peak today. In 2014, chokers came back into fashion - jewelry around the neck that wraps tightly around it, and to this day, decorating yourself with such a product is considered a sign of good taste. Tattoo chokers, which from afar resemble tattoos applied to the arm or neck, do not have to be bought in a store, they can be made independently from materials that you will probably find at home. How to learn how to weave a stylish choker, you will learn in this material.
How to weave a choker: we analyze a phased master class for beginners
Those who are just starting to get acquainted with needlework, but really want to become the owner of an exclusive choker, should start with the basics. We will tell you how to weave a choker tattoo and what it can be made of. Fishing line, old thin wires, for example, from headphones that are no longer in use, and special jewelry wire are best suited for this purpose. Weaving a choker according to the patterns below is also possible from nylon, waxed, leather or suede laces, ordinary satin ribbons and even woolen threads. Absolutely any material suitable for weaving can be used.

Learning to understand the "pigtail" technique for beginners
There are a huge number of ways in which you can weave a choker around your neck. One of them is available to everyone, since everyone knows how to braid, and any braid weaving technique that you own will do, whether it is a regular or reverse braid, a spikelet, a braid of four or more strands. Each time you get different and original decorations.
We will tell you how to weave a choker using the technique of a regular pigtail. To do this, on a solid basis, for example, the cover of a book, we fasten three pieces of fishing line with a clerical clip, each one meter long or a little more, or three pieces of wire from headphones (of any material chosen for weaving).
This is followed by the technique: we cross the right wire or a piece of fishing line with the central one, which after that we take a little to the side so as not to interfere. Now the piece that was on the right becomes the center piece. We take the left piece of the material we are working with and intersect it with the central one, move it to the left. Now the piece that was left has become central. Let's see how it looks on the diagram.

Repeat the technique until about 3 centimeters of free ends remain. They are needed in order to secure the product. The easiest way is to tie. To do this, we collect the three free ends of the product and tie it with a regular knot into one bundle. We do the same on the other side of the product. Now you need to connect the two resulting ends. This can be done in different ways. The diagram below shows the secure mounting options.
Or, if the choker is made from fishing line or nylon cord, you can fuse the ends together with a lighter. Having melted them on one side, we thread the fishing line from the other end of the choker into the loop formed and also fuse it, in the same way, as shown in the photo.

By experimenting with the colors and materials from which you weave, as well as with the tension, you can get a variety of options for a choker woven using the same technique.
How to weave a tattoo choker with the technique of simple knots with a job description
To do this, a cord 3-4 meters long, depending on the girth of the neck, must be folded in half and fixed, for example, with a clerical clip. From the two free ends we will weave a choker, as shown in the diagram.

We take the left end, put it on the right end and thread its tip into the loop formed from below. It is not necessary to tighten it tightly, otherwise the pattern will not turn out to be openwork. We do the same with the right end of the cord and weave to the required length.
In the technique of double knots.This weaving option is more complicated and involves working with four threads. Fasten the threads folded in half, as shown in the figure below, or with a clerical clip, each separately. For convenience, we number the threads from left to right from 1 to 4. Put the thread No. 1 on top of the ends No. 2 and 3, and bring it under the thread No. 4. Now we work with the far right, under the fourth number. We wind it up behind threads No. 2 and 3 and bring it up into the loop formed between threads 1 and 2. Now you need to tighten the knots if you want to get a tight choker (for example, from suede or leather cords), or straighten the loops if you want to get an openwork decoration (from fishing line or waxed cord). We got 4 threads again. Now you need to continue weaving, starting from the right extreme (No. 4). The diagram shows the weaving process in detail.

Having mastered the basic techniques, you can experiment with the number of knots and the strength of their tension, come up with your own weaving patterns, use a crochet hook for this, weave ribbons, beads, pebbles or sequins into the choker to create sets of exclusive jewelry for the neck, arm and even leg . With them you will be unique and stand out from the crowd.
Video on the topic of the article
If you still have questions about how to weave a stylish choker, then these video tutorials will serve as an excellent hint.