Crochet berets are a must for any woman or girl in the wardrobe. Moreover, not only in the cold season: in summer they will protect our hair from ultraviolet rays, and in autumn and winter this headdress will warm us from frost.
Crochet beret - a very exciting job, especially if you pick up beautiful yarn. Of course, it may take more time to complete it if you are new to this business. But, thanks to clear diagrams and a detailed description, any beginner will be able to knit the simplest beret in a couple of hours! Below you will find crochet berets for women with a description and patterns for free.
Crochet - description and diagram
Already on the street autumn but not yet so cold to put on nice winter hat, so we suggest you consider new models of knitted berets for this cool season. You don’t even need to take off to measure the girth of your head - crochet allows you to try on products while you work.
So, first you need to decide which one you want to take, and from what material. Can choose cotton or acrylic for this season. In general, the best material is cotton, because. it warms but allows the head to breathe. And this is a great choice for a child. In addition, it is possible to choose the color of the future product ( blue, red, black, yellow), model ( with pompom, regular, mesh, original rastaman), yarn ( thick, thin). For beginners, we suggest doing without decoration, our step-by-step description of knitting sag will help them with this.
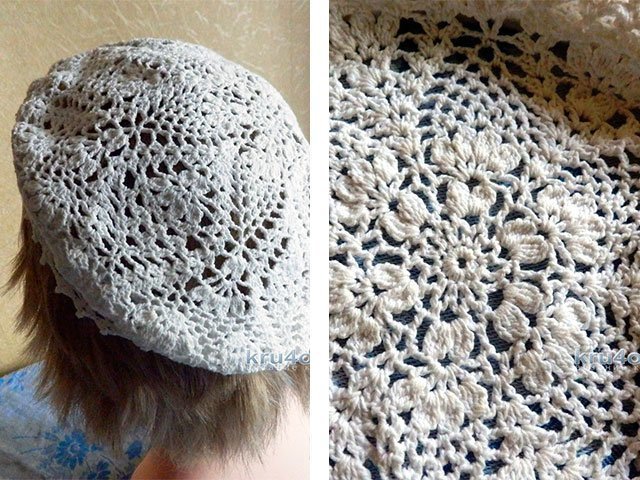
We offer little master - a class on knitting a beret from a thin white thread
(cotton 100%). Such a white beret (from snowball yarn) will not leave anyone indifferent! It is very airy, it just fits in, you can finish the work within an hour if you read and understand the diagram with the description correctly. 
Beret: how to crochet?
Crocheting a beret for beginners has a detailed description. Knitting should be voluminous, and try on the size step by step. Take 100 grams of yarn in two colors: pink and gray. Next, pick up two hooks: No. 3.5 and No. 3. You can print out the diagram in advance if it is inconvenient for you to read it from the site. So the needlework can be marked on the sheet: which row you knit, how many cm are left, where and when to change the color of the thread. Crochet: scheme and description for beginners:
Popular articles:
Summer, spring and autumn crochet berets
If you want to make women's berets: spring, classic summer and light autumn - you won't have to look for a long time, there are such products in our article! Be fashionable and beautiful all year round! The master class below will help you with this.
Crocheted for spring for women: 250 grams of angora, hook No. 4.5 - 5.

A new summer trend - a pink openwork beret for real fashionistas and their kids!
It is somewhat reminiscent of the "grid" pattern from the descriptions above. The diagram will tell you in detail how to properly tie such a work of art! The pattern of this model is very reminiscent of a star or a flower.
Crochet summer for a woman: scheme:


A long-awaited option for autumn from warmer yarn and tighter knitting, because. we will do it with a double thread and a large hook number 4.

How to crochet beret for beginners: video
Crocheted women's berets with patterns with a description: photo 2018
Waiting for you below crochet berets for women– the best and fashionable photo selection 2018. Buy or knit the most fashionable headwear models of this season! 


Crocheted berets with diagrams and descriptions: new warm models
It will take melange yarn for such a cute hat(the diagram can be downloaded for free) and hook number 3.5.
Dial chain 5 V.P. close in a ring. Knit S.S.N. in C / X in a circle up to a diameter of 22 cm. for this, make additions until this goal is achieved. Next - 19 cm straight knit. The last 6 R. - S.S.N. , and 7 R. - "crawl step".
Crochet hats and berets for beginners master class: video
Master class from Lilia Ulyanova - classic beret and hat:
Crochet for autumn 2018: scheme and description
In this MK the thread will alternate gray color and fuchsia. The beret is knitted to the size of the head - 56 centimeters.
We knit not like a regular beret - from the bottom edge- gum in a gray tint. We carry out a chain of 60 V.P. in the ring S.S. The serial number corresponds to the number of the circular row of the product.
- 1 V.P. lifting, 1 S.B.N. = 60 P.
- 60 P.
- 1 V.P., 1 S.B.N. in every S.T. to the end of R., finish S.S. = 60 P.
- 1 V.P., 1 S.B.N. in every S.T. to the end of R., finish S.S. = 60 P.
- 1 V.P., 1 S.B.N. in every S.T. to the end of R., finish S.S. = 60 P.
- Hook number 10 - fuchsia thread. 2 V.P., 1 half S.S.N. - skip, half S.S.N to the end of R., close S.S. in 2 P. lifting.
- Grey colour: repeat 6 R.
- fuchsia color: 2 V.P. lifting, 1 1 floor S.S.N. miss, semi s.s.n. (P.S.S.N.) in the next 12 S.T., (2 half S.T. with 1 vertex, 1 half S.S.N. in the next 13 S.T.) * 2, 2 semi S.S.N. with a common top, S.S. in 2 P. lifting.
- Grey: 2 V.P., 1 half S.S.N. skip, 11th floor of S.S.N., (2nd floor of S.S.N. with a common top, 12th floor of S.S.N.) * 2. 2 semi S.S.N. with a common top, S.S. on the second P. rise = 52 P.
- Fuchsia: 2 V.P. lifting, 1 floor S.S.N. skip, 1 half s.s.n. in every S.T. to the end of R., S.S. in the second P. rise.
- Grey: 2 V.P., 1 half S.S.N. skip, 10th floor of S.S.N., (2nd floor of S.S.N. from a common peak, 1 floor of S.S.N. in the next 11 S.T.) * 2. 2 semi S.S.N. with a common top, S.S. in the second P. rise.
- Fuchsia: 2 V.P., 1 P.S.S.N. skip, 5th floor S.S.N., (2 P.S.S.N. with a common top, 6 P.S.S.N.) * 4. 2 P.S.S.N. with a common top, S.S. in the 2nd P. rise.
- Grey colour: 2 V.P., 1 P.S.S.N. skip, 4 P.S.S.N., (2 P.S.S.N. with a common top, 5 P.S.S.N.) * 4. 2 P.S.S.N. with a common top, S.S. in the 2nd P. rise. = 36 P.
- Fuchsia: 2 V.P., 1 P.S.S.N. skip, 3 P.S.S.N., (2 P.S.S.N. with a common top, 4P.S.S.N.) * 4. 2 P.S.S.N. with a common top, S.S. in the 2nd P. rise. = 30 P.
- Grey colour: 2 V.P., 1 P.S.S.N. skip, 2 P.S.S.N., (2 P.S.S.N. with a common top, 3 P.S.S.N.) * 4. 2 P.S.S.N. with a common top, S.S. in the 2nd P. rise. = 24 P.
- Fuchsia: 2 V.P., 1 P.S.S.N. skip, 1st floor of S.S.N., (2nd floor of S.S.N. with a common top, 2nd floor of S.S.N.) * 4. 2 semi S.S.N. with a common top, S.S. in the 2nd P. rise. = 18 P.
- Grey colour: 2 V.P., 1 P.S.S.N. skip, (2 P.S.S.N. with a common top, 1 P.S.S.N.) * 4. 2 semi S.S.N. with a common top, S.S. in the 2nd P. rise. = 12 P.
- Fuchsia: 2 V.P., 1 P.S.S.N. skip, 11 P.S.S.N., 5 times 2 P.S.S.N. with a common top, skip 2 v.p. at the beginning of the circular R., S.S. in the first P.S.S.N. = 6 P.
He takes, perhaps, the headdress in which the girl will look more feminine. But beret is a style from time immemorial. It is easy to note that hats very close to the shape of a beret were found on the works of the Bronze Ages.
The cut of this headdress is elementary: a circle tightened along the edge. Now everything has changed, berets are made from different fabrics, and the style has been slightly corrected. It can also be knitted or crocheted.
In a small review, crocheted knitted berets are collected, new and elegant models with descriptions and diagrams. This will help everyone create a selection of new items for themselves with a crochet hook and the right yarn.
What should be the yarn, and what determines the choice. The master begins the choice of yarn with an assessment of the model, often it already has some clues.
 Choose yarn depending on the season for which the garment will be created. For example, a beret can be summer, winter, spring (autumn). And this is where composition matters.
 To meet the winter frost, it is better to choose yarn with a lot of wool. Thin yarn and a lot of cotton is typical for the summer version.
 But demi-season- can pamper themselves with yarn of mixed composition. The hook is always in second place.
 The thin part of the hook should be 2 times the thread.
Step-by-step instructions for creating a crochet beret
Crocheting is a pleasure. A set of first loops for beginners.


You can knit in any direction, more often from the crown, there are a lot of patterns and patterns. The most interesting thing is that in the first stages the product may resemble an ordinary napkin. Further, due to the narrowing and elastic band, it already becomes a long-awaited beret.

A selection of the best patterns that can be crocheted for winter, summer, spring (autumn).
Beautiful beret for a woman
This model made of thick yarn and is useful for late autumn or early spring. 
For work you will need:
- yarn 50 g/50 m from 100% wool;
- hook number 8.

Crochet density according to the scheme of this pattern: 10 cm - 9 columns with 3 crochets.
Starts taking from the crown. It is necessary to dial 3 air loops and close in a circle.
1 row: in a circle of 5 columns with one crochet.
2 row: there should be 10 columns with 2 crochets = in each of the 5 previous elements, make 2 columns with 2 crochets.
Knit on the pattern of shells to the desired diameter. Then two rows with small decreases. It remains to make an elastic band with 4 cm single crochets. The beret is ready, you can knit a good scarf with a similar pattern.
Warm women's beret
This winter hat will keep you warm in the cold. It is better for a beret to take threads with a high composition of mohair (it will make the beret not only warmer, but also airier, softer). 
For work you will need:
- yarn 50 g/190m 3-4 skeins of 10% polyamide, 20% mohair and 70% viscose;
- hook number 3.

The finished model is ideal for a girth of 56-57 cm. Work begins with a special sliding loop. Then 3 air loops and 11 double crochet in the ring. Tighten the loop. Knitting goes strictly according to the scheme.
Increases create to the desired diameter. In this model, the widest circle is 18 "bumps". Decrease to the end of the beret, do it symmetrically to the increments: in the places of the increments, make 2 relief columns together.
 How to make a rubber band: with the help of embossed columns, an imitation of an elastic band with 1 * 1 knitting needles is obtained. To do this, creating convex columns, insert a hook into the columns of the previous row. But do the concave columns in the usual way.
Slim crochet
This model looks equally good on girls and women. Plus universal white color. Can be made in any other color. The only thing is that it is the white color that is the way to repel hot rays and prevent overheating on hot summer days. 
For work you will need:
- iris white;
- hook 0.75.

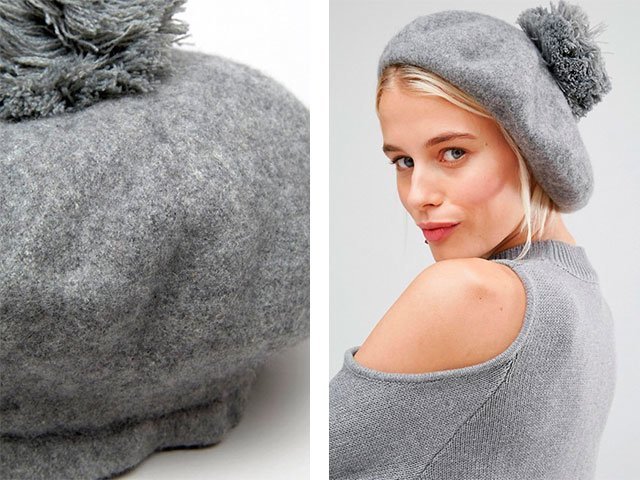
Beret with pompom
A very original model - it takes an ombre from lush columns. 
For work you will need:
- yarn children's pekhorka of two colors;
- small label;
- hook number 2.

As for flowers, you can trust not only these colors. A wonderful combination of colors gives yellow and blue. You can try and experiment with different options. And if it is difficult for you to choose the most acceptable color, then you can always use the color combination tables. Even an experienced craftsman has a moment when his imagination runs out and he turns to new models for help.
Knit according to the scheme with the additions and decreases of the pattern. The elastic band is also crocheted. Alternating rows of a convex column and a concave one.

Takes for a child and for an adult woman - just choose the style and pattern you like. Video information is offered to help you: you will see with your own eyes on the screen how to crochet, for a child or an adult, warm, for the off-season, or very light, for the summer.
Do not be surprised by the variety of patterns: you will quickly learn how to get the most intricate knitting options with your crochet hook.
p.s. In the last article, we looked at how to knit beret with knitting needles, now crochet.
Having learned, you will be able to crochet a beret without prompts, even more attractive than you saw in the video tutorials. This is far from being as difficult as it might seem to you at first: your work skills will develop quickly, it remains to add a little of your own imagination.
We offer video lessons for beginners with which you can quickly learn to crochet:
Takes with a head circumference of 31 cm, if your doll has a larger head circumference, you can take thicker yarn and a thicker hook. You can knit a sample with double crochets, calculate the density in such a way that with the same number of columns as on the model, you get the number of centimeters you need.
After that, you can start knitting. First of all, the bottom of the beret is knitted in the form of a flower. You will get 32 columns, located in two tiers one above the other. The next tier consists of elongated columns that form arches, 8 large and 8 short ones.
Video lesson:
Used yarn "Pekhorka Pearl", one hundred grams contains 425 meters. The composition of the yarn is half cotton and half viscose. Work begins with knitting six air loops and closing the resulting column into a ring. Lifting columns are knitted on this ring, thus gradually forming an air pattern in which the columns alternate in a checkerboard pattern until a disc with a diameter of 28 cm is obtained.
This size corresponds to the 56th head size, if you need a larger size, you can knit another row. 
Video lesson:
For work, NAKO Bambino yarn was used, which contains 130 meters in a 5-gram skein. The composition of the yarn is 25% wool and 75% acrylic. It will take 75 grams of it, this is one and a half hanks. Used the fourth hook number. First of all, it is necessary to measure the volume of the head, in our case it is 58 cm.
First of all, the bottom of the beret is knitted until a circle with a diameter of half the size of the head is obtained. In the first row, 12 columns are knitted and in subsequent rows add 12 more columns each. When the bottom is ready, the depth of the beret is knitted, from one to three rows without increments. 
Video lesson:
The red yarn "Children's Novelty" from Pekhorka was used, knitting is done in two threads, therefore a thick hook No. Work begins with the formation of an elastic band 4 loops high and up to the required head size.
The ends of the elastic are connected to each other. Subsequent columns are performed with decreases, knitting is repeated in a circle. At a height of 15 cm, the decrease begins. The circle is divided into eight sections, if there are extra loops, they are evenly distributed over the sectors. 
Video lesson:
Knitted with GAZZAL yarn, consisting of 40% wool, 20% cashmere and 40% polyacrylic. A 50 gram skein contains 200 meters of thread. When working, hook No. 2.5 was used. First, a free ring is made of thread, and there are 10 columns on it. Then the ring is pulled together, and these columns become the future center of the beret.
Further, the pattern is gradually built up, alternating two air loops and two double crochets. On the next row, work two air loops, one double crochet and two double crochets. The next row is knitted in the same order. 
Video lesson:
Designed for head circumference 50-52. A fur pom pom can be purchased at the same store as the yarn, or you can make your own from white yarn. Beret for girls crocheted beret No. 3.5. For a child on a beret, 100 grams of yarn will be required. These 100 grams account for 200 meters of thread. It is knitted in two skeins, that is, in eight threads.
Since the beret is associated with a gradient, a color transition, the remains of white, light lilac and dark lilac threads were used. The elastic band is knitted with single crochets, he takes it himself - with single crochets. 
Video lesson:
Knitted from "Sapphire" threads, the material is semi-woolen with 45% wool and 55% acrylic. A 100 gram skein contains 250 meters of thread. The hook was used thick, No. 4, significantly different from the thickness of the thread. First, a circle with a diameter of 15 cm is knitted with single crochets, in six directions.
The first columns are knitted therefore exactly six. Then the number of columns is doubled, two for each column of the first row. Further, two columns are knitted in the first loop, and one in the next, so in the end you will get 18 columns. 
Video lesson:
It is especially good for spring. You can use other threads, the principle of knitting does not change. A thin elastic band is inserted into the collar so that the beret sits well on the head. In you take only 31 rows of double crochet and single crochet. Used hook number 4.5. The yarn used is Mondial, an Italian mohair yarn made from 80% baby mohair and 20% polyamide.
For 25 grams of yarn, there are 245 meters of thread, knitting goes in two threads, so 2.5 skeins are required. To get a striped beret, it took three hanks of different colors. Dark gray, light gray and turquoise, such rows are knitted in turn. 
Video lesson:
Knitted to cover the head 48-50 cm. Yarn used with a density of 350 meters per 100 grams, a total of 50 grams was used. Hook used No. 2.5. First, a chain of 9 air loops is dialed. Further, single crochets are knitted above them. The next row is also knitted with single crochets, but they are formed not on a loop of two threads, but in one half-loop, back.
The next rows are knitted in the same way, forming an elastic band. Its length corresponds to the girth of the head. Next, a strip of gum is tied together, after which the knitting of the surface of the beret begins. 
Video lesson:
A beautiful headdress is knitted from the top of the head and can be brought to any size. Used hook No. 2.5, yarn Alize Lanagold Fine Mississippi, she left half the ball. Any yarn can be used - mohair, wool. We form 12 loops on the ring from the thread, since the beret is designed to be six-wedge.
The ring is tightened, and in the next row one and two columns are knitted alternately into the loops. In the third row, an increase is made in every third column. So the bottom is knitted to the desired diameter with gradual increases, after which nine circular rows are knitted without additions. 
Video lesson:
We all once start with something, as was the case in my case of knitting a baby beret. There are certain skills in knitting and crocheting, but she knits for the first time
I would be glad if the MK I made turns out to be some help for someone who has looked at me at the light
I prepared the yarn, picked up the hooks, chose the model I liked 


The beginning of knitting the beret model I have chosen is from the crown. Therefore, it was easy to knit at first according to the description. However, I needed to calculate the diameter of my beret, which is where I left off.
I found plates with approximate sizes on the Internet, but ... that’s why they exemplary, but I wanted it right away, as it should be, and for it to fit for sure
To calculate the dimensions of the product, I used materials from the post of Svyatulka
"A crocheted beret holds its shape better. For the calculation, it is necessary to knit a loop sample, calculate the density of the fabric and know the following dimensions (see figure): 
1 - head circumference minus one or two centimeters - this is how loops are calculated to start knitting.
2 - the circumference of the beret. It depends on what size you want to get - this is how the maximum number of loops is calculated.
3 - radius of the circle. Calculated from the known circumference (2), according to the formula: (3) = (2) / 6.28
6.28 is 2*pi.
4 - difference between the radii of circles (2) and (1). The radius of a circle along the circumference (1) is calculated in a similar way.
All calculations are carried out in centimeters, then, in accordance with the density, they are converted into loops and rows.
I also searched and got acquainted with the descriptions of those who knitted earlier, where they offered, as options, to knit
1) in each of the 12 parts takes 13 - 15 tbsp. s / n (depending on the yarn);
2) knit according to the principle of a round napkin to the desired width, but so that the edges are folded.
Tied up. It turns out a very magnificent beret, and if you also decorate it with flowers, it will look, in my opinion, like a flower bed in which the child's head will be lost. But, as they say, the taste and color ...
Disbanded again.
I walked around the Internet, stopping at this model of the craftswoman Golubka
And her accessible description "Crochet with embossed columns" http://www.baby.ru/blogs/post/11955936.
Here I knitted my beret and took step-by-step photos of the progress of each row:
1. 
2.
3. twisted front column s / n knitted through one ordinary column s / n 
In the following photos I show that ordinary double crochet posts are located between the twisted double crochets, beret sectors begin to emerge 
4. At the beginning of the expansion, I knitted one additional regular st on each side. s / n from twisted art. s / n, i.e. in the sector there was no longer 1, but 3 tbsp. s/n 
5. 
6. Wrong side 
7. 
8. The farther from the beginning of knitting (crown), the less often I made increments: so, in the next circle - only on one side of the twisted column; the next row - according to the drawing; then - on the other side of the twisted column; some kind of circle - increases through the sector 
9. 
10. 
11. So she continued uniform increases, so that in the end, in all sectors, 9 tbsp were knitted between the twisted columns. s/n 
12. it was this number of columns in the sectors that I needed according to the diameter of the future beret 
13., so I knitted the rows according to the pattern and began to decrease, i.e., round the bottom, according to the description of Dove 
I tied the flowers and decorated them with a mother-of-pearl bead, but arranged them in my own way 
Scarf 

Crochet is almost lace. This tool is used by needlewomen when you need to knit a beautiful thing for the home: a napkin on the table, a tablecloth, a bedspread. Even curtains are crocheted when there is enough time, patience and desire for it.
Making your own beautiful beret is easy. The main thing is to be good at crochet. If you have begun to master the instrument, do not deny yourself the pleasure of knitting the first thing - a beret.
The first takes is difficult to tie openwork, but dense, warm and elegant - by all means. Leave more thread for a scarf, mitts, mittens to complete your image. When you get a warm beret, you should take on the openwork option.


Crochet hats are usually knitted from the crown. It is necessary to dial two or three loops, close in a circle and knit in a spiral. In each loop, five single crochets are knitted. A new row is knitted like this: in each loop after 1 - 2 single crochets. It all depends on the threads: sometimes something like a shuttlecock begins to turn out. Then the number of columns must be reduced. Is knitting tight? Zoom in! You need to get an even circle. Watch for evenness while knitting and add 6 to 8 stitches in each row. Knit further a few rows without increments. Then start rows with decreases of 6-8 columns. The beret needs to be tried on to understand when to finish the decrease. Having reached the desired parameter, knit the band in simple rows without decreasing.


The simplest beret is a summer version of the mesh type. You can knit it like a cobweb, consisting of chains. Knitting starts from the middle: a chain of air loops is knitted. We make from three to five loops and close in a circle. Next, from each loop, knit several columns, between which perform an air loop. In the next row, knit a chain - seven loops, attaching to the resulting circle through three loops. A row is knitted with such chains, after which it is necessary to knit longer chains, for example, from eleven air loops, attached with a single crochet to the middle of the chains of the previous row. So the circle should be connected. After that, we do not increase the chains, but we knit them of the same length.


If you are good at crochet, then it will not be difficult for you to find beautiful openwork patterns for knitting a beret. For example, a fan pattern. Beginners can take a simpler scheme. Cast on 5 air loops, knit 2 air loops for lifting, and then alternate 3 air loops and a double crochet from the base of the row - five times. The row closes. The next row starts again with two lifting loops and consists of repetitions of three chain loops and two columns with a crochet. You need to do 11 repetitions, after which - 2 air loops. The third row is done in the same way, only 1 single crochet is performed. Next, the beret is knitted in a similar way, only you need to add a column in each of the emerging petals. Try on the job. When you realize that you do not need to increase, knit the petals straight and try on again. Then you need to knit with decreasing columns in each petal 7 rows. The lower edge of the beret is knitted from two rows of single crochets.


Crochet for autumn for women - diagrams and description
Autumn berets should not be airy, like lace, because their task is to warm. Such a product must be made of thick threads, but it is not necessary to use wool, and even more so downy yarn, because these are options for winter. For September and early October, you should choose acrylic yarn.
Crochet knitted berets - options in pictures
How crocheted berets look, look at the pictures. Openwork knitting is used for summer things, and for winter - more dense.


Knitting patterns
Crochet products are sometimes easier to understand if you see a diagram in front of you, and not a description in rows. After all, most of the work is knitted in a spiral, so it is not always possible to understand where the row ends and the next one begins.


How to knit a warm beret for the winter
Warm berets for winter are best knitted from downy threads. This will give them a stunning look and make them as warm as a fur hat. In addition, when knitting a beret, not a single animal will suffer, since the sheared wool of goats or sheep of specially bred breeds is used for yarn. Such wool is found under the name "Angorka" (more often this is called goat wool) or "Mohair" (sheep or even camel wool is mentioned under this name, which does not exclude its merits). Knit beret from wool will turn out both with knitting needles and crochet. A seamless product comes out either by crocheting or by using circular needles.
Winter beret "Snowball": scheme and description

1.) We make 1 loop.
2.) We knit 12 columns (st.) from it without a crochet.
4.) Again 24 columns - one from the loop. We get a "snail".
5.) We begin to knit this row in a different way: 1 tbsp. single crochet from the loop, from the next - 2 of the same columns, 1 air loop, and so on until the end of the row.
6.) 1 single crochet - from 2 loops, 2 tbsp. single crochet - from 1 loop, air loop - and continue until the end of the row.
7.) Next, make single crochets 3 times from each loop, 2 tbsp. - knit from 1 loop, knit an air loop and continue like this until the end of the row. At first, the work will begin to turn into a shuttlecock, but do not worry, because the tails are included in the style of this beret. In addition, after this row, you have to make decreases through the row. As a result, the resulting wedges will begin to wrap.
8.) So, we knit 2 columns without a crochet together, we knit 1 column twice from the loop, and from the next - 2 tbsp., An air loop and continue until the end of this row.
9.) 1 st. without a crochet we perform 4 times, then - 2 of the same columns and an air loop. We do this until the end of the row.
10.) We knit 2 single crochets together, we perform 1 such column three times, then - 2 single crochets and an air loop - until the end of the row.
Decreases are made until the work reaches the desired diameter.
The last two rows must be connected with columns in each loop. The third row is special: you need to lay an elastic band and tie it.


Today, berets and hats with braids are gaining popularity. Sometimes even an ordinary felt beret meets with braid-type clips. It is very good to perform such patterns on knitting needles using a special pin. If it is not in your toolkit, then you should use a regular hairpin, an additional knitting needle, or any other wire product that has a smooth surface from which the loops will not come off. Such a device allows you to overlap the loops, which allows you to get the structure of a rope or braid.
If in your arsenal there is only a crochet hook, you should act smarter and make your work profitable at the expense of yarn. Learn to crochet with boucle yarn. Even if it is performed with ordinary single crochets, the knitting will not look smooth precisely due to the special texture of the thread. In addition, the beret hat will turn out warm. Under the beret, it is worth initially making a pattern in order to compare the work with it. But if you knit without a pattern, then you need to make an even circle of at least 30 cm in diameter, and then think about reductions. When to stop making them, a simple fitting will show. Do not forget to tie a band: it will allow the beret to fit well to the head and not stretch from socks. When the product is stretched, it is worth saving the work by tying a row on the band, where to skip the elastic.
If you want to practice knitting berets with different patterns well, then you won’t find a model better than a child. The most number of options can be chosen for girls, because boys should hardly wear fancy fishnet hats. While a girl - sister, daughter, niece or granddaughter - is growing, both the size of the products and the style are changing. What a baby can wear is not always appropriate for a “lady” of primary school age, and even more so for a teenage girl. While you are practicing, your model is a small child. In addition, a small thing can be connected very quickly.

Crocheted openwork berets are more suitable for little fashionistas, as they are not very hard. If tight knitting is done, it is better to do it on knitting needles.

For an older child, it is good to tie the Snowball beret, because it looks great on both adults and children. To run a beret from the petals, described in the paragraph “Summer beret”, is worth it for beginner knitters. You can also find a lot of patterns on the Internet and create an original work of art based on them if you are fluent in crochet.
How to choose the right beret pattern and knitting method
You need to knit a beret not only as an abstract product, but as a wearable thing. You need to take the choice of pattern seriously from the very beginning. Do you prefer a one-color product? Choose an embossed pattern to decorate your beret! If you are a minimalist by nature, then get by with smooth knitting. Fans of African motifs should take a closer look at the Kenyan berets. Usually they repeat the colors of the flag of an African country. You can search the Internet for a product diagram on the request "Takes for Bob Marley."
Refined natures are suitable for openwork berets of the summer version. Do you want something airy in winter? It is worth choosing the “Snowball” beret scheme described above. It sits well on the head. Tie a beret from threads of pastel colors, why you will specifically win. It is worth knitting a dense pattern if the beret is knitted for the winter. The work is done both crochet and knitting.
In addition to the pattern, it is important to know which color of the beret to choose. The color of the threads should be in harmony with your clothes, complexion and eyes. And it is not necessary to think that only orange or green is suitable for green eyes. Everything is decided near the mirror.