In order to make a paper airplane, you will need a rectangular paper sheet, which can be either white or colored. If desired, you can use notebook, xerox, newsprint or any other paper that is available.
It is better to choose the density of the basis for the future aircraft closer to the average, so that it flies far and at the same time it is not too difficult to fold it (it is usually difficult to fix the folds on too thick paper and they turn out uneven).
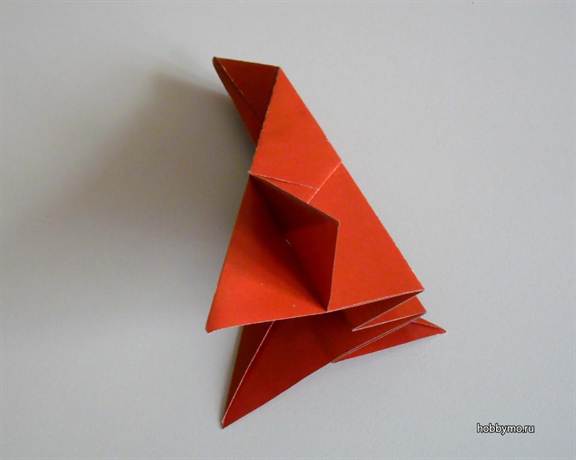
We add the simplest figure of an airplane
It is better for novice origami lovers to start with the simplest airplane model familiar to everyone since childhood:
For those who failed to fold the plane according to the instructions, here is a video tutorial:
If you got tired of this option at school and you want to expand your paper aircraft building skills, we will tell you how to step by step perform two simple variations of the previous model.
long-haul aircraft
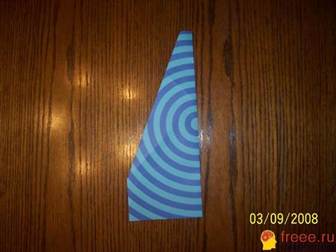
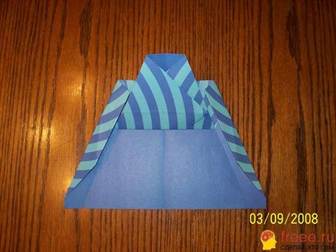
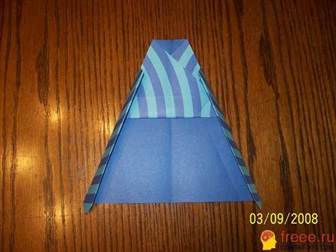
 Step by step photo instruction
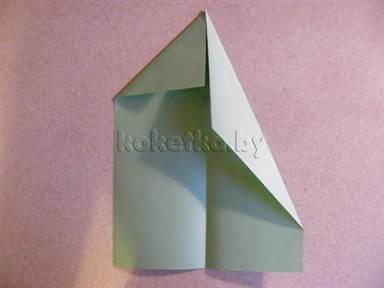
- Fold a rectangular sheet of paper in half along the larger side. We bend the two upper corners to the middle of the sheet. We turn the resulting corner with a “valley”, that is, towards ourselves.

- We bend the corners of the resulting rectangle to the middle so that a small triangle peeks out in the middle of the sheet.

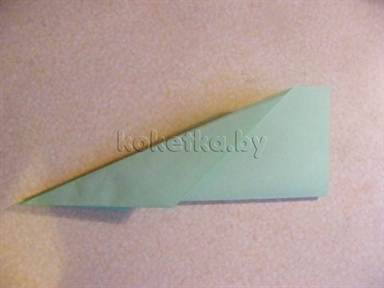
- We bend a small triangle up - it will fix the wings of the future aircraft.

- We fold the figure along the axis of symmetry, given that the small triangle should remain outside.

- We bend the wings from both sides to the base.

- We set both wings of the aircraft at an angle of 90 degrees to fly far.

- Thus, without spending a lot of time, we get a far-flying airplane!


Folding scheme
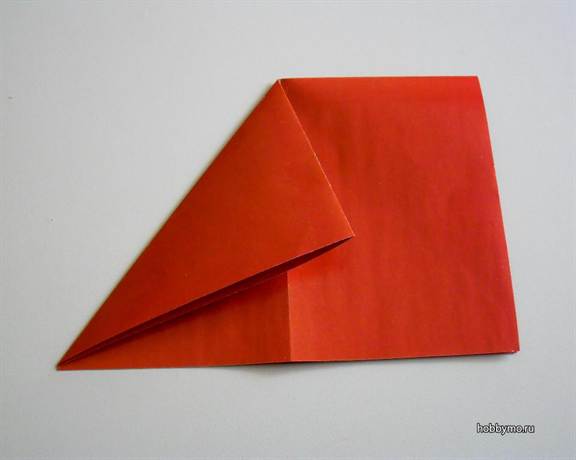
- Fold a paper rectangular sheet along its larger side in half.

- We bend the two upper corners to the middle of the sheet.

- We wrap the "valley" corners along the dotted line. In the origami technique, a “valley” is the fold of a section of a sheet along a certain line in the direction “towards you”.

- We add the resulting figure along the axis of symmetry so that the corners are outside. Be sure to make sure that the contours of both halves of the future airplane match. It depends on how it will fly in the future.

- We bend the wings on both sides of the aircraft, as shown in the figure.

- Make sure the angle between the airplane's wing and its fuselage is 90 degrees.

- It turned out such a fast plane!

How to make the plane fly far?
Do you want to learn how to properly launch a paper plane that you just made with your own hands? Then carefully read the rules of its management:
 If all the rules are followed, but the model still does not fly as you would like, try improving it as follows:
- If the plane constantly strives to soar sharply upwards, and then, making a dead loop, abruptly goes down, crashing its nose into the ground, it needs an upgrade in the form of an increase in the density (weight) of the nose. This can be done by slightly bending the nose of the paper model inward, as shown in the picture, or by attaching a paper clip from below to it.
- If during the flight the model does not fly straight, as it should, but to the side, equip it with a rudder by bending part of the wing along the line shown in the figure.
- If an airplane goes into a tailspin, it urgently needs a tail. Armed with scissors, make it a quick and functional upgrade.
- But if the model falls sideways during the tests, most likely the reason for the failure is the lack of stabilizers. To add them to the design, it is enough to bend the wings of the aircraft along the edges along the lines indicated by the dotted lines.

We also bring to your attention a video instruction for the manufacture and testing of an interesting model of an aircraft that is capable of not only far, but also an incredibly long flight:
Now that you are confident in your abilities and have already got your hands on folding and launching simple airplanes, we offer instructions that will tell you how to make a more complex paper airplane.
F-117 Stealth Plane ("Nighthawk")


bomber aircraft

Execution scheme
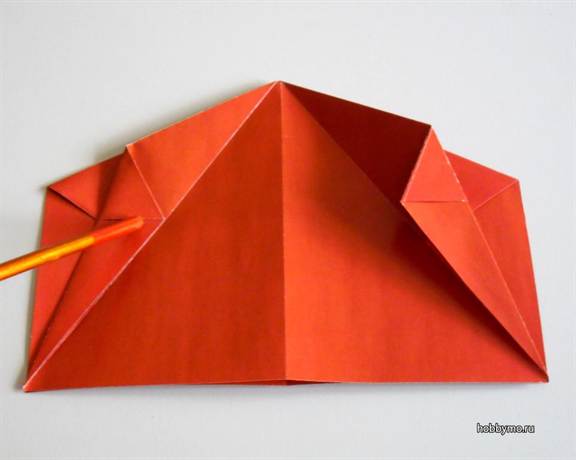
- Take a rectangular piece of paper. We fold the upper part of the rectangle into a double triangle: to do this, we bend the upper right corner of the rectangle so that its upper side coincides with the left side.
- Then, by analogy, we bend the left corner, combining the upper part of the rectangle with its right side.
- Through the intersection point of the obtained lines, we perform a fold, which in the end should be parallel to the smaller side of the rectangle.
- Along this line, we fold the resulting side triangles inward. You should get the figure shown in Figure 2. We outline a line in the middle of the sheet in the lower part, by analogy with Figure 1.

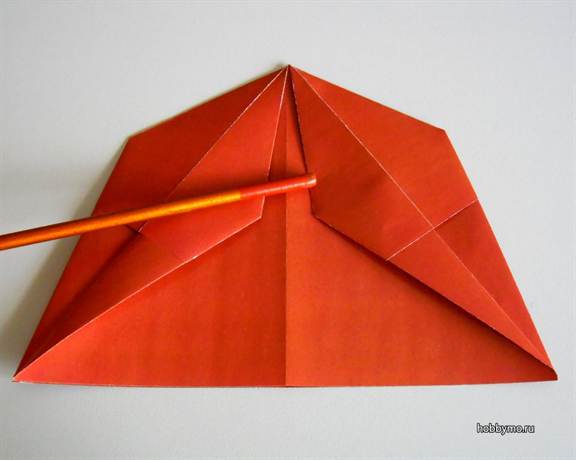
- We denote a line parallel to the base of the triangle.

- We turn the figure over to the back side and bend the corner towards ourselves. You should get the following paper design:

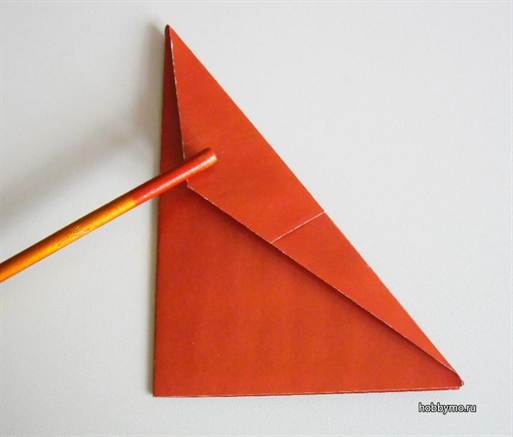
- Again we shift the figure to the other side and bend the two corners up, after bending the upper part in half.

- Turn the figure back and bend the corner up.

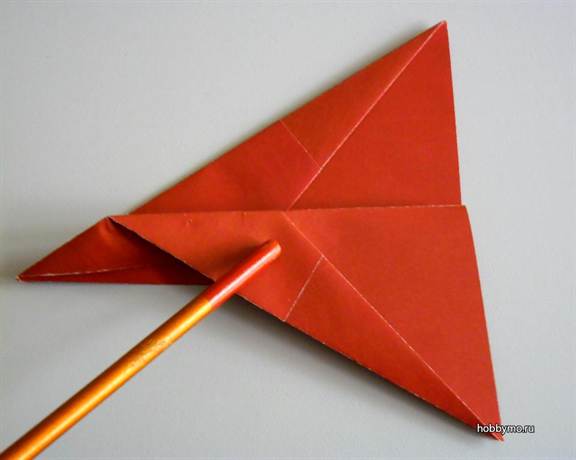
- We fold the left and right corners, circled in the figure, in accordance with picture 7. Such a scheme will allow us to achieve the correct bending of the corner.

- We bend the corner away from ourselves and fold the figure along the middle line.

- We bring the edges inward, again fold the figure in half, and then on ourselves.

- In the end, you will get such a paper toy - a bomber plane!

Bomber SU-35


Fighter "Pointed Hawk"

Step-by-step execution scheme
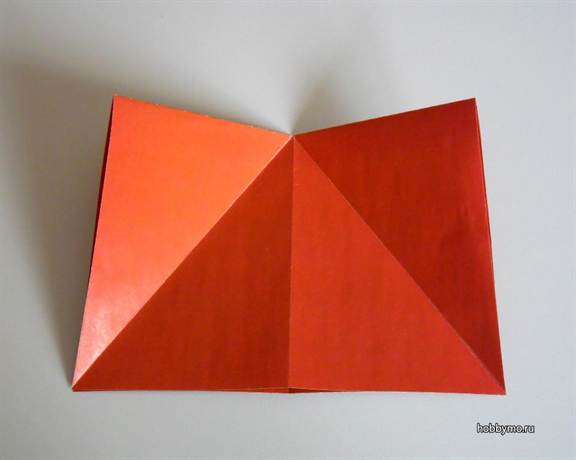
- We take a piece of rectangular paper, bend it in half along the larger side and outline the middle.

- We bend in the direction "towards ourselves" two corners of the rectangle.

- We bend the corners of the figure along the dotted line.

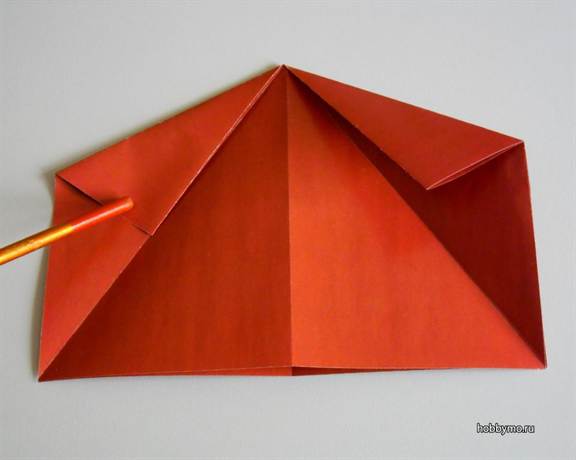
- We fold the figure across so that the acute angle is in the middle of the opposite side.

- We turn the resulting figure on the reverse side and form two folds, as shown in the figure. It is very important that the folds are not folded to the midline, but at a slight angle to it.

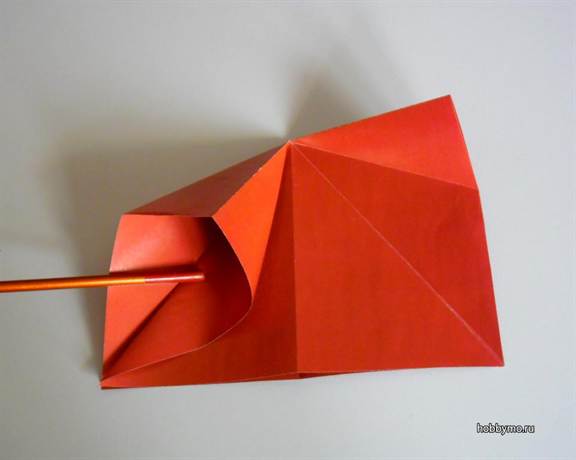
- We bend the resulting corner towards ourselves and at the same time turn the corner forward, which after all the manipulations will be on the back of the layout. You should get a shape, as shown in the figure below.

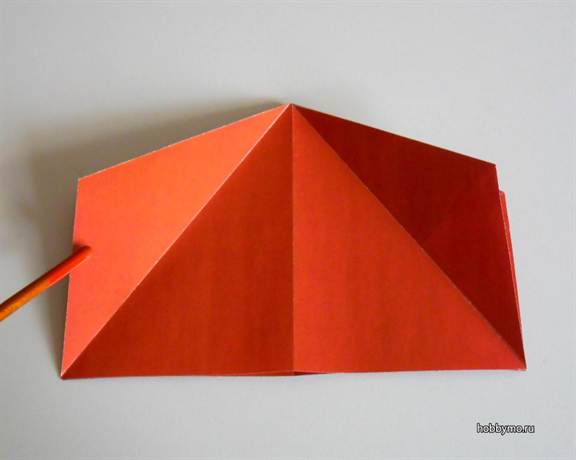
- We bend the figure in half from ourselves.

- We lower the wings of the airplane along the dotted line.

- We bend the ends of the wings a little to get the so-called winglets. Then we spread the wings so that they form a right angle with the fuselage.

The paper fighter is ready!


Fighter Planing Hawk

Manufacturing instructions:
- We take a rectangular piece of paper and outline the middle, folding it in half along the larger side.

- We bend inward to the middle the two upper corners of the rectangle.

- We turn the sheet over to the back side and bend the folds in the direction "towards ourselves" to the center line. It is very important that the upper corners do not bend. It should look like this figure.

- We turn the upper part of the square diagonally towards us.

- We fold the resulting figure in half.

- We outline the fold as shown in the figure.

- We refuel inside the rectangular part of the fuselage of the future airplane.

- We bend the wings down along the dotted line at a right angle.

- It turned out such a paper airplane! It remains to be seen how it flies.

Fighter F-15 Eagle

Aircraft "Concorde"


Following the given photo and video instructions, you can make a paper airplane with your own hands in a few minutes, playing with which will become a pleasant and entertaining pastime for you and your children!
Who said origami is for girls? Yes, yes, a lot of flowers, butterflies, hearts, of course, can lead a person to this conclusion. But, everything is completely wrong, because among the origami crafts there are those that have the right to be called purely masculine. And this is a very realistic technique, weapons and armor made of plain paper. Like, for example, today's craft - an origami f15 fighter.
Today's master class is a detailed demonstration diagram on how to make an airplane from a sheet of office paper. And it does not matter that now you can only do origami folding, although you dream of real combat vehicles. After all, such work with paper will allow you to find out more about technology, so that in the near future you can easily and simply design operating mechanisms.
So, if you are ready to start creating an origami f15 fighter, then go ahead - take the submitted instructions for boarding.


Well, for those who still do not know how to get out of impasses only through origami diagrams and tips for them, we offer an excellent video master class that will put everything in its place.
Paper is a great creative tool. Origami art provides us with great opportunities, as well as the opportunity to create paper crafts ourselves. A lot can be done with paper crafts. For example, create a beautiful decoration. You can also make beautiful flowers, postcards, cars and much more from colored paper. Masters even make entire flower beds of paper flowers.
Who among us did not fold paper airplanes in childhood ?! A bunch of old notebooks, newspapers and magazines were used. This activity has not lost its popularity to this day. For children, assembling a paper airplane is exciting and quite simple, everyone has a desire to make the fastest and most beautiful model. This hobby is a well-known form of aerogami, one of the ingredients of the art of paper folding.
In this collection, I will show 6 ways to make a paper plane with step by step photos. Probably, the hands of every adult remember how to make an airplane from an ordinary notebook sheet in a matter of seconds. This simple toy, reminiscent of childhood, delights with its flying abilities. At a time when children did not yet know about phones and tablets, it was paper airplanes that entertained the boys at school breaks.
Our airplanes made of plain paper will help you to assemble your own military aviation kit. All models available in this selection of our site are very easy to assemble.
We hope you will not have any difficulties. There are many ways to make a flying plane, we will introduce you to only a part of them. After reviewing the pictures, you can design an aircraft carrier or a fighter that will impress you and those around you. See how to do it here.
DIY paper plane
Of course, making simple “ticks” in the form of airplanes is too easy. Using the origami technique, you can teach your child to fold a model of a combat fighter out of paper. The process of its manufacture is simple, if you follow the step-by-step photos presented in this master class.

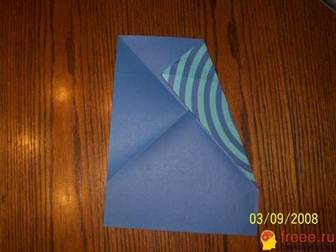
To create our fighter, one A4 sheet will be enough. We used blue paper.

Fold the sheet in half first.

After that, we do another addition, but in a different direction.

Now, to the just outlined fold, you need to bend the lower part.

We perform a symmetrical fold from above.

Let's expand the blank of the future fighter and rotate it a little.

Now let's start forming the wings. To do this, bend the upper right corner as follows.

Symmetrical fold is performed on the left.

Let's bend the right side again.

On the left side, we will make the same fold, after which we will straighten it.

On the right side, the folded fold needs to be straightened as follows.

After that, you need to bend the top layer to the right.

Do the same with the other wing.

We return to the right side again. The top layer is slightly bent to the left, focusing on the fold line.

After that, bend the fold down.

On the left side of the aircraft, we perform the same actions.

Let's turn the fighter blank to the other side.

Here we repeat all the folds made earlier. First, we make small folds on the sides.

After that, we bend everything to the center line.

Now we fold the fighter blank lengthwise.

Let's form its wings. To do this, bend the top layer down.

On the other hand, repeat the symmetrical fold.

It remains to form the flaps. To do this, perform the following folds on both sides.

Our origami paper fighter plane is ready to fly.


How to make a well-flying airplane model
Consider the relatively easy assembly of an origami fighter plane. Surely, boys will be happy to perform such a model. And in the future, you will get a valid, well-flying model. Use the same bright red or a calmer color for work.

The material for work is a sheet of thin double-sided paper (it is desirable that the length of the rectangle be 2 times greater than the width).
Assembling an origami fighter step by step
Take a rectangle (A4 format is also suitable).

Bend the sheet lengthwise clearly in the center.

Lay out the paper and fold the corners from one side to opposite sides, highlighting the X-shaped line.

Bend the second corner to the other side.

Make a perpendicular bend at the intended point, make sure that the side lines match.

Flip paper over and spread out. Then press the sides inward, forming a triangle. The paper will easily succumb to your actions, the previous layout was made for that.

Bend the lower strip under the triangle along in half. Cut off the resulting top layer with scissors.

Take the upper sharp corner first to the left.

In the bottom layer, fold the slope to the center vertical line.

Put that corner back in place first.

Then turn the second corner to the right.

Also join the side slope to the center vertically.

Return sharp corners to their places.

Lift perpendicularly up one of them.

Then lower down, making a fold exactly in the center of the highlighted small triangle.

On the opposite side, do the same.

Move both remaining tabs to the left.

On the top ledge, lower the slope down, aligning with the center vertical.

Turn this folded ledge back again.

Grasp the corner with your fingers and pull out the sharp tail.

Repeat all the same operations on the second ledge and form the same tail, which will be directed in the opposite direction.

Close the protrusions and check the symmetry of the tails.

Move on to the wings. Bend over one of them.

Then the second.

Bend the tails at an angle first.

Then reorient so that they go around the ledges on both sides.

Bend the model in half lengthwise.

Lift both wings up, making 2 more additional longitudinal folds.

Straighten out your origami fighter.

If desired, you can still bend any parts of the wings or the inside to make the model more streamlined.


Our do-it-yourself paper plane is ready!


A paper plane that flies for a long time
Aircraft that fly indoors need a shift in the center of gravity towards the nose. These models fly faster and better, they are convenient to launch into the air. If you decide to compete for time, then it is worth throwing the plane as high as possible so that it can dive for a longer time.
There are as many ways to launch paper airplanes as there are structures to collect them. The most satisfied modeler will be the one who manages to design his own model of an airplane. Any properly folded airplane will have good flying qualities.
A model that flies for a long time - video lesson
Helpful Hints:
- Carefully smooth the fold lines with a hard object or fingers.
- For products, choose only flat paper sheets. An airplane will not come out right from crumpled, torn and bent sheets.
- Try to maintain symmetry about the axis when folding the airplane. If this is not done, during the flight it will tilt to the side.
In order to make a paper airplane, you need to take a rectangular piece of paper, it can be of any color. You can use a sheet from a notebook or a newspaper spread, in general, any paper that you have will do. The density of the base should be medium so that the plane flies long distances and it is easy to assemble (it is difficult to fix an even fold line on an overly dense material).
A paper airplane is a great way to have fun, combining business with pleasure, fine motor skills, imagination and thinking are developing. Most children are interested in creative activities. If they fold paper crafts, this will help develop children's fingers.
The child learns to focus on the subject, think creatively and connect his imagination to the case. For a birthday, you can arrange competitions between children who will fold the airplane faster.
There are many aircraft models, but the one from childhood, No1, is the easiest option. He took the paper, closed his eyes - after a couple of minutes the plane had already taken off into the air ... no, after 25 seconds, watch the video!
A simple paper airplane model
People have been dreaming about flying into the sky since ancient times. Since then, centuries have passed, and only a little over 100 years ago, the first prototype of a modern aircraft rose into the sky. As for children's fun, the technology of the 21st century has allowed toy helicopters and airplanes not just to fly, but to perform aerobatics. But these aircraft are expensive and designed for teenage children.
And if your little son is just starting to get interested in aviation, then it's time to start making paper airplane crafts with him. The creation of one of these airplanes is presented in this master class.

For the manufacture of this aircraft model, we will prepare:
- a sheet of colored paper A4;
- transparent tape;
- scissors.

Before work, arrange our sheet horizontally. After that, the upper side corners are required to be bent to the middle.

Similarly, you need to do with the lower side corners, bend them up.

The lower edge of the workpiece of the future airplane must be bent up.

Now our triangle should be folded in half.

Let's unfold the blank of the future airplane and rotate it 180 degrees.


We perform a similar fold on the left side. Now the blank of the airplane has acquired a square shape.

Let's continue the work by turning the craft to the other side.

Here you need to bend the side corners to the center.

We fold the blank of the future airplane along.

Arrange the resulting trapezoid as follows.

Let's begin to form the wings of our aircraft. To do this, we bend the upper layer of the trapezoid at an angle, forming one wing.

In the same way we make the second wing.

The tail part is formed by arching the rear part upwards with the formation of a triangular fold.

Now it's the turn to use transparent tape. We connect the right and left halves with a small piece.

Our plane is ready!

Jet plane from separate paper elements
When a person has a piece of paper and an excess of free time at hand, his hands automatically begin to fold a paper airplane. This is a simple origami that everyone can do. Some inquisitive children go further - they begin to make paper models of real airplanes and spaceships.
Of course, it is far from a fact that by making paper airplanes, a child will grow up to be an aircraft designer. But such an activity develops spatial thinking well, and the child also receives pleasure from the result. If you notice your son has a tendency to model, then suggest that he make a model of a jet plane from separate paper elements.

To create such a paper airplane, we will prepare only 3 square sheets of the same size.

For the convenience of showing in the master class, we use different colors, but the paper plane can be made in the same range. For the front of the plane, we use a red square of paper. Fold it diagonally.

After that, we fold along the other diagonal. So we did it.

This allows you to fold the red square into a double triangle.

At the top layer of the resulting triangle, bend the right corner down.

The left corner of the same top layer needs to be bent down.

On the reverse side of the red blank, repeat the same.

Slightly bend the corners of one layer. And we bend the protruding corners of the other layer up.

After that, we tuck the bent corners inward.

Return the top corners to their original position. This completes the work with the red module.

From the yellow square we will create the middle part of the plane. We fold it along two diagonals.

Then we give it the appearance of a double square. This work sequence is similar to the previous module.

At the top layer, bend down the corners.

The side corners of the other layer need to be bent to the center. First we bend the right corner.

After that, fold the left corner.

Now let's fill the slightly protruding corners inward.

Let's turn the yellow blank to the other side.

The bottom corners need to be bent up.

After that, we'll put them inside.

This is how the second module for our paper plane looks like.

We will make the tail part from a blue square. To do this, the initial steps are repeated until we fold the figure in the form of a double triangle.

At the top layer, we bend the side corners to the middle.

After that, we raise them a little. This completes the work on the blue module.

We have obtained such blanks.

You can start assembling an airplane out of paper. To do this, the corners of the red module must be inserted into the yellow one.

So we connected the front and middle parts of the plane.

In order to add the tail, the workpiece must be turned over to the other side.

After that, insert the blue module.

Our jet plane made of paper elements is ready!


How to make a fighter plane out of paper
In Soviet times, circles of children's creativity at the Palaces of Pioneers were very popular. Every second boy wanted to enroll in a car, ship or aircraft modeling circle. The choice of a creative direction was directly related to the professions that were popular at that time: a truck driver, a sea captain or a pilot.
Perhaps in the 21st century these professions are not shrouded in a halo of heroism, but children still make models of tanks, ships and aircraft. We propose to make a paper fighter that will delight the child with its flight. The process of creating such a paper fighter is shown in this master class.

To make a fighter out of paper, take:
- A4 sheet;
- glue;
- scissors.

First, the sheet must be folded in half in the longitudinal direction.

Then we will form the bow, for this we will perform a fold in the form of a corner on one side.

After that, the same fold must be done on the other side.

In expanded form, the blank of the future aircraft looks like this.

Bend the corner up.

Now we bend it in the opposite direction, focusing on the edges of the resulting triangle.


You need to give it the following look.

On the other hand, we do the same.

On the left side, slightly raise the folds made.

Turn the inner corner out.

Now let's bend it inside.

In the upper part of the resulting triangle, we will perform another fold.

Bend the fold to the right side. So we got the cockpit.

We fold the workpiece lengthwise.

In the back, you need to cut along the indicated lines. Therefore, it is better to outline them in advance with a pencil.

Cut out with scissors. So we began the formation of the tail and wings.

Narrow parts at the edges of the wings need to be bent forward.

Let's do this on the second wing of the fighter.

Let's bend the left wing to the side first.

We also bend the right wing.

Fold the narrow parts along the edges of the wings in half.

After that, bend them down again.

The cut part will not be superfluous. From it we will make the tail.

We paste it.

Our paper fighter is ready!


DIY simple paper plane
Collecting to one degree or another is characteristic of every person and especially a child. Someone collects stamps and coins, and someone collects models of cars, tanks or aircraft. At the same time, collecting is not a cheap activity, because each model can cost hundreds of rubles. Therefore, you can start small - for example, a child is quite capable of independently making a semblance of some kind of aircraft model.
Our master class shows the step-by-step production of a simple airplane from colored paper.

To create it, it is enough to prepare:
- green sheet of A4 paper;
- scissors;
- glue stick.

First, fold the sheet in half lengthwise.

Now we outline the future nose of the aircraft. To do this, first bend the corner on one side.

On the other side of the workpiece, you need to do the same.

This is how the blank of the future aircraft looks like if you unfold a sheet of paper.

For further work, for the sake of convenience, we will slightly rotate the workpiece. After that, bend the corner up.

Now you need to make folds on the sides again, forming the nose of the aircraft. First, make a fold on the right.

We make a symmetrical fold on the left.

Again, bend the corner up, combining it with the uppermost edge of the workpiece.

And now the same corner needs to be bent in the opposite direction so that it protrudes about 2-3 cm beyond the edge.

We fold the workpiece along.

We begin to form the wings. To do this, first fold down on one side.

After that, we make a symmetrical fold on the back side.

Raise both wings up. Now we need scissors, with their help we need to cut along the intended line.

Carefully cut along the marked lines. So the wings and tail section of the aircraft were more clearly defined.

Again, bend the wings in different directions. This is how our craft looks at this stage.

We make small folds along the edges of each wing.

For the final formation of the tail, you will need to cut out one more detail from green paper.

We glue it. At the same time, apply glue to the inner fold.

We connect everything neatly. Our paper airplane is ready!


How to make a mangami plane
An airplane made from a banknote is an interesting origami craft from childhood. To complete such a model, you need to remember the folding procedure from start to finish. This tutorial shows how to make a small souvenir and made a craft from a souvenir 100 euro note. These planes fly great, you can play with them for a long time.
At your leisure, make such a toy with your child, then he will launch it up for a long time and admire how far it flies. You can also make two or three airplanes and compete to see whose plane will fly the farthest. It is the airplane that is the most popular and familiar model, and made of money, it also looks piquant.

Material used in the work: 1 euro souvenir banknote, but you can pick up any other type of money.
How to fold an origami airplane out of money
Prepare your banknote. A beautiful green euro bill will be an excellent basis for a small airplane. Or cut out a rectangle of colored paper of the same size.

Fold the bill in half lengthwise. Align opposite corners and long sides. After that, run your finger along the crease.

On the selected median longitudinal line, make a fold of two corners on one side. Form a triangle.

Lower the selected triangle in the opposite direction, but not clearly along the lower base, stepping back by about 1 cm. Draw again along the crease.

Turn the workpiece over with the back side towards you and make a small bend, form a fold about half a centimeter wide. Then do not unbend, but continue folding.

Again, turn the bill over with a folded triangle towards you and try to bend the corners, but not clearly along the middle line, but as if forming a small collar. A small corner should be visible from below.

Lift this small corner up, fixing the bent sides of the bill.

Bend the workpiece in half lengthwise, leaving the corner outside, that is, the fold line should pass clearly through its middle. Press down the sides along the entire length.

Pull the sides down so that the wings of the airplane are highlighted. The nose should be pointed.

Taking the construction with two fingers from below, smooth the wings to the sides and the side parts can be bent upwards at a right angle. The origami airplane from the banknote is ready. Now you need to be sure to launch it into the air to check how far it will fly.

This is an unusual version, which is made from an unusual source material, and is also unique in that the wings have an unusual configuration.


Interesting Facts
- In the Middle Ages, papermaking in Japan became widespread, and origami became a samurai art. At the same time, a culture of folding secret letters emerged. In temples, for several centuries, techniques and methods of folding paper into a variety of figures have been practiced. Perhaps, if not for the Japanese crane, we would not know anything about paper airplanes.
- Every child and adult dreams of an airplane that will fly 100 meters. Think it's unrealistic? In 1983, Ken Blackburn of America set a world record by surviving a paper plane in mid-air for 27.6 seconds.
- The competition to launch the Red Bull Paper Wings has reached the global level. For many years, together with his friends, he was fond of paper airplanes. In 1989, he took a desperate step by creating the Paper Aircraft Association. From under his hand came a collection of rules for launching paper aviation, which today is used in competitions at various levels as an official setting.
- The modern airplane came into being in the hands of Jack Northrop in 1930, who co-founded the Lockheed Corporation. He used paper models to carry out test tasks in the construction of real aircraft.
Do you still think that paper airplanes are simple art? Then let's put together a plane that flies well and folds quickly - perhaps you will become the owner of a new record.
Working with paper is a real pleasure. A model with ironed even curves will fly high and will not lose shape for a long time. First get used to simple layouts, then move on to more complex models. Toddlers like to make origami, so they will be happy to keep you company in this matter.
If you are just starting to get acquainted with origami, then first make simple models. Once you get on with the paper and understand that your models fly well, move on to more complex designs. Using photos and videos with detailed instructions, you can make an airplane yourself, playing with which will become a favorite thing for you and your children! Make several models at once and arrange a real show on the street.
Remember your childhood - launch a paper plane into the sky! Flying weather!
Origami art is a great way to keep a child busy and spend time together. One of the best and most useful hobbies for children. Making these crafts develops accuracy, attention and fine motor skills. Origami planes made of paper are very different: from the classic ones that everyone did in childhood, to the coolest fighters. The problem is that not all of them are good flying airplanes. You can consider several schemes of the simplest and fastest models. How to make a beautiful origami plane out of paper yourself, you will learn very soon.
We make an airplane from childhood using the origami technique
Paper of any color, A4 format is taken.
Folds in half, lengthwise.
Straightened back and placed vertically. The corners are bent towards the middle.

Then once again the sides are bent inward, as shown in the photo.

Now it is bent in half, lengthwise.
You need to spread your wings. Bend them to the sides.

It turns out an old familiar airplane, like this:

Work harder with plain paper
The creators claim that he is the longest flight record holder. The paper format is the same, A4. The sheet is taken by the corner and bent into a triangle.

Then it must be straightened back and, holding the other corner, bend it with a triangle too. Folds are needed, so you need to carefully iron the folds. It turns out like this:


Now you need to fold the future plane in half, lengthwise.
Unfold back and fold again, but across.

The middle is bent up and two new side lines are made for the fold.

Now the sides are bent, to the fold line and again.
The sides are now upright and you need to bend the nose to them.

The plane folds neatly in half.

Wings fold down.

And the plane is ready!
Just do not throw the plane too hard, this will only make it fly worse.
We create a fighter plane according to interesting schemes
In the instructions for the airplane, the creators claim that it flies perfectly in open areas. He needs room to fly.
The paper format does not change, A4. The sheet is folded in half, lengthwise, then unfolds.

Now folds across.

The corners bend inward and straighten out again.
The side parts fold again, but now to the fold line.
A pencil is inserted inside the side parts and pushes them apart, making a pocket.
The sides are flattened and smoothed out.

Fold in half, towards the edge. You get this figure:
The movable top of the small triangles now fold inward.
The figure turns to the back and here the sidewalls are also bent.

Bend diagonally to the middle, as shown in the photo.
The sides of the resulting rhombuses are wrapped under the figure.

It turns out a triangle, which must be folded in half, vertically.
The figure is placed down with the longer side and a line is drawn, about 2.5 cm from the edge of the fold. Like this.

The upper part of the triangle (wing) bends down exactly along the line.
Likewise on the other side.

The movable edge of the triangle wing is bent upwards at a right angle.

In today's article, we propose to create the most popular toy among boys - a paper plane, origami - a technique that will help improve the fine motor skills of the baby's hands, as well as take this fidget for a few minutes. You can create with your child and help him in complex processes, spending more free time with the dearest little man on this planet.


Easy option
There are a huge number of options for the process of creating an airplane out of paper with your own hands, and one of them is origami. This technique came to us from Japan and helps to create very beautiful and cute paper crafts. For the classic technique, you need to prepare a single sheet of paper or corrugated board. Another characteristic of origami is that you do not need to use scissors and glue, so we advise you to start creating an air vehicle with your baby in order to develop fine motor skills of his hands. The manufacturing process can be followed by the example of step-by-step instructions.
As materials, use thin paper, just one sheet, as well as felt-tip pens or colored pencils.

Now let's start creating. First of all, fold a sheet of paper vertically, then unfold it. We fold the two upper corners to each other along the fold line. We do not expand. We fold these corners one more time. You should get the following result: the edges do not connect with each other and do not intersect at the central fold. Then we bend the upper sides down from the right and left sides. In the last step, lift each part of the figurine and shape the wings of the plane. We got such a toy in just five minutes.

In the previous photo, you can see a diagram of creating an airplane made using the origami technique in this master class.
Related article: Non-creasing (non-creasing) fabrics for dresses, shirts, suits

We conquer the sky
We all know that preschool children are very fond of crafting something from cardboard, paper, and even a matchbox. So let's make a flying machine out of plain paper. In the next step of the article, we will describe in detail how to make an airplane that can take off with our own hands.
Take a thin sheet of cardboard and make a square out of it. Fold the sheet diagonally, and then cut or tear off the excess, bottom. After that, unfold the workpiece and fold it in half. We bend all the upper edges to the center of the workpiece. We have a triangle that we bend. Again, bend the edges to the middle, and then bend the entire sheet of paper in half. Bend the corners, so you have the wings of the plane.
If you use corrugated cardboard in your work, then you can get a very spectacular tail or voluminous wings. Thanks to this, small aircraft will be able to stay in the air longer. If you want your airplane to last longer, then throw it up with all your might. In the photo you can see what beauty we got.

If your kid is so passionate and makes a huge number of planes, then offer to make him a whole fleet of aircraft. And where will he be? Exactly, we need to make an airport. This can be done from a box and a huge sheet of paper. We model real aircraft routes on paper, draw landing lines, lay out the points at which the aircraft lands and departs. In fact, you or even your little one will be able to easily play a huge number of aircraft games, the most important thing is to make them, and as you have already seen above. Using fantasy, you can improve the aircraft or decorate it with additional materials.