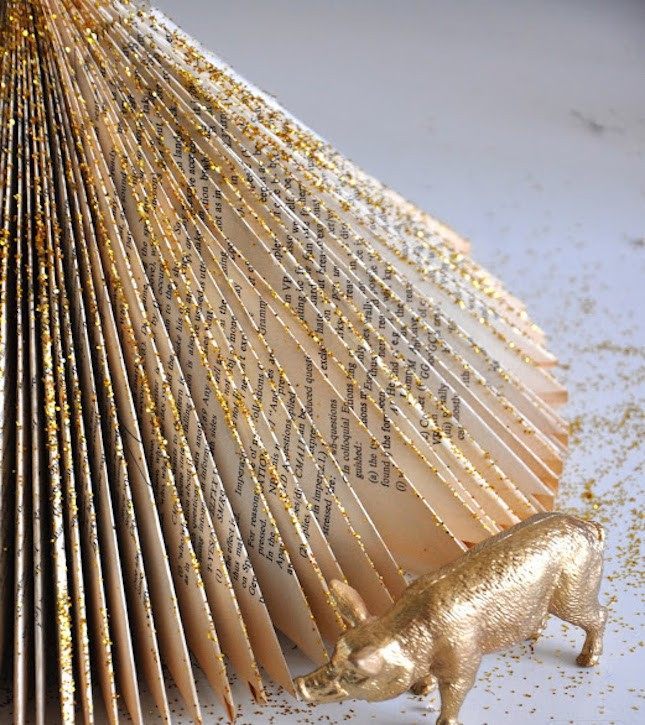
An elegant Christmas tree in the house is the main guest of every New Year's holiday. But rarely someone stops in preparation for the meeting of the new year at only one in the house. As a rule, the owners strive to decorate every corner of their home. At the same time, many decorations are made by hand. A self-made Christmas tree from a cone will become not only a small symbol of the holiday, but also a source of pride for any "homemade". And, since fantasy in this matter simply has no limits, the size, materials and appearance of cone Christmas trees will depend only on your taste, desire and skill. Therefore, stock up on materials, time and helpers, and we will tell you 17 ideas for making a Christmas tree from a cone:
Alternative Christmas tree
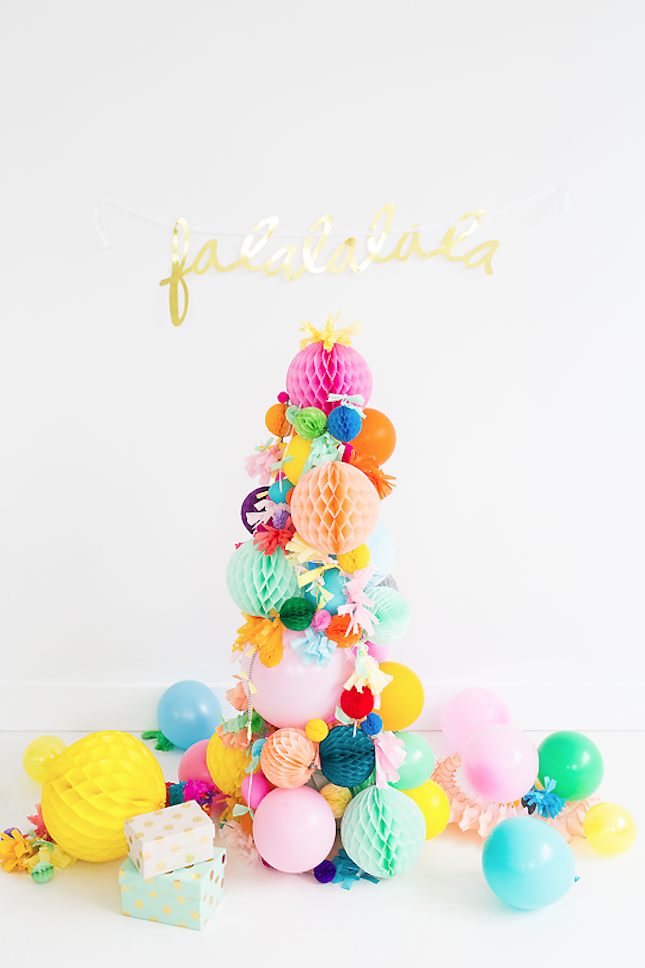
- To do this, it is enough to glue the cardboard in the shape of a cone and decorate it with ready-made, purchased balls and garlands.
- If there are no ready-made decorations, they can easily be: crumpling it into a ball and covering it with bright and shiny nail polish. So it will keep its shape and acquire the desired color.
Christmas tree with garland
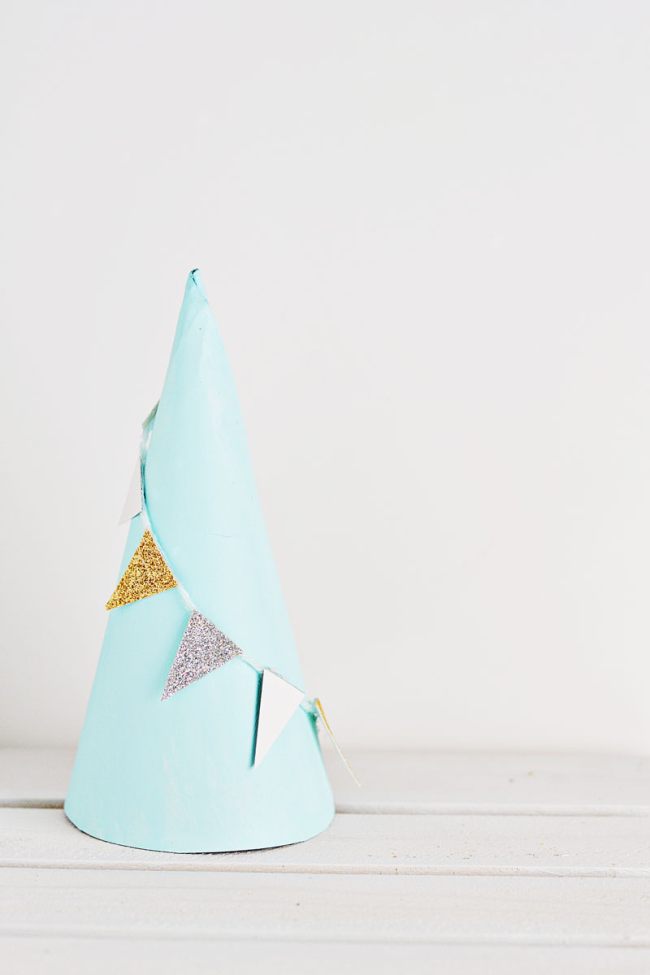
- A cardboard cone of any color is decorated with a garland, for which we take a thread and glue paper or foil triangles on it.
- Bows may also be suitable for this option, instead of triangle flags. A rectangle of paper is folded with an accordion, and the center is tied with a thread. The bow is covered with glue, and while it dries, sprinkled with shiny sand (glitter).
A beautiful conical Christmas tree is made from mother-of-pearl cardboard and glass balls.
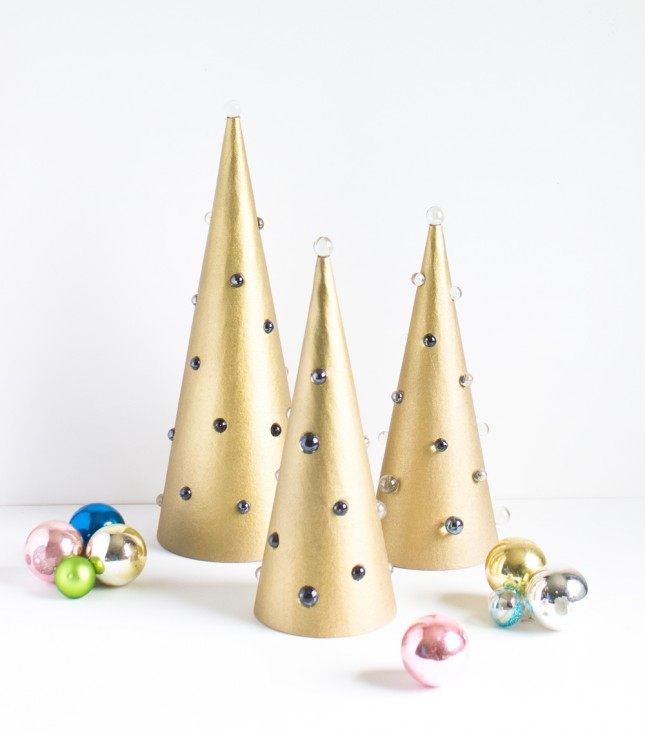
- Glasses are easily attached with a drop of superglue.
- If there is no beautiful cardboard, then you can glue it with foil. Glasses are easy to replace with rhinestones from unnecessary clothes.
Christmas trees made of glossy photo paper
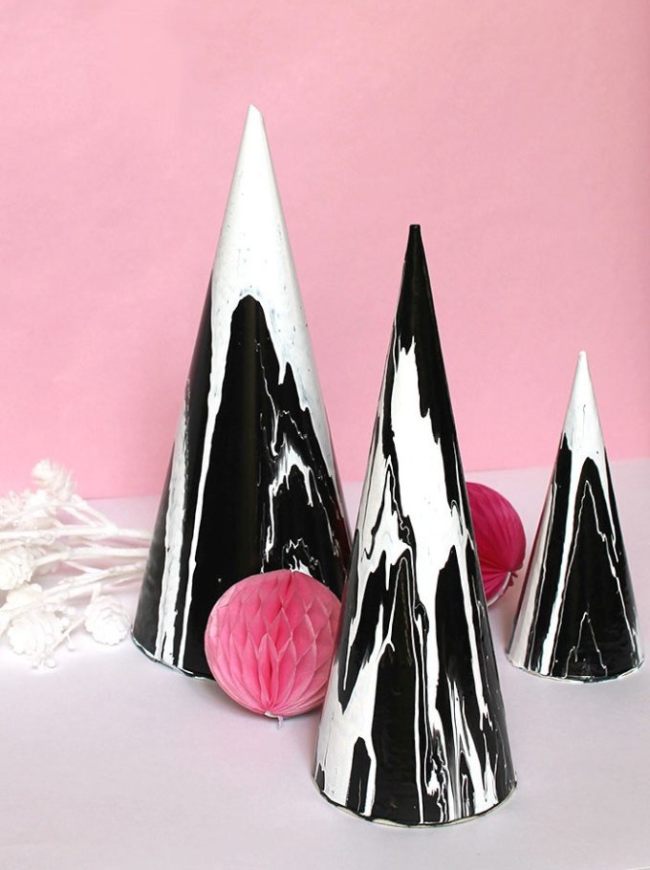
- You can make Christmas trees from a cone in the style of abstraction with lacquer stains. Choose the colors of your choice.
- Such a design can be made from ordinary cardboard and paints, covering it with a transparent varnish.
Snow-white Christmas tree decorated with cotton pads

- Here you can also use glitter or varnish.
- If they are not at hand, they are replaced with fabric ones, cutting them out of soft fabric.
Volumetric Christmas tree made of thick foil

- Cut out 2 Christmas trees of the same shape and size, and then cut one of them in the center, starting from the bottom base and not reaching the top. The remaining whole fragment is dressed in a partially forked one.
- This option can be done with cardboard, decorating it to your own taste.
Fluffy cone tree
Made from ordinary sheets of paper folded obliquely, corner to corner, and decorated with glitter.
Conical Christmas tree with a foil star on a match

- Fabric design will be a great idea that even a child can bring to life.
- Even in this embodiment, you can replace the fabric with velvet paper.
- Also, foil for decoration will be appropriate here.
- Or you can use paints, glitters or varnishes.
The cone is the simplest geometric figure. But it can be made with your own hands from paper or cardboard. This craft can be used for various purposes. Based on it, it is easy to make caps for a holiday or a New Year tree, bags for sweets or a base for a decorative composition. Lots of options. Based on the photos and videos below, there will be no difficulties in the process of creating a paper cone. The main thing is to clearly follow the scheme of the chosen method and everything will work out in the best possible way.
Necessary tools and materials
To make a paper cone with your own hands, you will need to prepare some materials and tools:
- a sheet of paper or cardboard;
- ruler;
- scissors;
- PVA glue or clerical version (or adhesive tape);
- simple pencil.
On a note! You can also use a school compass, if it's easier to draw an even and regular circle.

Step by step instructions for making a paper cone
When creating a paper cone, there will definitely not be any difficulties if you approach the work responsibly. A simple step-by-step instruction with a photo will help in this process.

As you can see, making a simple paper cone is not difficult. The formation of such a blank will not take much time, and if it is scary to make mistakes in the process of work, you can use not only the diagram, but also the video below.
Cone decoration
Any cone created on the basis of a sheet of paper can be made original, bright and unique. This is especially important during the creative process of forming a festive cap.
The easiest way is to decorate your little masterpiece with a pattern. To do this, you can use pencils, paints, felt-tip pens or pastels.
All sorts of patterns will look spectacular on the cone, for example, whirlwinds, stars, zigzags, monograms.
You can make a congratulatory inscription: it will look bright and colorful.

There is another option for decorating the cone. On a separate sheet of paper, you should draw something and color it. Finished compositions are cut out and glued to the base. Thanks to this technique, the design will turn out to be voluminous and more interesting. For the same purpose, you can use ready-made stickers.
If desired, you can use rhinestones, beads, fabric or paper fringe, decorative tape and other classic or modern options for decorating compositions made by your own hands in the hand-made style.
Important! But it should be borne in mind that at first it is worth decorating the workpiece, and only after that proceed to the creative process. Such a rational approach will avoid some of the difficulties associated with the shape of the resulting product.
One of the simplest paper designs is a cone. There are several options for how to make a paper cone. Even a child can master all of them. In the future, based on this design, it will be possible to create amazing crafts.
One of the simplest paper designs is a cone.
Building a cone-shaped paper structure is a matter of just a few minutes. To do this, you just need to make the right drawing from a rectangle of paper and fold the paper to size properly.
Production in stages:
- On a sheet of paper, measure the middle with a ruler and mark this place with a dot.
- Draw a circle with a compass and immediately cut it out.
- Draw a line from the center of the circle to the edge.
- Make a cut along the marked line.
- Roll up the workpiece, making a kind of funnel.
- Secure it with a paperclip and cut off the edges.
- Glue the design.
- Then measure the width of the base and subtract about three millimeters from the resulting number, thus obtaining the radius.
- Draw a circle on another sheet with exactly the same radius.
- Step back a couple of centimeters from the contours of the circle and draw another circle, making a circle with allowances.
- Cut the pattern along the outer contour.
- The floor on the sides of the circle must be notched, using scissors for this purpose.
- Bend all notches.
- Lubricate them with glue and carefully place them in the base of the cone, thereby creating an accurate layout.
How to make a cone from a sheet of paper or cardboard with your own hands (video)
How to make a cardboard cone: workflow
In order to create an even conical frame, you can use both colored and white cardboard. The choice of material directly depends on the purpose for which it is made. The design itself is strong enough, due to which it can be widely used.
What is necessary:
- a pen;
- cardboard;
- compass;
- scissors;
- glue;
- stapler.

In order to create a conical frame, you can use both colored and white cardboard.
Progress:
- Draw a circle on the cardboard with a compass and cut it out.
- Using a ruler and a pen, divide the circle into four equal parts. To do this, draw a pair of perpendicular lines through the central point.
- Fold the circle first vertically and then horizontally to form four folds.
- Cut off one of the four segments.
- Fold the truncated circle and, in order for the scan to keep its shape, fix the model in the lower part with a stapler.
- Lubricate the joints with glue.
Tip: if you need to make more than one figure, but several at once, then it is recommended to use the first cut circle with the removed segments as a template.
Do-it-yourself Christmas tree based on a cone
A voluminous Christmas tree in the shape of a cone is made very quickly and simply. And if you don’t draw the layout of the future figure yourself, but simply print it out and transfer it to cardboard, then this process will become even simpler.
What is necessary:
- cardboard;
- wrapping;
- double-sided and regular tape;
- scissors;
- decor elements.

A voluminous Christmas tree in the shape of a cone is made very quickly and simply
Progress:
- Form a funnel out of cardboard and after gluing it, wait until it dries.
- If there are any irregularities, then be sure to remove them with scissors or a clerical knife.
- Cover the finished design with wrapping paper. To do this, lay it out with the outside on the work surface and attach the tip to the top of the base with tape.
- After that, slowly scroll the cone, thereby wrapping it in bright paper.
- When the figure is completely wrapped, cut off the rest of the paper.
- Secure the ends with double sided tape.
- Glue buttons, beads or beads to the Christmas tree, thus imitating New Year's toys.
What can be done from whatman paper
Most people associate Whatman exclusively with the school wall newspaper. In fact, this material can serve as the basis for many crafts. For example, you can make a surprisingly beautiful heart-shaped box out of it.
What is necessary:
- whatman;
- lace;
- glue;
- scissors;
- pencil;
- ruler;
- ribbon;
- colored paper;
- beads.

Most people associate Whatman exclusively with the school wall newspaper.
Progress:
- Cut out a pair of identical hearts from whatman paper.
- Cut out exactly the same details from colored paper.
- Now cut out strips from whatman paper, the width of which should be about seven centimeters, and the length should correspond to half the volume of the heart.
- Bend each piece about a centimeter from the edge and make small teeth on this thin strip with scissors.
- The same four parts, but without cloves, cut out additionally.
- Glue parts with teeth to the bottom of the future box.
- Attach tape to the lid.
- Glue the sides with colored paper on the inside and outside.
Additionally, decorate the box with lace, beads and ribbons.
Craft Santa Claus based on a cone: do it with the children
From simple materials with preschool children, you can make a beautiful Santa Claus. The craft is unusual and festive. With its help, you can create a fabulous atmosphere on the eve of the New Year holidays.
What is necessary:
- red and white colored paper;
- cotton wool;
- glue;
- scissors;
- pencils.

From simple materials with preschool children, you can make a beautiful Santa Claus
Progress:
- Cut out a circle from red paper, about twenty centimeters in diameter.
- Fold it in half and cut.
- Fold the semicircle into a cone shape and glue.
- Now, on white paper, draw a circle with a diameter of four centimeters.
- Cut a circle along the line and glue just below the tip of the main figure. This will be the face of Santa Claus.
- Draw eyes, mouth and nose on a small circle.
- Cut out small details from red paper and glue them on the sides - these will be the hands.
- Attach a small piece of cotton to the tip of the cotton.
- Also fix small cotton balls on the bottom of the small circle, creating a beard.
Cockerel based on a cone: step by step instructions
A fairy tale cockerel made of colored paper is a simple and very fun craft that even very young children can make. The main thing is to help the kids form the basis - a geometric figure that is still difficult for them.
What is necessary:
- cardboard;
- colored paper;
- compass;
- pencil;
- ruler;
- glue;
- markers;
- scissors.
Progress:
- Draw a circle on cardboard and cut it out.
- Fold the workpiece in half and cut.
- Roll a semicircle, creating a cone.
- Glue the base and let it dry.
- Cut out a small piece of paper and form a beak out of it.
- Glue this element to the figure.
- Cut a thin strip and glue it to the top of the workpiece.
- Glue the same strip in several more places. It turns out a funny scallop.
- Also cut out three drops and fix them just below the beak, forming a beard.
- Cut off five strips of different colors.
- One strip on the same principle as the scallop, fix on the sides - wings are obtained.
- Make a ponytail from the remaining strips, twist each detail with scissors.
Draw the eyes with a marker.
How to make an origami cone (video)
The cone is a simple and original basis for an incredibly large number of crafts. It can be both completely uncomplicated, children's designs, and very original products that only experienced craftswomen can do. In any case, it is worth knowing in advance how you can make and twist a cone out of paper or other materials yourself, so that in the future there will be no difficulties in the creative process.
Other types of needlework
Olesya
For several days in a row, in an entertaining form, I taught my little nephew how to make a variety of geometric shapes and objects from paper, cardboard, polystyrene, we didn’t get to metal) I watched a lot of articles with master classes in pictures and thematic videos on YouTube. The calculation was to interest the child and to show all this in an accessible, interesting way. We started with small, simple things, made large bags from pre-colored A4 sheets and bags of different colors from velvet paper. Using simple shapes as an example, we made a small toy cap for a clown. Then they moved on to large things and made a wizard's cap, decorated it with foil stars, of course, he immediately ended up on the head of a happy child. A magician's top hat was made for me, it looks great. Next, we made paper gift wrappings and decorated them with crepe paper flowers, snowflakes and colorful paper polka dots. Expanded master classes help to calculate all the little things, offer stencils for many crafts, which you can then do at home with your children. Styrofoam crafts are still ahead of us.
The original Christmas tree-beauty will decorate the festive interior. Of course, a round dance around her is not to be led, but such a miracle will certainly raise the mood. Here is such an interesting desktop craft that can be made from the simplest things that are in every home.
Necessary materials:
- A4 sheet, cardboard;
- dense threads (preferably wool mixture);
- 2 "yolks" from kinders;
- wooden sticks for sushi;
- plasticine;
- Styrofoam;
- stationery knife;
- stroke corrector;
- red nail polish;
- PVA glue;
- fabric scraps;
- little things for decoration.
Make the frame of the future Christmas tree from A4 sheet - fold it into a bag. Insert the foam inside.

Apply glue to the surface of the cone in not wide strips and wind the thread around it.

Secure the end of the thread with glue.

Sushi sticks will serve as the legs of our beauty. To do this, they need to be painted with a proofreader.

While they dry from the "yolks" make boots, as shown in the photo.

Fill them up to half with plasticine and wrap with a cloth.

Insert stick legs into boots, decorate the Christmas tree with various bows, ribbons. Paint the legs with stripes of red varnish. ready!

You can make a hat out of cardboard, cover it with a cloth and sew on a pompom.
DIY shabby chic Christmas tree
Let's make such an amazingly beautiful and original craft in a trendy shabby chic style.

Necessary materials.

For the base, we take a large paper cup or any plastic utensils. Separately, we dilute alabaster or gypsum with water to the density of liquid sour cream and pour it into the future pot. We fix the trunk of our tree, plant a branch in the center and fix it in this position until it hardens.

We make a cone out of cardboard using a stapler.

We make the top of the spruce from wire and foam rubber.

We connect the top with the trunk and attach the cone.

We wrap the base of the tree with white fur.


Cut off excess from below.

Then we fold the ends of the burlap inward and attach it with hot glue.

Let's get down to the fun part - decorating our Christmas tree in the shabby chic style.


To create a finished composition, we need a stand.

We make a bench from a bamboo napkin.


From white fur - a snowman.


We attach a bell to the top of the spruce.

We decorate the Christmas tree with beads, pearls, flowers, lace, etc.


We apply transparent glue to the very top of the tree.

And sprinkled with artificial snow.

We do the same with the bench.


Our composition "Winter's Tale" is ready!


Decorative Christmas tree made of napkins
We will make it from cardboard and single-layer napkins. You will also need beads for decoration.

First of all, we will build a frame for our Christmas tree. We fold the cone from cardboard, fasten it (I sewed it with threads) and cut exactly the bottom of the cone so that it can stand.

The base is ready, set aside for now. Now let's move on to napkins. From them we will make roses. Single-layer plain paper napkins are suitable for us.

We take a napkin and cut it along the folds. Then fold it in three and cut along the folds again.

The resulting strips are still tripled and cut again. We got a square equal to 1/9 of the napkin.

We fasten this square in the center with a stapler.

Then cut out a circle from it. Mega-accuracy and accuracy are not required here at all, the finished rosette can be slightly corrected with scissors.


Thus, a rose is formed. If the finished rose seems uneven to you, then you can trim it with scissors.

The number of such flowers depends on the size of your cardboard cone. My Christmas tree turned out to be 21 cm high and I needed 59 roses for it.

When all the flowers are ready, we return to the cone. Starting from the crown, glue the flowers onto the cone so that the base is not visible. I glued it with hot glue (it’s more convenient for me), but the most ordinary PVA will do.

I made a Christmas tree from napkins in two colors. If you also decide to create your own craft from multi-colored roses, then you can safely experiment with their alternation on the cone. If the result does not suit you, you can always tear off the flower and re-glue it to another place. In this case, only the lower layer of the flower will suffer. It (the bottom layer) is simply torn off. The rosette will not lose its appearance.
So, we glued the flowers to the cone. The Christmas tree itself is ready and you can stop at this stage.

I also decorated it with beads - I glued it on the same hot glue, here PVA will no longer help.

Do-it-yourself decorative Christmas tree made of napkins
As you can see, even a beginner can make such beauty, so you can safely involve children in the process.

Another version of the Christmas tree from napkins

Craft from cones, balls, ribbons and beads
How to make such a craft - see the video tutorial at the end of the article.
Christmas tree made of plasticine with sweets
What do we all associate a wonderful New Year's holiday with? With the smell of pine needles, bright lights, garlands, sweets. And children still create unusual crafts with their own hands, thereby bringing a pleasant moment of the onset of a fabulous night. Lessons of creativity of such subjects they like most of all. It is in crafts that you can realize any fantasies.
We offer to make an elegant Christmas tree, which is easy to decorate with sweets. Blind crafts from plasticine - the cheapest and most popular material. You will definitely make a beautiful souvenir if you follow our tips - they are simple.

To sculpt a Christmas tree with your own hands, prepare:
- green plasticine for the crown;
- a stump in the form of a cap or an empty spool of thread;
- toothpick, red and white plasticine for sweets.
Choose a green block of plasticine from the set. The body of the Christmas tree itself will be made from it, and in the future we will make small sweets as toys. Of course, a small souvenir does not have to be green, any other color that you choose at will will do. If you manage to find a set for sale that has a gold bar, then this option will look rich.

Thoroughly knead the entire prepared bar in your hands and prepare for further work. It is necessary to form a cone-shaped crown, and not quite the usual even, but curved, similar to the cap of a fabulous gnome. Since we are talking about a magical holiday, it is not forbidden to fantasize and create something incredible.

Pull all the soft plasticine into a long cone. Sharpen the upper part as much as possible, press the lower part along the circumference with your fingers, showing the skirt. Then take and bend to the side the entire structure. Sometimes Christmas trees do not stretch up perfectly evenly, but lean to the side like this.

To model Christmas decorations - small sweets - use white and red plasticine. Form red round pills (the inside of the candy), as well as white triangles (the twisted part of the candy wrappers).

Glue delicious sweets. Glue a white dot on each red circle and push in the center with a toothpick. Glue triangular pieces on the sides.

Make enough decorative details to fill the entire surface of the Christmas tree, evenly distributing sweets around the circumference at some distance.

Glue all the resulting blanks to the crown. A beautiful Christmas craft is almost ready. From below, press down a small lid - a stump (or mold it from plasticine).

And the top is still missing. She asks to complete the resulting fabulous Christmas tree. Come up with some option, for example, the same spruce branches in combination with red berries. All this looks festive and bright.

This is such a fantastic Christmas tree. This is an elegant version of crafts for the New Year, which will be a great gift for your favorite holiday.

The New Year is just around the corner - you need to hurry up to catch everything.


How to make such a postcard.

Do-it-yourself Christmas tree made of felt
Let's make felt Christmas trees - this is a great Christmas decoration and perfect for school or kindergarten.
Prepare for them:
- A set of colored felt;
- cotton wool;
- glue "Moment" transparent;
- any beads;
- threads for knitting and sewing;
- a needle
- scissors;
- felt-tip pen.

Choose the right colors for the felt. It can be different shades of green. Or you can show your imagination and make an unusual red or blue spruce. Fold a couple of sheets of felt together, draw the shape of a spruce on the top.

Cut a piece of patterned felt along the entire length and fold it in half as shown in the photo. We do this only if the felt is not very thick, otherwise it will be difficult to cut 4 layers at once.

Cut out 4 blanks.

To give them a bulge, put some cotton wool, as shown in the photo.

Lubricate the edges of the workpiece with glue.

Cut a piece of knitting thread and attach it to the top of the workpiece, directly on the glue. For him it can be hung. Attach the second blank and press along the edge so that both parts stick together.

On a light Christmas tree, make stitches with threads of a darker green color. This will add originality to the craft.

Decorate the second with a border of pearl beads. To do this, make a layer of glue along the edge and put beads on it.

Now let your kid decorate them however he wants. After drying, the craft is ready for use.

Such a simple craft will be a great decoration for your Christmas tree. It can be given to grandparents. Older kids can do it completely on their own. By this principle, you can make any decorations from felt. Anything your imagination tells you.
From natural materials with flowers from foamiran do-it-yourself video lesson
Herringbone-sachet - to create a festive aroma
A sachet is a small bag filled with dry fragrances that is used to create a fragrant background in a wardrobe or chest of drawers. If you put such fragrant bags on the shelves with things, then a pleasant and subtle smell will settle in your closet.

It will not be difficult to make such a sachet with your own hands, and if you create it in the form of a Christmas tree, then in addition to the aroma, the festive composition will also set the appropriate mood.
Materials for the master class:
- Peel from citrus fruits;
- essential oil of orange;
- thread, needle;
- beads, beads, sequins;
- satin ribbon;
- green fabric, cotton;
- scissors and pencil.

On a sheet of paper, draw a spruce template and cut it out.

Finely cut the peel from citrus fruits, and to give more flavor, you can also add a few drops of essential oil.

From a thin green cotton fabric, cut out two blanks according to the template, fold them with their right sides inward and sweep.

If possible, sew and process the edge on a sewing machine, but if this is not possible, process the edges by hand.

Turn out.

From a silver thread, make a loop with a voluminous knot at the end, use a needle or a hook to thread the loop into the top of the spruce.


Tie a satin ribbon into a bow and secure at the top with a couple of stitches.


We fill the craft with fragrant peel from citrus fruits, sew the edge.


If desired, do-it-yourself Christmas tree-sachet can be decorated with various beads and sequins.

Our affordable and easy-to-make sachet is ready, now its aroma will delight, and its beautiful appearance will give an unusual and festive energy.

Photo of Christmas tree-sachet with orange flavor
Pasta tree toy

print Thanks, great tutorial +0
A cone is one of the easiest geometric shapes to make with our step-by-step instructions with photos. Moreover, its height and width can be controlled and create a shape that you like.

- Paper
- Stationery glue
- Scissors
- Ruler
- Pencil
Step by step photo lesson:
We select paper for the future cone. Can be used from plain white xerox paper to designer cardboard. Each has its own advantages and disadvantages. For example, if you make a cone out of ordinary white paper, then the craft will be very fragile. This is its disadvantage, but the advantages include the availability of this material and its cheapness. But designer cardboard has the opposite meaning. Therefore, we will choose the middle, namely, colored semi-cardboard. It keeps its shape well, has many colors and is more static to the environment.
Then we draw a circle. Its diameter will decide the size of the finished cone.

Carefully start cutting out the circle along the outline.

Then we divide the circle into four equal parts.

Then we determine which cone should be made. If we take one part out of four, we get a small thin cone with a sharp top. To create a cone with a wide base and a short length, cut one half out of the circle and glue the figure out of the remaining three. But we will select for our cone the average diameter for the base, which will give a low length. To do this, cut out half of the circle. By the way, this way we get two cones at once!

We take the edges and glue them with clerical glue. If there is no glue at hand, then you can do it quickly with a stapler, just by making two clicks.

In the end, after the figure dries, we get such a paper cone with our own hands. Some still prefer to make a base. So if you have the desire and free time, then why not do it?!

Video lesson