Hello, friends! Well, have you already started New Year's Eve fuss? Yesterday we finally bought an artificial one, but the truth is that there is still nothing special to decorate it with. Therefore, an interesting idea came to my mind about how to make Christmas decorations with my own hands.
I want to invite you to do this exciting business. So throw laziness aside, call your kids and start creating New Year's!
After all, in any case, you have paper, glue, plastic bottles and other materials at hand. Well, there is, right? That's all we need today. From them you can make the faces of little animals, and carved ones, as well as the Snow Maiden and Santa Claus and a bunch of other wonderful decorations. So do not think for a long time, but rather start the fun process.
Moreover, there will be more than enough ideas for such an undertaking. I, as always, tried and found from the Internet the best options for making toys for the Christmas tree. And if you are ready, then we begin. 😉
Do not forget that in any case you need to use your own imagination. Only in this way you can get amazing and exclusive souvenirs.
DIY Christmas tree toys from improvised materials for children
First of all, I want to offer you interesting ideas for creating jewelry from different and almost any materials that are in every home.
Be sure to involve your children in creativity, because it is they who are most waiting for this magical holiday - the New Year. And they will be extremely pleased to hang toys that they will make themselves on the Christmas tree.
I suggest you make an interesting decoration in the form of a small Christmas tree from an egg tray.
"Christmas tree from an egg tray"

You will need:
- gouache;
- Super glue;
- paper packaging from eggs;
- scissors;
- brushes;
- PVA glue;
- thread;
- pencil.

Manufacturing process:
1. Take a paper egg carton and cut out 5-7 cells. Cut out the details from them as shown in the photo. Cut one of the cells in half, this will be the top.

2. Glue the pieces together to form a tree. Roll the parts that came out of the halves into a cone and glue at the top.

3. Take green gouache and paint the workpiece.

4. Cut out decorations from the remnants of paper packaging, and if necessary, glue them together. Make small balls from a mixture of small pieces of paper and PVA glue.

5. Color in the decorations.

6. Decorate the Christmas tree by gluing all the decor. Don't forget to glue the thread with which you will weigh the toy.

7. Cover the product with a transparent varnish, dry. All is ready!

If you are a lover of expensive wine, then after emptying the bottle, do not rush to part with its cork. Collect them. And they will come in handy at the right time. For example, apply them for the following purpose.
"Wine Cork Souvenir"

You will need:
- 6 natural corks from wine bottles;
- natural twine;
- Super glue;
- scissors;
- confetti, small beads.

Manufacturing process:
1. Carefully cut each cork with a knife into 3 equal parts.

The knife must be sharp so that the corks do not crumble.
2. You should end up with 18 pieces.

3. Now lay out small triangles from these pieces on a hard surface. One triangle should consist of 6 pieces of traffic jams. There should be 3 triangles in total.

4. Glue each resulting triangle.

5. Cut three 40 cm ropes from the twine.

6. Tie each rope in the middle, forming a loop.

7. Take a dried triangle, attach a knot of loops to the top, while smearing the place of their contact with glue.

8. Circle the twine around the entire triangle, and tie the loose ends tightly in a knot.

9. For a tighter fixation, the thread can also be smeared with transparent glue.

10. Do the same with the two remaining triangular blanks.


Well, now try to make beautiful snowmen from iron corks.
"Snowmen"

You will need:
- tapes;
- bottle caps;
- acrylic paints;
- buttons;
- glue.
Manufacturing process:
1. Take three good, not deformed bottle caps. Wash and dry them. Then paint with white acrylic paint.

2. After the workpieces have dried, glue the covers onto the tape, while leaving a loop on top.


4. Cut a small strip from the satin ribbon. This will be a scarf. Tie it over the corks. And glue a button in the middle. A bright decoration in the form of a snowman is completely ready.

You can also use not only corks, but the bottles themselves. Only not glass, but plastic. For example, cutting them into halves, and then gluing the parts to the desired length, you get an excellent blank for any toy. Dream up. And then, using paint, revive the plastic blanks.
That's how beautiful and bright you can make a penguin. I think the diagram will make it clear to you.

Or fill the bottles with any New Year's souvenirs, and decorate on top.

You can also cut strips of plastic and assemble a ball.


Here's a simple idea for making small toys out of paper and satin ribbons. Find New Year's pictures on the Internet, print them in the shape of a circle, cut them out. Then glue onto cardboard. Weave the ribbons together and glue the contour with them. Glue the loop.

And here's a paper assembly for you. Also very simple product, just for kids. Print the diagram, cut it out. Assemble the craft along the fold lines, glue. Decorate with beads, plasticine, etc. Glue on the loop. That's all!

"Crystal Ball"

You will need:
- half beads made of glass and plastic;
- foam balls;
- trimming satin ribbons;
- scissors;
- glue gun.
Manufacturing process:
1. Take a foam ball and start pasting it in a circle with half beads. At the same time, you can lay out a certain pattern, or make the craft monophonic.
Remember that the glue must be applied in a thin layer, otherwise the foam will melt.
2. After you glue the entire ball over completely, you just have to embellish it a little more. Just tie a bow of satin scraps and glue to the product. Don't forget the loop too.

In the same way, you can make balls from buttons. Only first paint the foam balls with paint, and only then glue the multi-colored buttons.

And disposable plastic cups are generally a godsend for creativity. They just need to be turned upside down, and pasted over with paper decorations, sequins, duct tape or painted with paints. And as a result, ringing bells, funny snowmen can turn out.


For a change, choose a very simple product - sew or assemble a large Christmas tree bow. You can make many small bows.

I also came up with the idea to combine the purchase option with homemade art. Buy transparent balls for the Christmas tree, carefully unscrew the top and sprinkle sparkles there. Screw the item. Or apply glue on the surface of the ball in the form of any pattern and also sprinkle with sparkles. Very beautiful handicrafts.

Of course, do not forget about needlework from dense threads and ordinary glue.


Moreover, the use of this technology will allow you to make anything.

You can learn more about this technique here.

And here are the instructions on how such a miracle can be created.


Interesting products are obtained from pasta. Usually they are glued together and thus make snowflakes.


And a cool idea would be to decorate unnecessary old light bulbs. Usually they are painted with acrylic paints and decorated with knitted, rag and other attributes.

Also, toys can be molded from salt dough, plasticine or clay.

Well, or bake real edible souvenirs.

In fact, there are still a lot of holiday products that you can make with your own hands from improvised means, and you can’t list everything. Therefore, we move on.
Christmas toys, crocheted with patterns
Now a selection for those who are fond of knitting. I found the coolest, in my opinion, crocheted souvenirs. I'm sending you along with the diagrams. Knit, to health!
- "Bell";

- "Herringbone";

- "Angel";

- "Snowflake";

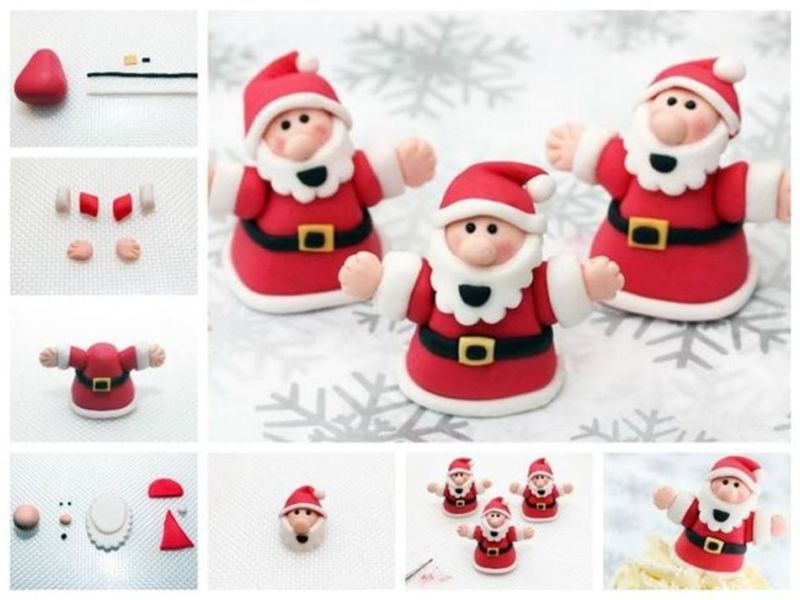
- "Father Frost";

- "Sweetie" and "Sock";

- "Snowmen";

- "Dog";

- "Mouse";

- "Piggy".

Do-it-yourself Christmas toys for the Christmas tree made of felt and fabric (patterns and templates are included)
From crocheting, we move on to sewing from felt and any other fabric. Guys, this time I won’t explain to you what and how to sew, I’m sure you already know all this. After all, the main thing is to find patterns. That's exactly what I'll help you with.
Loaded up a variety of options. I kindly provide them to you. Save, cut and start sewing.


Master class on making a star on the top of a Christmas tree from paper and cardboard
Well, now let's start making almost the most important attribute of a green tree - a star.
Of course, you can choose another way to make it, but I really liked the following magical transformation.
"Shiny Cardboard Star"

You will need:
- shiny cardboard;
- scissors;
- glue gun.
Manufacturing process:
1. Take cardboard and cut out strips of the same width and length from it.

If your cardboard is shiny on only one side, then first glue two sheets of cardboard together so that both sides are shiny.

3. Now bring the free ends of the strips together and glue them together as shown in the photo.

4. Pin the side strips together. You should get something like this.

5. Repeat steps 1 to 4, that is, glue another exactly the same part.

6. Connect and glue the two blanks together so that you end up with an eight-pointed star. Your voluminous star on the top of the spruce is ready.

I think that such a masterpiece will bring a lot of pleasure, especially when the lights will flash on the branches and the star will also sparkle with new colors.
Christmas tree toy 2020 in the form of a symbol of the year of the mouse
Do you remember what year is coming? That's right, the year of the Rat. So do not forget to appease the Mistress and make souvenirs in the form of funny mice.
"Pig made of colored paper"

You will need:
- double sided tape on foam;
- semi-cardboard pink and red;
- black marker;
- pencils;
- markers;
- glue;
- scissors.

Manufacturing process:
1. Take a pink semi-cardboard and cut out many strips from it 1 cm wide and 7 cm long.

2. Now, using a pencil or scissors, twist each strip.

3. Apply glue to the top of one of the strips, and attach another strip on top. Thus, glue the strips in a circle.

4. As a result, you should get such a blank.


6. Now cut out a long pink strip 0.5 cm wide.

7. Twist the strip so that you get a curl like a pig's tail.

8. Glue the tail to the ball.

9. Cut out two circles of different diameters and ears from half-cardboard. From red paper, cut out two small circles - these are the nostrils.

10. Glue a piece of double-sided tape on a circle of smaller diameter. Attach it to the big circle. Use glue to glue the "nostrils".

11. Draw eyes with a black marker and draw the contours.

12. From red paper, cut out two strips 2 cm wide, 5 cm long. Paint them all with the same black marker. This will be a scarf.

13. Glue the scarf to the back of the pig's head. Then glue the head to the body (3D ball). And don't forget to cut and glue the ribbon loop.

Agree, this is a very easy craft and is available for children's creativity.
Step-by-step instructions on how to make a New Year's toy from cotton wool
And ahead of us is a detailed master class on creating another Christmas decoration in the form of a bright cockerel. We will make it from ordinary cotton wool.
"Wadded Cockerel"

You will need:
- cardboard (dense, but cutting);
- cotton wool (from a pharmacy, regular in a roll);
- cotton pads;
- threads are white;
- potato starch;
- half-bead eyes in black;
- tailor's pin (with a loop at the end);
- paints for painting.
Manufacturing process:
1. Take the cardboard and draw the outline of the cockerel on it. Cut it out.

2. Unwind the cotton wool from the roll and tightly wrap the cut out contour to the legs with it.

3. Now wind the thread over the cotton. Do the same with the leg.


5. Cut out wings (4 pcs) and tail parts (4 pcs) from cotton pads.

6. Cut out one comb from the cotton pad and two parts for the beard.

7. Cook a starch paste and coat our cockerel figure with it. Then wrap our product with thin pieces of dry cotton wool. Lubricate all irregularities with a paste. Next, soak all other parts with a paste and carefully attach them to the cockerel. Form folds, fluff the tail, additionally you can make a thin strip of cotton wool and stick it around the neck. Glue on the eyes.

8. Dry the product upside down (hang on the thread that we left). And then paint to your liking. Cut the thread and insert a pin, thread an elegant rope.

Use this technology to make other animals, fairy-tale heroes and characters.
Christmas tree toy "Garland" from plastic bottles
Now we will make a decoration in the form of a garland. Moreover, the garland will not be simple, but from plastic bottles. How do you like this idea? Personally, I'm delighted.
"Flower garland"

You will need:
- plastic bottles with caps;
- paints in spray cans;
- scissors;
- electric garland;
Manufacturing process:
1. Cut off the tops of the bottles. Make cuts to make a flower.

2. Round the petals and paint the blanks in any color.
3. While the flowers are drying, make cross cuts in the caps of these bottles. Insert light bulbs from an electric garland into the cuts.

4. When the blanks are dry, screw them to the lids, spread the product over the Christmas tree and turn on the electric garland. Enjoy the creation!

Well, a simple manufacturing option garlands of icicles Crafts for the Christmas tree from polymer clay
I will briefly tell you what figures can be molded from clay. You can also take plasticine as a material.
Here it is important to come up with a hero, mold the details, then put them together, well, make a loop.
Here are a couple of patterns for sculpting winter characters.
- Father Frost;

- Monkey;

- Girl;

- Snow Maiden;

- Piggy.

And options for finished work.


Video selection of the best toys for a Christmas tree made of wood
Well, if you are fond of woodworking, then you will be interested in the following story. It contains ideas for creating wooden toys at home. So watch and create. By the way, such souvenirs are perfect in quality.
And this is where I end today. I look forward to your comments! Am I helpful and creative? 😀 I think that it is undeniable - "yes".
I wish you to make what you like and decorate the Christmas tree with homemade toys together with the kids. With coming!
Winter has come into its own and 2016 is just around the corner. Soon it will be time to decorate the apartment with New Year's tinsel. You can make original toys for the Christmas tree yourself from improvised materials, and master classes with step-by-step instructions, photos and videos will help with this.
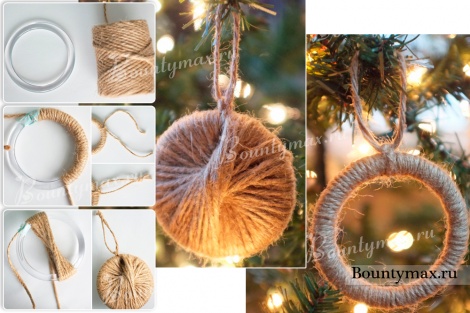
Christmas ball of threads
To create this original Christmas tree decorations, you will need:
- balloon;
- twine or thread for knitting;
- PVA glue;
- a plastic bottle in which there will be glue;
- scissors;
- needle.

We inflate the balloon to the size we want to see our balloon and tie it. You can wrinkle the ball a little to make it more rounded.
Container for glue (plastic bottle), pierce with a needle with an inserted thread, then pour glue to cover the thread. Thus, the thread comes out of the container already completely saturated with glue. Gently begin to wind the thread around the ball in different directions, often turning it. Do not forget that the ball will need to be removed, so you do not need to wrap it very tightly near the tail. Having reached the required density, we cut the thread. Leave a small piece of thread for the loop.
We leave the ball to dry - it will take 1-2 days - or dry it with a hair dryer for about 15 minutes. After that, we pierce the ball with a needle and carefully remove it. Make a loop, and you can hang a Christmas ball of thread on the Christmas tree.
Learn more about how to make a Christmas ball of thread in the video below.
Ball decorated with buttons

A ball with buttons is very unusual and stylish (photo: pda.diary.ru)
Every housewife has deposits of buttons cut off from old things, or bought for future use and never used. A great idea is to make a Christmas toy for the Christmas tree with your own hands from buttons.
You will need:
- foam or plastic ball base;
- buttons of different colors and sizes;
- Moment glue or glue gun.
We glue the buttons with glue to the surface of the ball, leaving no gaps. Glue a bow at the end.

How to make such a ball is shown in the video below.
DIY Christmas tree toys from light bulbs

Do not rush to throw away ordinary light bulbs that have burned out. You can make a Christmas tree toy out of them.
In order to make a similar decoration on the Christmas tree, take:
- an ordinary light bulb;
- acrylic white paint;
- acrylic or stained glass paints;
- brushes;
- decorative elements (beads, ribbons, sequins);
- glue.

Now we can paint our toy. What it will be - separate pictures or faces of animals, snowmen, Santa Claus - you decide.
If you use stained glass paints, then the light bulb can not be covered with acrylic base paint. This way you will keep it transparent and it will catch the highlights of the garland.

If you are not very good at drawing, you can apply decoupage drawings to the bulbs - glue pieces of special decoupage napkins with PVA glue.
We think you can easily cope with the manufacture of such an unusual Christmas decoration. Most importantly, do not forget to glue or tie a thread on top for hanging at the end.
Another idea for decorating a light bulb is offered by the master designer Guzel Gulmutdinova in the video below:
Cardboard ball

You can make a ball out of plain paper or colored cardboard, which will turn into an original Christmas tree decoration. For this we need:
- several sheets of colored cardboard;
- glue;
- scissors;
- thread or ribbon (for hanging).
We cut out 8 round blanks of different colors from cardboard. We bend each circle so that a triangle forms in the middle. We glue the bent corners of several circles together in turn. In the middle of one of the petals, glue a thread for hanging. The photo below shows step by step how to make a Christmas tree ball out of cardboard.
Be sure to hang a symbol of the coming year on the Christmas tree - a monkey (photo: www.livemaster.ru)
Sewing small funny figurines of objects and animals from felt is not at all difficult. A wonderful idea - a monkey - a symbol of the year 2016. It can be easily sewn using a pattern.

To make a toy you will need:
- brown and beige felt;
- thread and needle;
- filler for soft toys;
- eye patches.
We transfer the pattern to felt. Cut out 2 pieces of each. We sew with an overcast seam, preferably with a contrasting thread. Sew on the eyes - and you can hang the monkey on the Christmas tree.
A more detailed master class on making a felt monkey is in the video below.
Scientists say that the tradition of decorating a Christmas tree for the New Year came to us from our pagan past. There is a lot of controversy and debate on this subject. But we, the descendants of those same pagans, by and large do not care where this tradition came from. The main warmth of the family hearth and such a bright symbol of the new branch of time. New Year is for many that point in the life span of time, which is so required to be set. Mark the end and, accordingly, the beginning.
Both big and small love to decorate the green fragrant beauty of the Christmas tree. Agree, there is something magical in this. We could not avoid this issue and we offer you a selection of ideas for making Christmas toys for your crazy hands. Let's not talk about value, a lot has already been said about this, and on our website, in particular.

Just read the article, you will surely be interested in one of the ideas. And if one of the crafts we have proposed takes pride of place on your New Year's green or maybe not green beauty, it will be a holiday for us.
In this article, let's talk about Christmas tree decorations that can be built from improvised means and which are advantageous to distinguish your Christmas tree from many others. So, let's begin…

The snowman is one of the traditional symbols of the New Year and, as a result, the most popular Christmas decoration. But how often have you met snowmen made of iron bottle caps? Not? Then meet: snowmen from caps.
What you will need to create a fun snowman:
- Iron caps from glass bottles (these can be found on beer bottles and lemonade bottles in glass containers).
- Acrylic paints.
- Paint in a can. White.
- Tapes. Preferably not wide up to about one centimeter.
- hot glue
- Buttons.
- Scissors.
- Tassel.
- Glitter or something similar for decor at your discretion.

Using spray paint, paint the inside of the caps white. Before painting, bottle caps should be washed, dried and laid out as tightly as possible on one plane. Painting is preferably done outdoors. The paint should cover the inner surface of the lid tightly, if necessary, repeat the staining.

We form the body of a snowman
We form the body of a snowman
After the covers are dry, you can start assembling the bodies of the snowmen. Lay three lids in a row, with the convex side facing you. Try on how many ribbons it takes to secure all three lids together with hot glue. Cut off the measured piece of tape, do not forget to leave a margin of tape in order to make a loop for hanging.
Glue the cut tape, as mentioned above, with hot glue to the lids. You can grab the covers a little beforehand so that they hold better on the tape, so to speak, add structural rigidity.

Take acrylic paints and use a thin brush to paint eyes, nose, mouth and buttons on the painted side of the bottle caps. If you do not have a suitable brush, you can replace it with a toothpick. The edge of which needs to be kneaded a little to get something like a miniature panicle. After the paint dries, you can add a little sparkle.

Cut small pieces of colorful ribbons and tie them to your snowmen in the manner of scarves. In places where you tied scarves, glue on a bright button. How do you like the idea?
A burnt out light bulb is considered garbage and is rushed to be thrown away. Well, in vain. In our business, exactly what should be thrown away will ideally fulfill the role of something new. Here's an idea with funny penguins for you to consider. Such penguins will perfectly decorate the Christmas tree and delight your family.

So, what you need to create a cute inhabitant of polar ice floes:
1. Damaged incandescent bulbs.
2. Acrylic paints or gouache.
3. Tassels. It would be nice to prepare a few. It is good to cover large areas with large ones, and draw small details of faces with thin ones.
4. Ribbons, cords, threads or something similar.
5. You can prepare hats in advance. The hat left from the toy will do or you can build something similar yourself.
6. Hot glue.

Damaged light bulbs should be cleaned of dirt and degreased. Then cover with black and white paints. Do you remember the color of real penguins? Exactly. The back is black, and the belly and muzzle are white. You can make a simple and slightly complicated coloring of a pingini. You can simply cover the light bulb with white and black paint, or you can draw a little fins and an arc above the eyes.
Light bulbs painted white and black must be dried. Then paint the muzzles. Just use a thin brush to draw eyes, nose and blush.

Tip: to make it more convenient to work, take a reel of scotch tape or toilet paper, or something similar. Install the bottom of the light bulb in a round hole of suitable size, it will not stagger and thus it will be easier for you to apply drawings to the surface.
After you have painted the penguins and painted their faces, you need to dress the cute ones. For this purpose, doll things are well suited. And if you wish, you can build clothes on your own. Knit simple hats and scarves from the remnants of the threads.

Yes, but don't forget the hanging loop. If your penguins will not be wearing hats, then simply use hot glue and apply the right amount of it to the very top of the cartridge and glue a loop of lace or tape. And in the case of hats, you must first leave a hole in them in order to thread the loop.

We put on hats, put on scarves. Scarves can simply be tied on penguins, or you can fix them with hot glue. This is at your discretion and wish.
That's all. Cute lamp penguins are ready. Hurry up to hang them on the Christmas tree. Let the family please.

The fashion for knitted napkins is immortal. All the same, for several dozen housewives there is one who will not fail to decorate the furniture with a knitted napkin or throw light lace on the monitor, in the manner of a grandmother's decor. Yes, they are not extinct, they exist. Therefore, rummaging through your stocks or mother’s, or even grandmother’s, you can find a couple of three openwork lace napkins. It's time to give them a second life.
Openwork ball can be used as christmas tree decoration or as a New Year's room decor. And even leave it as a ceiling. There are many applications for this product.

- Lace. The remains of simple lace are perfect. Old knitted napkins.
- Inflatable ball.
- PVA glue.
- Tassel.
First you need to dilute the PVA with water. The approximate ratio of parts is 2:1. Glue and water must be thoroughly mixed and poured into a container with a fairly wide neck, you can even take a plate for this purpose.

Tip: do not use any other glue, especially silicate. He has a quality that in this particular case is completely out of place. After drying, this glue is known to turn into a substance that vaguely resembles glass. And having a tendency to crack and turn into sand from mechanical stress. Which is absolutely inappropriate. Yes, and when it dries on the ball, it will burst it. Experimentally proven.
Then, lace and napkins should be soaked in the resulting solution.
Tip: Naturally, the material of napkins and lace should have absorbent properties. At least the minimum.
Diluted glue can be applied to napkins and with a brush. Having previously laid them out on an oilcloth.

Now we need to inflate the balloon. Ideal if you take a simple and strong round ball. Determine the size yourself.
Gently cover the inflated and ball with glue-soaked napkins and lace. Try not to leave unfilled space between the material, but do not apply it in a thick layer. After the ball is completely wrapped, it must be carefully hung up and wait until the glue is completely dry and turn the napkins with lace into a kind of crust.
Next, the ball must be burst with a needle or something similar. The rest of the ball must be carefully removed. Now, for greater stability, the openwork ball can be sprinkled with hairspray. It was hairspray that showed itself perfectly in this case. Proven experimentally.

Tip: do not use this design as a candlestick (there are such ideas on the Internet). An openwork ball can easily ignite and then the result may be slaps on the butt of firefighters, and not a fun pastime. Don't ruin your holiday!
Watch the video on the topic: Christmas ball of threads
Although sometimes winter in our area reminds us of spring, and deep autumn, and then spring again, in a word, any season, just not winter with snow. But a warm knitted hat still remains a symbol of winter cold and snow. Use our idea and make funny warm hats as toys for the Christmas tree. Original, and what is important, practically from garbage.

So what you need:

1. Garbage. More specifically, toilet paper reels, cling film, or any other lightweight cardboard reel that you may be taking out of the trash can right now.

2. Remains of threads from knitting. It is desirable that they be approximately the same in texture and thickness, the latter is more important. The length of the segment can be taken from 25 centimeters.

3. Scissors.
4. Ruler.
5. A simple pencil or something with which you can take notes.
Let's start making:
Cardboard cylinders should be marked and cut into rings, like a cucumber. Choose the width of each ring yourself. This will determine what kind of cap lapel you want to make.

Tip: if you are planning to make wide lapels, then the length of the threads also needs to be increased.
The threads must be folded in half and make loops on the cardboard rings. They must be constantly tightly shifted one to the other. The cylinder must be tied tightly.


Leave a few loose threads about a centimeter, when you cut off the excess, they will form a semblance of a pom-pom.

This will give the cap realism and cuteness. A loop for hanging can be made from the same thread with which you grabbed the top of the cap under the pompom.

Thus, when hanging, the hat will not hang evenly, and this will give the product asymmetry, which will only benefit the appearance.


And again, the material for the future masterpiece is nothing but garbage. The lemonade bottle would have been thrown away at any other time, but not in this case. We offer you the following idea for service, namely a snowflake from the bottom of a plastic bottle. This craft will fit perfectly with any other Christmas decorations. A snowflake is a traditional symbol for winter and the New Year.

So, what do you need to create a wonderful Christmas decoration:
- Plastic bottles. Standard clear or blue/light blue.
- Stationery knife.
- Awl.
- Dye.
- Tassels.
- A thread or thin ribbon so that the toy can be hung.
- Sequins for decor at your discretion.
From the whole bottle, we are only interested in the bottom. Cut it off with a utility knife. Make it as low as possible. Heat the awl and carefully make a hole in the cut, into which you will eventually thread the thread for hanging.

Now apply a pattern of curls or lines to the cut bottoms. It can be both complex and simple, it depends on your imagination and wishes. You can add sparkles to the drawing or mix it with paints. That's all, the Christmas tree decoration is ready.

Call the kids! The proposed idea will simply honestly allow you to spend amusing minutes, or even hours, together. Everyone is used to the fact that Christmas balls are round and convex. No, but this does not affect the originality and beauty of the toys at all. Moreover, the manufacturing process is absolutely simple. Even a small child can handle it. It will even be better for the children to help you in the manufacturing process. Since a kind of awkwardness inherent only in children, let's call it charm, is required to stylize our jewelry.

- Knitting threads, multi-colored. Better than medium thickness.
- Wire or twigs that will be easy to bend, and they will keep their shape.
- Pliers.
- Beads with large holes.
- Fantasy.

Let's start doing Christmas crafts
We take the wire and wrap it with a piece of dark fabric, or thread or dark paper. It is not necessary to do this carefully, it is enough that the wire is hidden by 80%.

We grab the free ends with pliers and make a few turns. Make sure that the wire is fastened and the wrapping material is fixed. It turned out a kind of not quite even circle with antennae.

If you use twigs, then fasten them with a thread so that they keep their shape. Just made a few turns. And don't forget to leave long loop ends so your balloons can be hung up.

Now we take multi-colored threads and wind them on an impromptu frame. We do it not tightly, but also weakly. You can use up to three colors, preferably contrasting.

On the thread that you plan to wind last, string a few beads, if desired. Attach the thread to the "tail" of the frame.

Everything, your New Year's toys are ready. Extremely simple and at the same time extraordinary and eye-catching. Happy New Year!
The better the choice around, the more you want something original and memorable. Of course, you can buy Christmas decorations at the hand-made fair, but it's much more pleasant to try to make them yourself. And if you still involve the whole family in this activity, then you can have a great weekend! We look around and choose improvised materials for super-stylish, mega-authentic and extra-ordinary Christmas decorations.
1. Corks
Starting from December 19 (St. Nicholas Day) and until the New Year itself, a series of primordially Slavic and slightly borrowed holidays begins in our latitudes. We love to celebrate and we know how to do it on a grand scale. So there should be no shortage of such improvised material as corks. Wine corks, corks from champagne or cognac will serve as an excellent basis for a mini-Christmas tree or for a full-fledged Christmas tree toy.
2. Buttons
From bright multi-colored buttons left over from clothes that have long sunk into oblivion, you can get an elegant garland, a New Year's ball and many more different decorations. Buttons can be strung, glued, pyramided and tied to each other. Use your imagination to the fullest!

3. Bulbs
Use nail polish or acrylic paints to make a fun snowman or cute brownie out of a burned out light bulb. The resulting toy can not only be painted, but also dressed.

4. Threads
If you had an "5" (or "12") for work, or you just like to sew and knit since childhood, you can knit your Christmas tree both with knitting needles and crochet. If you are trying to knit a Christmas tree toy for the first time, find the simplest and easiest option on the Internet so that the result does not disappoint your expectations.

5. Wire
Thin, flexible wire is perfect for creating a variety of snowflakes and the original top for the Christmas tree. Beads, beads, buttons and even stones can be strung on the wire to make the toy even brighter and more unusual.

6. Felt
From felt you can create a real miracle. This material is great for making toys with children. To keep babies safe, use a glue gun instead of a needle and thread.

7. Polymer clay
If you like to sculpt, choose polymer clay. It comes in a variety of colors, and toys from it are simply magical.

8. Newspapers
Of course, in our time it is already a disappearing consumable. At home, there is more likely to be a couple of old mobile phones than old newspapers left behind for interesting clippings. But if they do exist, this is a suitable material for making curly toys, papier-mâché or origami.

9. Pasta
From spaghetti, horns, spirals, tubules and other invariable paraphernalia of Italian cuisine, you can create original Christmas tree decorations. Color them with multi-colored paints, sprinkle with glitter and decorate with beads.
What could be better than do-it-yourself Christmas toys, especially since you can easily make beautiful New Year's toys from improvised materials (junk, in some cases practically from garbage).
What exactly can you make an unusual toy from? - see below.
Unusual Christmas decorations from improvised materials with your own hands
I'll start with the option that lies on the surface (for those who have children or have their own toys). The idea is this: you need to screw a loop into an old toy in the form of some animal (for example: a lion, a horse, etc.) or a car, then paint or paste over the toy with sparkles. Thread the thread into the loop and that's it - a beautiful toy is ready.

Mosaic can also be attributed to the number of improvised materials and make a good New Year's toy out of it. You heard right from the details of the mosaic. Simply paint the jigsaw pieces in the colors you want: red and white to create candy and snowflake toys, or brown and white to make a deer face. True, you will additionally need to glue a string for hanging, a bell, eyes and a nose.


If you have large mosaic pieces, you can draw an angel or something else on them.

Love to eat ice cream on a stick? - do not throw away the sticks and you can make a beautiful Christmas tree toy out of them. For example, such a cute snowman as shown below.

Or such a toy girl-angel.

Speaking of sticks, you probably won't have a hard time finding twigs. Believe me, Christmas decorations from branches deserve attention. Just cut the branches to the desired size and glue them into the desired shape: a snowflake, a Christmas tree or a star. The finished toy can be left in this form, or it can be painted, pasted over with sparkles or artificial snow.


In addition, you can make a big star from the branches to decorate the top of the Christmas tree.

Feel sorry for destroying trees? - use tubes for cocktails. Even if you do not have them at home among improvised means, you can always buy them in the store (they are not expensive). From the tubes you can make a simple snowflake or something more complicated.

And here is an example for you to inspire a feat - a beautiful Christmas tree toy comes out of the tubes, it seems that it is difficult to do it with your own hands. But as you can see in the photo instructions, everything is very simple. So experiment!

One more ingenious idea to make a Christmas tree toy with your own hands deserves attention quickly and easily. Use cookie cutters. Tie beautiful threads or ribbons to them and hang them on the Christmas tree. By the way, after the new year you will be able to use them for their intended purpose.

And you can do a little magic on these molds: paint them white (or any other color of your choice) and paste over with beautiful electrical tape. Of course, such molds will not return to the kitchen, but your stock of unusual Christmas toys will be replenished.

A beautiful star can be made from ordinary wire, thread and paint. You can form a star out of wire with your hands (it is better to take a thick wire), or you can drive approximate carnations into some unnecessary plank and use them to make a star, which you then wrap with threads and cover with paint.

And you can string glass beads on a thin wire and make a star - you get an almost weightless Christmas tree toy.

Or wrap the wire base with a strip of sequins and threads. In addition to the star, you can make a Christmas tree in this way.

A beautiful star can also be made from cardboard: cut a star out of it and wrap it with thread or twine.

A crumpled sheet of paper plus leaves of some plant and you will get a beautiful snowflake.

I don't know about you, but I love snowflakes. In addition, a snowflake is perhaps one of the most logical Christmas decorations. In general, we are looking at another original way to make a Christmas tree toy in the form of a snowflake. You will need Styrofoam (dig through old tech boxes) wire or regular toothpicks. From the foam you need to make several balls of different sizes (depending on what kind of snowflake you want to make), the edges can be smoothed out simply by pressing with your fingers. In the center there will be the largest circle, into which we will stick a wire or toothpicks and string smaller balls. Smear the finished snowflake with glue and sprinkle generously with sparkles - you must admit that the snowflakes are simply gorgeous. Such a toy will perfectly fit into any decoration.

A beautiful Christmas tree toy in the form of a snowflake can be made from handles from plastic disposable forks, spoons and knives. Glue together several cut off handles and decorate the middle with a beautiful bead.

No less beautiful snowflake is obtained from cut corks from wine bottles. Paste them with sparkles, ribbons and you can admire the result.

Well, a classic of the genre: a snowflake made of clothespins. Many of you may have already seen such snowflakes (as well as others, in general), but I’ll post it anyway - it turns out to be a very attractive snowflake.

Are we talking about lids? Lids from plastic bottles, as well as from glass ones, are easy to turn into original Christmas tree decorations. You can make Santa Claus, a snowman, etc.


Lids from ordinary jars are also suitable. You can paste a photo or rhinestones inside the lid, and paint beautifully on the outside. Or cut out the middle and paste the embroidery.


And you can use the lid as an auxiliary material: with its help, carefully glue the nuts into an even circle.

A beautiful circle can be made from beads and wire.

And you can roll the wire from the binding of the notebook into a circle.

Another find is the rings from the rod in the bathroom: wrap them with different threads, decorate with some New Year's mini toy (if we are talking about how to make a Christmas tree toy from improvised materials: use an old fridge magnet) and admire the result.

Still using toilet paper with an insoluble core? - this is good luck, cut thin circles out of it, paint and paste some paper cut out inside.

Girls can donate old bracelets.

And from old beads and ordinary wire, you can twist a beautiful Christmas tree toy that is somewhat reminiscent of a nest.

Immediately, we will not immediately pass by such a thing as a ball of thread, made with a balloon of thread and glue. Still, despite the ease of implementation, the result is pleasing to the eye, and please note everything from improvised materials.

Everyone has spools of thread: so decorate the Christmas tree with them. In addition, you can stick a piece of paper with a romantic message / New Year's greetings to your loved one to the coil.


Not a shortage and egg packaging. Meanwhile, you can make original Christmas decorations from them. Show your imagination!

The following selection is more suitable for guys who like to drink beer from cans. But still, what if one of them decides to decorate the Christmas tree in the hostel in an unusual way, or you are a young couple having a party for friends. And in general, some toys made from tin cans are also suitable for decorating a “home” Christmas tree.
Such as a star, an angel or a snowflake.


Well, to cheer up your friends, you can make toys from cans without depriving them of the shape of the can.


You can even build Santa's sleigh with his faithful deer helpers.

I also want to draw your attention to one winter hero - a penguin. Of course, contrary to popular belief, he does not live at the North Pole, but since it has become so customary ... Moreover, you can make such beautiful Christmas decorations in the form of penguins, which is just ah. Use old light bulbs, plastic bottles, different paints, your imagination and you will definitely get a beautiful penguin.