Every girl loves jewelry. For any outfit, you can purchase suitable beads or a necklace. In the article, we will present a variant of threads. Such products look original, there are few of them on sale, and you can choose the right color of thread for any outfit.
In order to learn how to make such decor items, it is not necessary to be a handmade master, you only need to have patience, endurance, since weaving is a painstaking task. You will also need to be careful and careful. After all, even one wrong turn will stand out from the rest. The work is a little monotonous, since for the manufacture of lacing you need to perform the same turns. Therefore, be patient and start making original decorations from threads.
Necklace with large pendant
Before starting work, think about what dress or blouse this item will be worn under. Having decided on the color scheme, go to the sewing accessories store and look for suitable threads. You will also need a large pendant. If it is golden, as in the photo, then the fastening threads must also be selected in gold. Then the product will look aesthetically pleasing.
1. First of all, you need to unwind the coils. To do this, you need to use some kind of dense template. For example, take a cardboard shoe cover or simply stretch them between the sticks of the back of a chair. The template should match the length of the thread decoration.
2. The threads are removed from the template and the edges are trimmed. It turns out a pack of threads of the same size.
3. Now you need to make a buttonhole separately, on which the whole structure will hold. To do this, insert a small round button into one of the threads and tie a knot. Having correctly measured the length of the necklace, on the other hand we make a loop according to the size of the button and also tie it in a knot. The thread thus prepared is applied to the rest. The ends of the bundle are tied with threads so that they do not fall apart during further work.
4. The most painstaking work remains. It is necessary to weave dense rings around the main part of the thread decoration with golden threads. The edge is hidden at a distance of 1 cm from the end of the beam so that it does not crawl out. Then tightly begin to wind the thread around. There are two ways: just wind the thread, pressing it tightly against the previous turn, or each time pulling the previous turn into the loop. In the second option, a pigtail will be visible on the side, which will need to be positioned evenly. But the threads will not overlap each other and the product will turn out neat.
Necklace with roses
The principle of making such an ornament from threads is the same as in the previous method. In this product, instead of a button, a large bead is put on one end of the bundle, in the tone of one of the roses. When the whole main part is done, we begin work on decorating with flowers.

To do this, you need to separately wind a bunch of threads of the main beige color and the same - contrasting, for example red, as in the photo. The ends are wrapped with brown threads on both sides so that they do not fall apart. Then we make several turns of yarn in a circle, threading the main part of the bundle into the loops formed. But not too tight. The middle of the rose should be free. Finished decor elements are placed in the center of the necklace and sewn on the back with simple threads. They should not be visible on the front side.
Adding braids
The decoration of threads on the neck, made in a way familiar to readers, can be diversified by adding any details. It can be beads or rings, pendants and knots. The next necklace is made with weaving thin braids. At the first stage of pulling the threads on the template, you need to separately weave several braids. For this, several threads are taken in each strand so that they have volume. It all depends on the desire of the craftswoman, because you can weave several different braids using a different number of threads for the strands.

Then the finished pigtails are placed in a bundle, located in different places so that each is clearly visible. You can decorate the yarn decoration with a bright contrasting bead.
So that she does not roll up and down the yarn, it is necessary to tie a knot that will hold her in one place. The pigtail that comes out of the bundle with a bead looks beautiful. It turns out an asymmetry that adds originality to the product.
big pigtail
A thick braid is woven from floss threads. Rings made of beads and beads are put on it. They should be bright and contrasting with the main color of the yarn.

The lock on this model is purchased. Now you know how to weave a beautiful decoration from threads. It's easy and looks very effective.
Loop decoration
For such a product, you need to choose the same threads of two contrasting colors that would look harmoniously together. They are selected the same length. Then the bundles are intertwined with each other, forming a loop in the middle. Then, purchased plastic or metal jewelry is inserted from one and the other end, and they must be the same.

"Chocolate with milk"
This original decoration is also made of two parts. The first half is represented by chocolate-colored yarn, which is assembled from long threads and folded in half. Since the necklace has an asymmetric structure, the brown threads should be longer than the white ones.
One end of the yarn is wrapped with black thread. The central part of the beam, divided in half, is processed in the same way.

The lock is made according to the method described earlier, only a large bead is used instead of a button.
Thread earrings
Now earrings made in the form of thin tassels are fashionable. Making them is very simple, you just need to know how. If you have never done such things before, then look at the step-by-step instructions. There is nothing complicated here. The only thing is that it will take a long time to wind the threads around the template, as they are very thin. To make the brush so lush, you need to unwind the whole coil. The pattern must be tight. You can use a wooden plate or very thick cardboard.

When the bundles for earrings of the required thickness are tightly wound, the extreme turns are tied in a knot. Then everything is removed from the template. It turns out a ring tied from opposite sides to knots. Putting the threads together, from above we perform several windings around the end, under the knot. And carefully cut the lower part under the ruler.
If you didn’t get it right the first time, then you can trim the edges with sharp scissors. The upper knot, together with the winding, is hidden in the purchased elements of the earrings. The second earring is made in the same way.
When the master makes the jewelry on his own, you can choose the color of the threads for any outfit. When buying ready-made products, you will have to choose only from what is presented in the window. The desired combination of shades can not be achieved. And what you buy won't always fit perfectly. So don't be afraid to try making your own decoration. It is not so difficult, but the result will exceed all expectations.
Plain solid color bracelets
To make such jewelry, you will need to purchase a plastic even bracelet and thin silk threads of the desired color. PVA glue is also used here. Before you start winding the thread in a circle, you need to tie a knot at the beginning of work and hide the edge under the turns of thread. A 1 cm bracelet is smeared with glue and we begin painstaking work. When the entire area is filled with threads, the next centimeter of the surface of the product is smeared. The glue dries quickly, and the winding is slow. The threads need to be pulled tight so that there are no sagging areas.
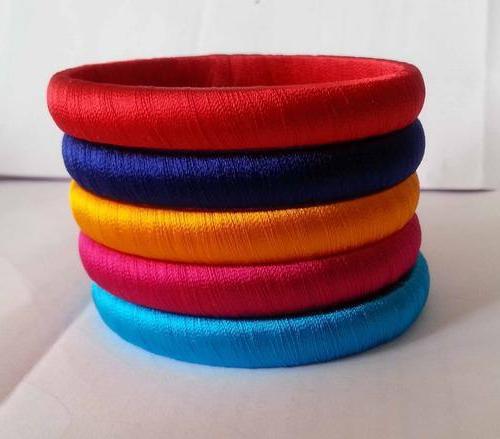
The end of the threads must be hidden under the last couple of turns. You can make a whole set of matching colors, consisting of two or three bracelets.
Wide bracelet with decor
Such jewelry is made in a similar way, only a plastic ring is bought in a larger size. After completing the winding with threads, work begins on decorating the bracelet. To do this, a simple single pigtail is woven from the thinnest blue satin ribbon according to the size of the circle. Stick it in the center of the ring. Further, two rows of purchased chains of plastic balls are placed on both sides. They have a large selection in hardware stores.

It remains to stick the half-beads with rhombuses at some distance from each other. Everything, a beautiful bracelet is ready!
The popularity of baubles
If you ask people on the street about the name of a thread decoration, then the answer will be unequivocal - a bauble. This is a braided bracelet. The Indians of North America wove such products. They associated such weaving from threads with strong friendship. Such traditional decorations have been passed down from generation to generation. If the bracelet was removed or returned to the person who presented it as a gift, then this was considered a very offensive act, interrupting communication. Especially if the removal of the baubles took place in public.
The ancient Slavs also wove such ornaments with symbols to protect them from evil spirits. Such amulets were popular with both women and men. In the last century, they remembered such wicker hippie jewelry. Baubles also received another meaning. Couples in love wore jewelry on a red thread. Special baubles were also made, which had the meaning of a talisman, a symbol of friendship. Each color has its own meaning. Consider how to make a simple red bauble for a couple in love with your own hands.
Baubles of love
An ornament made of threads, whose name is a bauble, can be not only woven from different threads, but also twisted from one. For lovers, they are usually made from red threads. This is a symbol of love. In the center of such baubles, either identical beads are put on, or the letter that is the first in the person's name. Making this product is easy. A dense red thread is taken. Having hooked it on some kind of strong base (a hook, the back of a chair or a cabinet handle), they tie a knot and begin to twist the two threads together. Approaching the central part of the bracelet, make several knots. Then they put on a letter or a bead and again tie the same number of knots so that the product looks symmetrical. Then again, the two threads continue to twist.

At the end, a knot is made that will be inserted into the first turn of the thread. It will play the role of a lock fastening a bauble on the owner's wrist.
Lovers wear such products as a sign of eternal love. Make them the same.
You can make any products from threads, it is not difficult to make them, and you can embody any creative ideas.
Natalya Plakhteeva
Neck jewelry is what women all over the world wear. Beads, necklaces and bracelets are probably the most ancient jewelry. No matter how old a woman is, these accessories always complement the outfit, create a unique, individual image.
There are never too many decorations on the neck, each of them must correspond to the outfit, time and place. They are also varied in shape and color and are made of different materials.
Now it is very easy and simple to buy neck jewelry. But if you want others to pay attention not to the high cost of jewelry, but to its originality, then it is better to make jewelry with your own hands.
Surely many have heard of "hand-made", but did not dare to do it for fear that the plan would not be successful.
But to create with your own hands, as this expression means in translation, the original jewelry is not so difficult and long as it might seem at first glance. Every housewife has materials for needlework: balls of bright threads, beads, satin ribbons, buttons, pieces of lace, strips of fabric and other, at first glance, “unnecessary” items.
I offer a master class in making jewelry with your own hands
Thread beads
For making I needed:
Lock.
Preparation method:
Knit stripes from colored threads

I really like to use roses made of paper twisted into flagella in my work. Now I used knitted strips of thread to make such roses.

I fastened each flower with threads and strung them on a thin fishing line, alternating with beads

Original beads turned out in such a simple way

I have accumulated a lot of shreds, satin ribbons and beads - they can be used by making an original set - a necklace and a bracelet.
First, from brocade patches, I sewed several large beads filled with padding polyester

Then, alternating them with small plastic beads, I strung them on a fishing line. I braided satin ribbons of white, gold and red color with a pigtail and sewed them to the extreme beads. The length of the ribbons must be chosen so that the finished necklace is freely threaded over the head, or you can tie the ribbons on the back of the bow

I made the bracelet the same way.


Exclusive handmade jewelry always looks very original and stylish.

Such a gift to relatives and friends, I hope, will be doubly pleasant, because it was created with love and presented from the heart!
Related publications:
For the manufacture I needed: - knitting threads; - knitting needles; - household non-woven napkins; - a box of chocolates. Way.
Rosette for March 8 from paper A holiday is approaching - International Women's Day on March 8! And I want to do something with my own hands, something.
Master Class. Willow with your own hands. Hello, dear colleagues, today I want to bring to your attention a master class on manufacturing.
Every teacher dreams that order and tranquility reign in the group. It takes very little to make this dream come true. You just need to take it.
I invite everyone to our workshop. Today we will make a gift to all those whom we love. 1. We take wire and corrugated paper, red.
It is very important that parents are active participants in all activities in the group. Our parents are just like that. They support any of ours.
You will need
- - Knitting thread;
- - threads for felting;
- - crochet hook;
- - a hook for felting;
- - beads;
- - starch;
- - fishing line;
- - accessories for beads.
Instruction
Beads can be made from ordinary ones. To do this, take two rectangular pieces of cardboard, wind threads around them, pass one thread between the cardboards, and then cut the threads so that you get a pompom. Having made several pompons, you can use beads from them.
If the threads are dense and look like thin waxed shoelaces, wind them a couple of dozen turns around your assistant's stretched arms or, for example, around a saucepan. Carefully make an incision on the received. The result should be equal segments of threads. Take a few large wooden beads or beads from. You can also use pendants. String beads or pendants on cut strands. You can string beads on separate threads or leave gaps between them by tying knots. Then take wide bead clasps and pinch them at the ends of the cut strands. Also, threads can be braided into a braid.
You can also make openwork beads. To make beads from knitting thread, take a crochet hook and crochet small openwork squares or circles. They should resemble small napkins. Make five to seven parts that are in harmony with each other, starch them and connect them with a pair of threads. Beads of a suitable color can be strung on the connecting threads, with the help of them you can also distinguish between knitted elements of the beads. You can knit beads not from separate elements, but in the form of a lace collar.
Another version of knitted beads suggests the presence of base beads. These should be large beads of any material. Such beads must be tied with threads using a hook, and then collected on a thread or fishing line. By tying beads, you can make a tight knit or an openwork pattern. Beads or sequins can be sewn onto tightly tied beads.
If your threads are woolen and have a fairly loose structure, you can knit the beads. For the same purpose, you can take felting threads and a special hook. Take dark loose woolen threads, mix them so that the wool fibers are located in different directions, then wind them into a small ball. Stick into this ball and take out the felting needle, holding it strictly vertically. Turn the ball, dumping the wool until a bead of the desired density and shape is formed. Such beads are pierced with a needle and collected on a fishing line. They can be decorated with beads, sequins or ribbons. Also, these beads can be combined with ordinary glass, wood or others.
In the new review, the attention of readers to 12 stylish jewelry at once, each of which can be made with due diligence and attention to the issue with your own hands. Definitely, any of these crafts will help to make a positive impression on others, so watch and remember.
1. Thread earrings

Original long earrings that will be a great addition to both everyday and evening looks, and the process of their creation will take no more than half an hour. To create such earrings, you need a skein of floss threads of the color you like, which you need to carefully cut, form two tassels, attach loops to them, fasten with a thread of a contrasting color and put on the base hooks, bought in a specialized store.
2. Pin necklace

From safety pins of the same color and size, beads, two strong cords, you can create an unusual and very effective necklace that will become an exquisite addition to any look.
3. Resin pendants

From epoxy resin, without special skills and efforts, you can create incredibly beautiful pendants. To do this, you need to put dried flowers, shells, beads or sparkles in special silicone molds, fill them with epoxy resin, pre-mixed with a hardener, and wait for it to harden.
4. Glitter pendant

A simple and at the same time very attractive shimmering pendant that you can make yourself from a metal base, decoupage glue and sparkles. Sequins should be carefully laid out in layers on a base greased with glue. Each new layer must be smeared with glue and filled with glitters until they fill the entire pendant.
5. Bright necklace

A stunning large necklace made of dyed beans will be a wonderful addition to the spring and summer look. Painted beans, together with accessories, must be glued to thin plastic according to a specially prepared template. When the layout is finished and the glue dries, the necklace must be carefully cut out, holes made on the sides and fastened to the chains.
6. Asymmetrical necklace

An original asymmetrical necklace in the style of Christian Dior, which can be made from a hoop by sewing strings of beads of different lengths to it.
7. Choker

Trendy choker with a ring in the middle, which is not at all difficult to make with your own hands. To do this, using glue and a small ring, you need to fasten two identical pieces of thin velvet ribbon and equip the product with a clasp or ties.
8. Massive necklace

An original massive necklace made of rope and knots, which, despite the simplicity of its creation, will become a universal decoration and addition to any outfit.
9. Necklace-harness

An ordinary clothesline can be braided with threads of beads and create a unique and very beautiful neck decoration that will undoubtedly draw attention to its owner.
10. Wooden earrings

From small wooden blocks, special accessories, glue and varnish, you can make unique long earrings that will surely appeal to all lovers of natural materials and connoisseurs of creative things.
11. Dreamcatchers

Simple in execution, but at the same time beautiful and airy talisman earrings that you can make yourself from special accessories, small rings, wire, threads and feathers.
12. Volume necklace

Leather accessories always look expensive and elegant, and if the product is also made with your own hands, it automatically becomes exclusive. Getting a unique necklace is not difficult at all. You just need to cut out several identical petals from the skin, give them the desired shape, fasten them together with glue and connect them with a chain.
When you think about threads, the first thing that comes to mind is knitting or sewing. But the boundless world of fantasy is not limited to these activities.
Yarn can be used to create delightful decorations that will help emphasize your personality. And also you can easily get rid of the remnants of threads that are a pity to throw away, but there is nowhere to use them. Stock up on patience and yarn and rather "dive" into the deep pool of "tangled" pastime.
1. Thread hairpin.
Once you learn an easy way to create a cute hair accessory, you will no longer be buying tons of hairpins in stores. You will need: threads, buttons, elastic or invisible, decor elements. Wind the thread around the index and middle fingers. Choose the thickness of the winding yourself. Then rewind the resulting skein once or twice in the middle. You will get a bow. Use glue to glue the button in the middle. Remember that the size of the button should be commensurate with the resulting bow. Then attach a bow to an elastic band or invisible. If desired, you can use multi-colored threads and a variety of decor: beads, sequins, pearls.
2. Twisted scarf.

The second name of such a scarf may well be an “anti-knitted” scarf, since neither knitting needles nor hooks are used in the process of its creation. Surprise others with a stylish and beautiful thing that you will not want to part with. You will need: thread, glue, fabric, leather, scissors. Take a chair and wind the yarn around its back several times. Bandage in three or four different places. It is these places that will need to be covered with leather inserts. Fix them with glue. If desired, you can decorate the scarf with beads or sequins.
3. Ball vase.
A wonderful version of an unusual vase that is suitable for flowers. You will need: a ball of thread, a small container of water, acrylic paint, a brush. Take a ball of yarn and make a hole in the middle with your finger. Then use paint to paint the ball in the desired color. Dry. Take a container of water and place it in the middle of the ball. Add flowers to taste and enjoy your new piece of furniture.

If you are a supporter of multi-colored decorations in the house or dream of surprising your loved one with a stunning gift, then this method is just for you. You will need: noodle (a flexible stick for swimming in the pool), scissors, yarn of different colors, PVA glue, glue moment. Take the noodle and use instant glue to glue the ends together to form a circle. If it seems to you that the size of the circle is too large, then cut the noodle to the required diameter. Take a piece of yarn and tie around the circle, forming a loop on which you can hang a wreath. Then take the yarn and start winding the circle. The beginning can be fixed with a glue-moment. Periodically lubricate the noodle area with PVA glue, and then wind the thread. Continue until there are no gaps left on the circle. Fix the end of the thread with glue-moment. Decorate with all sorts of decorations if desired.

An alternative version of the multi-colored wreath, which will especially appeal to children. The wreath turns out soft and fluffy, and in combination with other wreaths it will look wonderful. You will need: multi-colored yarn, thick cardboard, scissors, marker, glue gun, glass, plate. Take cardboard, a glass and a plate. Using a marker, circle the plate first on the cardboard, and then the glass in the center. Carefully cut out the base of the wreath. Then take the yarn and wind it around two fingers. As soon as you reach the required thickness, cut the thread with a margin. Rewind the resulting skein in the middle. Try to wrap it tight enough. Then carefully remove the skein from your fingers and tie a knot. Take scissors and cut the resulting bow along the sides. Fluff the pompom and trim with scissors. Make the required number of pompoms to cover the entire area of the cardboard blank. Take a glue gun and fix the pompoms on the cardboard. The wreath is ready.
6. Yarn bracelets.

Bracelets made of yarn will fit perfectly into any look and will be able to please you for a long time. The main thing is that you can create bracelets of different colors and patterns. You will need: old bracelets, yarn, glue moment, decor (if desired). Take the yarn and wind the bracelet so that there are no gaps. Secure the end of the yarn with superglue. Decorate with beads or other decorative elements if desired.
7. Boxes of yarn for small things.

In order to get rid of the constant search for some small thing in your house, try to make a specially designated "cache" for things. You will need: yarn, scissors, empty milk carton, stationery knife, glue gun, decor (optional). Take a milk carton and cut off the top. The size of your box depends on how much you cut off. Take the glue and put a small amount on the box. Wrap the box with yarn, periodically smearing it with glue for better fixation. Dry. Then cut off a small amount of yarn and twist the spiral. Use glue to attach to the box. Make some spirals for decoration. An irreplaceable thing for the house is ready.
8. Clothes for Easter eggs.

Treat yourself and your loved ones with an unusual decoration of Easter eggs. You can use boiled eggs, or use small holes to blow out the contents of the eggs and use only the shell. For the shell version, the eggs must first be rinsed with water and dried. Using glue on one side, attach the end of the thread. Next, wind the yarn around the egg and also secure with glue at the end. You can decorate such a lovely egg with ribbons, rhinestones, beads.
9. Floral pom-poms.

If you want to give an unusual gift for a loved one, then you need to know how to create wonderful decorative pom-pom flowers. The bouquet turns out bright and interesting and can fit into absolutely any interior. You will need: yarn, scissors, legs from decorative flowers (you can use ordinary wire and green tape), glue. Wrap the yarn around two fingers. As soon as you reach the required thickness, cut the thread with a margin. Rewind the resulting skein in the middle. Try to wrap it tight enough. Then carefully remove the skein from your fingers and tie a knot. Take scissors and cut the resulting bow along the sides. Fluff the pompom and trim with scissors. Make the required number of pom-poms. Attach the pom poms to the legs using glue. If you have only wire and tape, then pre-wrap the wire with tape and fix it at the ends with glue. A bright fluffy bouquet is ready.
10. Colorful mobile.

A hanging decoration that will spice up your room and is sure to be loved by kids. If desired, you can develop a similar mobile for a crib. You will need: 3 hoops of different diameters, fishing line, yarn of different colors, gypsy needle, glue. Take the center of the hoop and wrap each with a neutral shade of yarn. Secure the end of the thread with glue. Then make multi-colored balls of different sizes from the yarn. There should be 10 balls in total. Using fishing line, tie each ring in three places. Measure the length of the fishing line depending on the desired height and the level of the rings above each other. Then tie a fishing line to each ball. First, try to assemble a separate structure from the rings. Then carefully add the balls, tying each one at a different height. The colorful mobile is ready.
11. Multi-colored spiral of threads.

If you are wondering what kind of decoration to buy for your home, then pay attention to the spiral of threads. You can make decor in absolutely any color. You will need: yarn, flat plate, glue. Take a plate and yarn. Fix the end of the thread with glue and start twisting the spiral. Alternate colors, fixing each end of the thread with glue. On the reverse side, use liquid nails to attach a hook to hang your masterpiece on the wall.
12. Decoration for shoes.

Sooner or later, even the most beloved pair of shoes begins to bother. But do not rush to throw shoes in the closet. Try freshening up your shoes with simple thread spirals. You will need: yarn, glue. Take the yarn and form a spiral out of it. If the spiral crumbles, then periodically glue the threads together. Fix the end of the yarn with glue. Do the same for the second spiral. Attach them to the toes of the shoes with glue. If desired, you can decorate on top with buttons, beads, rhinestones. A new pair of shoes is ready.
13. Fancy hats.

Little hats are a great way to decorate your plants or trees in your garden. In principle, in the apartment they can also find a place where they will look good. You will need: yarn, toilet paper roll, scissors. Cut the sleeve into small rings. Next, cut the yarn into long threads of 25 cm. Take the ring and start winding it. For winding, take one thread, fold in half. Pass the thread through the ring and insert the remaining ends of the yarn into the loop formed. Tighten. Wrap the entire cardboard ring in this way. Try to wrap very tightly so that there are no gaps at the end. The remaining “tails” are tied with a thread and cut off. The hat is ready. Tie a thread to each hat, and you can hang it anywhere.
14. Pompom chair.

If you prefer bright colors in the interior or dream of adding a color detail, then this master class will help you decide on this. You will need: yarn, wicker chair, glue, scissors. Wrap the yarn around two fingers. As soon as you reach the required thickness, cut the thread with a margin. Rewind the resulting skein in the middle. Try to wrap it tight enough. Then carefully remove the skein from your fingers and tie a knot. Take scissors and cut the resulting bow along the sides. Fluff the pompom and trim with scissors. Make as many pom poms as you need. Use glue to glue them to the surface of the chair. Dry. An unusual chair will serve you for a long time.
15. Garlands of yarn.
A decorative element in the form of balls will decorate even the most gray room, so feel free to grab your tools and start brightening up your life. You will need: balloons, PVA glue, yarn, decor (optional). Inflate the balloon to the desired size. The size of the final result depends on the balloon. For convenience, pour the glue into a bowl. Take the thread and dip it in the glue. Then start slowly winding it around the ball in a chaotic direction. After you're done, leave the balloon for a few days. As soon as the balloon dries, we pierce the balloon with a needle and carefully pull it out. Light lace ball is ready.
16. Gift wrapping with yarn.

Today there are a huge number of options for gift wrapping. Most of them are not original. But on a holiday you always want something unusual, so the decor of a gift with threads will make a real impression. To do this, you will need: multi-colored yarn, a gift, scissors, neutral-colored wrapping paper. Pack your gift first. Then cut the yarn. The length of the threads will depend on the size of your gift. Start wrapping the gift gently, forming a certain pattern. Tie each thread into a knot or bow. When finished, trim the ponytails with scissors. Your gift is ready.
17. Necklace braid made of yarn.
To create such an unusual necklace, you will need: yarn, scissors. Take the yarn of the desired color and cut long threads. The length depends on how long you want the scarf to be at the end. Collect 3 long bunches from the resulting threads. Then carefully tie the bundles together without tightening the knot. Start braiding a regular pigtail. As soon as you reach the end, then untie the starting knot and connect to the end knot with a knot. Alternatively, you can sew the seams or mask with a piece of fabric or leather. Decorate if desired.
18. Thread floor lamp.

If you want to change the look of your home but don't know where to start, then this tip will help you. Most likely you have a simple inconspicuous floor lamp that makes your room gray. Add bright colors by decorating it. You will need: yarn, floor lamp, glue. Take the top of the floor lamp. Then pick up the yarn and drip a little glue to fix the beginning of the thread. Attach the thread and start wrapping the floor lamp in a circle. Try to make it as tight as possible. If desired, you can use multi-colored yarn. Also fix the end of the thread with glue. Decorate with decor. The new floor lamp is ready.

All owners of long hair are familiar with the fishtail hairstyle. This is a fairly simple and interesting variation of a regular braid. But so often you want to decorate an inconspicuous braid with something unusual. Yarn can easily cope with this task. You will need: yarn, scissors. Comb your hair and divide it into 2 sections from ear to ear. Pin up the top part of your hair. Cut the yarn into threads. Calculate the length by your own hair, multiplied by 2. Then grab a small strand of hair and tie a thread at the roots. Repeat with the remaining yarn. 7-9 strands are enough for one braid. Lower the top section of your hair and braid. Trim the remaining threads with scissors. Summer and youth version of the hairstyle is ready.
20. Candlestick made of threads.

If you are planning to spend a romantic evening or create a pleasant atmosphere, you will definitely need candles. But in order to impress a loved one with an unusual presentation, you will need: a large candle, a tin can, yarn, glue. Rinse and dry the jar thoroughly. Take a candle and place it in a jar. The height and width of the candle depends on the size of your jar. Then fasten the beginning of the yarn at the top of the jar and start wrapping. You can wind in the middle, bottom, top or completely. Also fix the end of the thread with glue. A wonderful romantic candlestick is ready.
21. Panel of thread hearts.

A wonderful gift for your loved one will be a panel of hearts. Creating such a gift will not require much time and money, and the result will be amazing. You will need: thick cardboard, medium hard cardboard (wood can be used), glue gun, yarn. Take a piece of thick cardboard and cut out the base on which you will attach the hearts. Make hearts out of medium hard cardboard. You can buy wooden hearts. Take the yarn, fix the beginning of the thread with glue and start wrapping the hearts according to their shape. Try to make them slightly convex. Repeat with the remaining hearts. Fix on the base with glue. If desired, you can put it in a frame and decorate with additional decor. Confess your love beautifully!
22. Bookmark for a book.

The perfect craft for all book lovers. You will need: yarn, scissors. Wrap the yarn around two fingers. As soon as you reach the required thickness, cut the thread with a margin. Rewind the resulting skein in the middle. Try to wrap it tight enough. Then carefully remove the skein from your fingers and tie a knot. In addition, cut the thread and tie it again. Cut the resulting bow on the sides. Fluff the pompom and trim with scissors. Miracle bookmark is ready.
23. Letters from threads.

Recently, the use of decorative letters in the interior, during festive events or at a photo shoot has become especially popular. In order not to specifically acquire such letters, you will need: yarn, cardboard, marker, scissors, glue. To create letters, you need to cut out the letters themselves from cardboard in the size that is needed. Then fix the beginning of the thread and start winding the letter. If you can make three-dimensional letters, then the principle of wrapping is a little different. To do this, you will need to pre-cut the yarn into small pieces. Then, using glue, process the edges of the letters with this yarn. Next, take the yarn and start wrapping the letters themselves. Secure the end of the thread with glue. Optionally, you can decorate with beads or rhinestones.
24. Weaving for office supplies.


All people who have worked in an office at least once in their lives know that the variety of office supplies is endless, but among the countless things there are those that can be decorated. You will need: any mesh surface from stationery, gold spray, a needle with a large eye, yarn, scissors. Spray paint the mesh parts and dry. Cut a 2-meter thread and insert into a needle. Start cross stitching your desired pattern. Once the thread runs out, just cut it off. The stitches won't fall apart. Continue embroidering until you have a finished pattern. Begin each row under the previous one. An excellent lesson for a free minute in the office is guaranteed.
25. Hanger of memories.

Create a real corner of your desires or memories in your room using hangers. You will need: hangers, yarn, clothespins, photographs, glue. take hangers and wrap with yarn. Fix the beginning and end of the thread with glue. Then carefully place one hanger on the wall, hang the second from below. The number of hangers depends on your desire. Then use the clothespins to place the photos. Your personal corner of memories is ready.
26. Decorative brushes.

If you decide to freshen up a boring decoration, then you urgently need to try this method. You will need: long decoration, yarn, scissors, glue gun, pliers, jewelry parts for fastening. To make tassels, take any flat object and wind the yarn around it several times. Then carefully remove and cut one side with scissors. Place a jewelry cap on top of the other side with glue and attach it to your product on thin details. In the same way, you can make tassel earrings.
27. Wooden decor with yarn.

An original way to decorate your walls with an original composition of bright wood with threads. To do this, you will need: ordinary wooden knots, spray paint, multi-colored pieces of fabric, glue, yarn. Pre-paint your sticks with white paint. It will be much better if you leave unpainted areas. Dry. Then, using glue, fix colored pieces of fabric around the pieces of wood in a chaotic manner. Take the yarn and wind it several times at the junction of the fabric and sticks. Repeat with each seam. If desired, you can wrap the sticks with just yarn. Assemble the resulting pieces of wood into a beautiful composition on the wall.
28. Decorative pumpkin.

A great decor option for a festive table or creating a special entourage. You will need: a small pumpkin with a long stem, orange yarn, masking tape, brown floss, scissors. Take your yarn and start wrapping around the pumpkin. Try to wrap diagonally crosswise and make sure there are no gaps. The end of the thread can be fixed with glue or hidden under the main yarn. Then cut off a small piece of tape and glue the leg. Take floss thread and wrap the leg. A small pumpkin for your holiday is ready.
29. Cutlery decor.

Many nutritionists in the world agree that it is necessary to eat in a beautiful environment, so all appliances should be pleasing to the eye. Especially cutlery, which most of the time is in the hand. You will need: yarn, cutlery. Take a fork and wrap the handle with yarn. Hide the end of the thread under the threads. Repeat the same with all cutlery. A unique dining set is ready.
30. Modern panel.

Take a break from everyday life by creating a beautiful yarn wall mural. You will need: yarn, photo frame, cardboard, red marker, glue gun. It is advisable to purchase a white frame in vintage style for the panel. Get rid of glass. Then measure the size of your frame on cardboard and cut it out. Draw parallel lines with a red marker. Twist the yarn into small balls. Use glue to fix the balls on the cardboard, leaving the red marker visible in some places. The panel is ready. If desired, you can create a series of such panels, which together will make up a whole composition.
31. Earrings from paper clips.

Do you dream to surprise all your girlfriends and show off your skills!? If so, then feel free to grab the materials at hand and start creating beauty. You will need: paper clips, yarn, pliers, jewelry hooks, glue moment. Take 2 paper clips and twist them into triangles. Then wind the paper clip with yarn, periodically grabbing the entire surface of the paper clip. Fix the end of the thread with glue. Carefully add the hook. Decorate with beads if desired. There are a lot of options for such earrings, so experiment and wear your jewelry with pleasure.