If you do not know what to do with yourself at your leisure, try weaving bracelets. This activity has many advantages: you develop fine motor skills, give a flight of fancy, create unique, truly exclusive jewelry, and, of course, replenish your supplies of accessories. There are many different types of these ornaments, each of which has its own advantages and weaving techniques. You will learn how to weave bracelets from laces, paracord and ropes with your own hands from our today's article.
How to weave bracelets from laces
Laces are an excellent material for weaving bracelets. It can be thick or thin laces, fabric and leather, laces of a wide variety of colors and textures. In one bracelet, you can use as many laces as you like. A little tip: do not forget about the right color combinations and try not to overload the composition with ten different laces. Below in the photo you can see techniques that are perfect for beginners:

Sometimes bracelets made of laces alone look rough, then they should be diluted with delicate and romantic beads:


A leather bracelet will look stylish and fashionable. Just take some leather laces or ropes and make a simple but elegant braid:

Videos on the topic will help you understand the details:
Paracord bracelets are a type of cord bracelets. Paracord is a thin nylon elastic cable that was originally used in the manufacture of parachutes. Below you can see how to make a cobra style paracord bracelet:

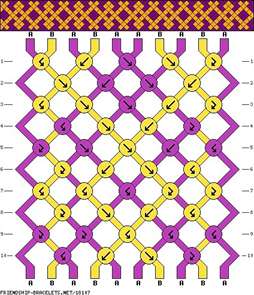
How to weave a friendship bracelet with your own hands
A friendship bracelet, or colloquially a bauble, is woven from thin threads. Just here you can absolutely not limit yourself in the number of flowers, the more there are, the more colorful and pretty the bracelet will turn out. Weaving them is not so difficult, you can see some schemes in the photo below:


Such bracelets can be worn three or more at a time, they do not overload the image, especially if you choose the right color scheme.
Rubber bracelet
Bracelets made from a variety of colored rubber bands came into fashion quite recently and immediately captivated the youth. Such bracelets are very inexpensive, and even an absolute beginner can make them on their own. They look bright and fresh, making them a suitable accessory for teenagers.
A rubber bracelet can be made in several ways:
- on a special machine. To make a fishtail bracelet, take one rubber band and twist it into a figure eight. Next, place your figure eight on a special machine and add two untwisted rubber bands to it. When adding each new elastic band, lift the tip of the first elastic band using the protruding parts of the loom. Do this until the length of the bracelet is satisfactory:
- On a fork. This option is also suitable for beginners. To do this, take an elastic band, twist it with a figure eight and fold it in half to get one small ring. After that, place it on the middle tines of the fork. Do the same with the outer tines of the fork on both sides. Next, put another small ring on the middle teeth and “throw” the ends of the first gum over it. Repeat these steps until you complete the bracelet.


Paracord survival bracelet
If you are a seasoned tourist and cannot imagine your life without hiking, then this bracelet will become your indispensable assistant. The survival bracelet is made from paracord, so it is lightweight, durable and flexible. In addition, this is probably the most multifunctional bracelet in the world. With it, you will be able to:
- build yourself a shelter;
- organize a dryer for things;
- repair tools;
- stop bleeding using the bracelet as a tourniquet;
- collect a homemade bow;
- collect a fishing rod and catch fish;
- build snares;
- make a lifeline
- and much more.
The length of the cable in such a bracelet is from three to five meters, while it is comfortable and almost invisible, such decoration is extremely easy. We can add various useful things to the bracelet, for example, a small blade, a carabiner, a metal token or a capsule.
Many needlewomen are fond of such a type of creativity as weaving. This needlework uses cords, hemp and clothesline. You can weave anything, from decorative elements in the interior to original decorations for clothes. Weaving rope bracelets is so exciting that this activity can lure you for a whole day, or even become your favorite hobby. After all, these products can be a great gift for a loved one or girlfriend.
Hidden meaning
Or ropes were woven in ancient times. Jewelry was inexpensive and used as an addition to clothing. Nowadays, hippies have aroused interest in these products by introducing a fashion for lace accessories. A rope bracelet, which adorned the hands of a person, was popular with people of this direction. It is known that when creating such an accessory and using different colors of cords, woven stones, beads, medallions, the master put a certain meaning into jewelry. Weaving for good luck, for attracting positive energy, for protection from evil spirits and for other ritual conspiracies. Today, a rope bracelet is not only a hit of the season and decoration, but also a helper for those who love to travel and go hiking.

Survival Bracelet
Going out of town, to nature is a pleasant activity, but not always safe. Therefore, going on a hike, tourists stock up on all kinds of equipment. And of course, a coil of rope will be needed. With its help, you can dry wet clothes, repair damaged equipment, when you get a deep wound, you can use it as a tourniquet, and much more. A special rope bracelet for tourists is a multifunctional accessory that can perform all the above actions. When woven, it looks original on a man's hand, but when it is needed, the bracelet unwinds in a few seconds with one movement, forming a strong cord about 5 meters long. Necessary items can be woven into the bracelet, such as a knife, fish hooks, a whistle, a name tag.

Bracelet weaving
Prepare a cord 5 m long (a clothesline is suitable for training), a lighter, a clasp, scissors. Burn the ends of the cord with a lighter, preventing them from unraveling. Fold the rope in half and thread the loop through one element of the fastener. Insert the ends of the cord into the loop and tighten.
To be your size, measure your wrist and form two loops equal to the volume of your hand. Lift the ends of the cord up to the clasp. To fix the length of the measured loops, wrap all the threads with the left end of the cord, and then pass under the right loop. Lay the opposite end of the rope under the first, then stretch it over the loop and under the second loop, leading it from bottom to top into the hole formed on the left side. Tighten the resulting part of the knot.
Then pull the right end of the rope between the loops from the bottom up. Put the left part on the cord and stretch under the first loop, bringing the end over the second, and bring it into the hole formed by the right end from top to bottom. The knot can be carefully tightened. Please note that in the first half of the knot the ends of the rope will look up, and in the second half they will look down. We thread the remaining small loops into the fastener, solder the two ends of the rope so that they do not bloom. We learned how to make a rope bracelet with our own hands.

simple weaving
Consider how to weave an original bracelet for a woman's hand. Beads will be woven into this decoration. Therefore, pick up a few identical decorative ornaments that you like. The main thing is that the number of beads is enough for your hand size. We will also need glue, fastener elements, thread and clothesline of any color. To determine the length of the bracelet, wrap the cord around your wrist twice and add another 15-20 cm. Fold the rope in half, forming a loop, tie a thin thread to this place. Put the middle of the cord into the carabiner and glue the place with glue. Then wrap one end of the rope with a colored thread and put on a bead, then repeat with the other side of the rope, again threading the thread into the next bead. Continue working, weaving to the desired length.

Thus, the middle of the bracelet will consist of beads arranged one after another. Finish by attaching the thread to the rope and gluing it to the second half of the carabiner.
Rubber bracelets how to weave? If you are asking this question, it means that you have already purchased a wonderful set for creativity - Rainbow Loom or Loom Bands. Usually, such a standard set includes: a special loom and a slingshot for weaving, a hook, clips for connecting bracelets and a certain number of small rubber bands of several colors - from standard to bright neon.
The very weaving of bracelets from rubber bands originated in America and has already spread throughout the world. This new type of needlework conquered the world with the availability of materials and the simplicity of the technique. Passion for weaving from rubber bands is characteristic of girls and girls, who in this way can enjoy not only the process, but also the result obtained in the form of new bright accessories. After all, every girl dreams of a large number of unique and original accessories that can be woven to each outfit in suitable colors. In this regard, this hobby will bring real pleasure to fashionistas - they will receive a lot of beautiful, unique, bright bracelets, necklaces, rings, earrings, pendants and even mobile phone cases.
How to weave bracelets from elastic bands will be prompted by detailed instructions with pictures on the site Maximum ideas. It is definitely worth starting with simple weaving patterns in order to gain weaving experience and not discourage the desire to engage in this hobby once and for all. It should also be noted that the manufacturer recommends weaving accessories from rubber bands from the age of 8.
Read this article:
Elastic band bracelets how to weave a fishtail on your fingers
One of the simplest, basic weaves is the weaving of a bracelet using the fishtail technique. For this scheme, you can use various devices - a weaving loom, a slingshot (which is included in some kits), a table fork, or you can simply weave a fishtail bracelet on two fingers.
To make a bracelet on your fingers you will need:
- about 50 pieces of rubber bands of the same color;
- 1 clip for connecting the bracelet;
- actually fingers)
How to weave a fishtail bracelet on your fingers?
For your first bracelet, take rubber bands of the same color so as not to get confused and understand the technique. In the future, when you understand the concept of weaving, you will be able to boldly create color compositions and unique models of bracelets and other jewelry.
Take three rubber bands. Put the first on the index and middle fingers with a figure eight, as shown in the photo.

Put on the next two rubber bands without twisting.


Thus, the lower rubber band should hang on the other two, forming such a loop.

In the next step, put on the fourth elastic band (all elastic bands, except for the first one, are put on without twisting). Each time, grab the bottom elastic band by the edges and pull it through your fingers.

Repeat these steps until you get a bracelet of the required length.

To complete the bracelet, secure the ends of the outer elastic bands with a clip.
 To do this, hook the clip on the last rubber band.

On the other hand, hook on a full-fledged loop (it was the second in a row at the beginning of weaving), and cut and remove the first one (which was the “eight”).
A rubber band bracelet woven on the fingers according to the fishtail pattern is ready!
Rubber bracelets how to weave on a slingshot
Some Rainbow kits come with a special device for making bracelets - a slingshot. It looks something like this:

You can weave on a slingshot in the same way as weaving on your fingers. You will need the same materials: about 25 yellow and 25 pink rubber bands (this time try using two contrasting colors for a prettier bracelet), an S-clip, and a weaving slingshot.
Take a yellow rubber band and put it on the slingshot with a figure eight.


Grab with your fingers (you can also do this with a hook from the set) the lowest elastic band and lift it up.

You do the same on the other side.

Put on a rubber band in a contrasting color again and repeat the previous steps.

We continue to weave until we get a bracelet of a suitable length.

Connect the ends of the bracelet with an S-shaped clip, as described in the previous diagram.

Rubber bracelets how to weave on a loom?
Similar bracelets can be woven using a special machine. This machine looks like this:

Rows with columns are removable and can change position for different weaving techniques.
To weave a simple fishtail bracelet, you need to follow the same steps, but instead of fingers and a slingshot, use the two extreme posts from the loom. This is how it looks like:

And this photo shows ready-made rubber bracelets woven according to the above master classes.

Rubber bracelets are an indispensable summer accessory for fashionistas of all ages. And it is not at all necessary to buy a stylish little thing, it is quite easy to weave it yourself with the help of elementary devices. Do not rush to make an intricate decoration, learn from simple patterns, fill your hand, then you can easily master intricate weaving.
How to weave a bracelet from rubber bands on your fingers
A simple way is weaving on the fingers, according to the technique - a fishtail. Prepare: 50 multi-colored rubber bands, clasp.
- Throw 1 rubber band, folding it into a figure eight, on the index and middle fingers. From above, fasten 2 more elastic bands without twisting.
- Pull the bottom elastic over the edge, tightening it with a knot between your fingers.
- Put on 4 elastic bands, and discard the bottom one from the edges. So follow to the desired size of the bracelet.
- Remove the work from the fingers, remove the two remaining rubber bands and hook the hook into the last loop.
The bracelet is ready - fashionable, handmade, made by yourself. Dress up, boast, shine in front of girlfriends and friends.
How to weave a rubber band bracelet on a slingshot
It is not difficult to make a fashionable bauble on a plastic slingshot, which can be purchased at a needlework store. You will also need 100 pieces of rubber bands in two colors, a clip to connect the bracelet. Weave a "French braid":
- take the slingshot with the horns up and the recesses towards you. Stretch the red elastic band with a figure eight, then the yellow and red ones - without twisting;
- grab the lower elastic band with a hook, lift it up and remove it from the column, the same from the opposite side;
- put on a yellow band. On the left side, pull off the red blank to the center of the bracelet, and the yellow blank from the right column;
- weave to the desired length, and when two elastic bands remain on each column, crochet the lower elastic bands. Throw the last elastic band to the opposite column. Attach the clip to both rubber bands. In the finished decoration, fasten the second side with a clasp.

How to weave a bracelet from rubber bands on a loom
Weave an Asterisk bracelet and get a trendy piece for a summer outfit. You will need a special machine - sold in hobby stores, elastic bands, clip.
Step one - designate a rectangle
Position the apparatus so that the concave side of the pegs is not facing you. Thread the black elastic over the initial pegs of the 1st and left rows. Tie all the pegs except the last one in pairs with black rubber bands. Get the selected rectangle.


Step two - the base of the bracelet
We will work with the central pegs, each even of which is the middle of the asterisk.
- Connect these pegs with multi-colored rubber bands to adjacent columns, starting from the 2nd column of the first row.
Important: work clockwise.
- Connect the 4th central column with the neighboring ones, forming an asterisk.
- Fold the elastic band of the main color into a ring and put it on the last column of the middle row. Do the same with the following details.


Step three - shaping the beams
Set the machine so that the last sprocket is the initial one.
- Grab the elastic from the middle post and slide it over the core post. From the right column, counterclockwise, remove the elastic bands, throwing them over the rays. Work like this until the end of the workpiece.
- Take the black rubber band that connects the extreme columns of the middle and left rows, and transfer it to the left peg. Combine the bars on both sides with rubber bands - 1-2, 2-3, 3-4 and beyond.
- Place the device with the pegs facing you. Pry the hook through the loop of the outer column, taking a black elastic band, and tie a double knot.
The work is ready. Make a loop at the end of the bracelet and remove the product. Crochet a chain from the loop and connect the ends of the decoration with a transparent clip.


Use our tips, weave and wear exclusive bracelets that will bring bright colors to your everyday look.
Today we offer you to make fashionable bracelets with your own hands.
Thread bracelets have become mega popular today. Such a bracelet is worn not one at a time, but in whole rows in several copies. On the hands of such bracelets look very stylish and fashionable. Well, today we propose to make such a bracelet with your own hands. Look at the photo and video, choose the bracelet you like and start learning. All you need (depending on the type): floss, beads, chain, button, golden nuts, ring, scissors and duct tape. Good luck!
Weaving bracelets
How to make a thread bracelet
You will need: floss thread or lacing, large beads, scissors and a button.

Measure the required number of threads so that we get a cut that, folded in half, will be equal to: 1st side 66 cm, 2nd 48 cm. Then, we fold it in half (see photo). You should get 3 identical threads and 1 short one.

At the very top, retreating about 1.5 cm, we make a knot. Cut off the short 4th thread.

Start weaving. Weave 2.5 cm and thread the beads into the left strand.


Again, left-empty-right. Here's what you should be able to do.

Weave on your wrist. At the end, we also simply weave about 2.5 cm (as at the beginning). We make a knot.

We thread a button at one end, two threads in each hole. We tie a knot.

Cut off excess threads. Here we made such a beautiful bracelet made of threads and beads with our own hands.

Ah, here's what they look like in different colors.

And on the arm. Very stylish. Is not it?

Macrame bracelet

To weave a macrame bracelet, you will need: 3.5 m of thin colored lacing, a flat ring, an embroidery needle, scissors, and adhesive tape.

Cut the lacing into pieces: 2 x 70 cm, 2 x 50 cm and one 25 cm. Fold the 50 cm piece in half and pull out the loop on the ring. Also repeat on the other side of the ring (see photo).

We take a 70 cm cut, fold it in half and make an air loop, wrapping it around our 50 cm cut. We throw the left side of the 70 cm cut on the right and thread it inward as shown in the figure on the right.

Pull to the end and slide the resulting knot tightly, to the very top.

Now we make an air loop on the other side. This time we throw the right side on top.

Make a tight knot again. Continue weaving macrame: to the left, to the right, to the left, to the right, etc., until the length of your wrist is necessary.

Upon completion of weaving, insert the needle in turn from one side and the other and pull through 2-3 knots as shown in the photo.


Cut off excess threads.

Now take the remaining 25 cm section and pass it through the outer strands on both sides, tie as shown in the photo.

We begin to weave macrame as at the beginning: left, right, left, etc.

Having made 5-6 rows, we also sew them with a needle.

We make knots on both sides and cut off. If the last steps seem difficult for you, you can simply weave macrame around the entire perimeter of the bracelet.

Your original macrame bracelet is ready.

DIY beaded bracelet

For such a bracelet with beads you will need: leather cord, colored lacing, beads connected together, a nut.

Fold the leather cord in half to form a loop, which should be the right size for the nut, as this will be the clasp. Start wrapping the leather cord with colored lacing (6-7 times).

Lay the beads along the cord and continue to wrap each bead with lacing.

Continue wrapping by measuring the length around your wrist.

At the end, make another 5-6 loops and tie a knot with leather lacing, wrapping it around the loops.

Thread the nut and make a knot again, fixing it.

Cut off excess threads.

You can make a whole bunch of such simple bracelets.

On the hands they look very nice and modern.

How to make a friendship bracelet
Another mega popular bracelet is the friendship bracelet, which is woven from colored floss threads.

Those are the ones you'll need.

We take a pair of 6 colored threads. We tie them into a knot, leaving an extra 5 cm. For the convenience of weaving the bracelet, we will fix its upper part with tape.

As in the picture: we tie together 2 extreme threads: red and orange.

Pull up and to the right to tighten tightly. Important: make double knots! Now do the same with each color (i.e. red with all colors until it is the extreme one on the other side).

Repeat the same with opposite threads.

When both red threads are in the middle, tie them and pull to the base (also twice).

We repeat weaving to the end. We get a charming rainbow friendship bracelet. You can braid it at the end.

Here, they are our beautiful)))

Isn't it lovely?

Weaving bracelets from threads and chains

All you need is colored threads, a thick bracelet chain, scissors, and stealth.

We divide the threads by color into two thick strands. We grab them with the help of invisibility and begin to pass through the links of the chain.

We carry out the first strand and start it under the other. We also draw the second strand and, again, let it go down.

We repeat the steps to the end and get a chic wicker bracelet.

Wow, very stylish

DIY bracelets video
Post Views: 8 702
Related posts:
No related entries found.