Despite the fact that a variety of toys and children's books are now sold in stores, every mother wants to make a beautiful gift for her baby herself. Therefore, sites dedicated to needlework and creativity are so popular. On them you can find photos about sewing for dolls or a video “hand made baby book”. With your own hands, using these instructions, you can create a variety of crafts. How to make a book for children?
Here are some tips for those who first decided to make a book themselves.
- First of all, you need to think over the plot and decide on the number of pages, find the necessary pictures and photos.
- The simplest baby book is obtained from a colored strip of paper folded into an accordion. For a flip book with a cover, the creation process will take longer.
- Pages for a book can be made from whatman paper, cardboard for children's creativity, pastel or drawing paper, corrugated cardboard.
- Drawings and photographs are best glued with double-sided tape: glue can soften the paper and begin to bulge after drying. If you still work with glue, then it is necessary to wipe the gluing places from its residues and place the pattern under the press.
- Volumetric parts should not be very small and poorly fixed so that the child does not accidentally tear off and eat the part they like.
- Safe, beautiful and educational - this is how a children's book should be. It is doubly pleasant to make such a book for a child with your own hands.
Folding book

To make a flip book you will need:
- paper for pages;
- decorative paper for the cover;
- Double-sided tape;
- universal glue;
- cardboard;
- scissors;
- ruler;
- pencil;
- lace or thin braid, the length of which is four times the width of the book with the cover.
Work description
- First you need to cut out two rectangles of cardboard with sides equal to the width and length of the book.
- Now, from decorative paper for the cover, cut out two rectangles with sides 2 cm larger than the length and width of the book.
- From a different color, we cut out a strip for fixing the ribbon 2 cm less than the width of the book, and one and a half centimeters wider than the width of the ribbon.
- Next we make pages. To do this, cut out another rectangle, but from paper for pages. The width of the rectangle will be equal to the height of the page, and the length will be equal to the width of the page multiplied by the number of pages in the book plus 2 pages. We fold the resulting rectangle with an accordion.
- When calculating, you must remember that on the back of the accordion you also need to mark the text and drawings. Otherwise, white sheets will remain on the other side, and you will get an unfinished baby book. With your hands, you need to go through the folds several times so that the book looks neat.
- We paste over with the help of cardboard for the cover, wrapping them with cut-out rectangles from decorative paper.
- We glue the first sheet of the accordion to the first cover, and the last sheet to the second.
- Decorating the book First, glue the ribbon onto the book with all-purpose glue. After the glue dries, glue a strip on top to secure the braid.

Now you can start writing text, drawing illustrations, gluing pictures and photos according to the chosen plot. We have a beautiful baby book. With your own hands, you can not only make a book out of paper, but also sew it out of fabric, decorating it with decorative elements: lace, appliqués, buttons, embroidery.
It will be interesting to sew a thematic book with removable applications that can be moved inside the book. Such removable parts can also be a counting material, which is very useful for a child. Pages are best made from materials of different textures and patterns. Thus, the child learns to distinguish colors, determine a smooth or rough surface, develop his tactile sensations - and all this gives one little book. With their own hands, a small child will be able to touch all the details, flip through the pages. If the book is torn, mom can always sew it up, and if it gets dirty, wash it.
Hi all.
On Tuesday, my daughter came from school with a task - to make a baby book with her own hands (a task on the outside world, they went through typography). The task for the week, that is, next Tuesday, must be handed over. At first, it took a long time to decide which work to take - the task was - small, you can come up with your own, or you can take something well-known. We decided to make a book by B. Zakhoder "The Whale and the Cat".
I’ll tell you what happened step by step, and in the middle, see a master class on covers for notebooks / books and others like them (I promised it for a long time, all my hands didn’t reach, but there is a reason). For those who have recently been with me, the book was sewn with Coptic binding (it is also a manual version of book binding), I had an MK for it somewhere in a magazine, or in the needlework community, I don’t remember already, I need to look for it.
To begin with, I created a layout in Photoshop, printed out the text and pictures in light gray font, because my daughter would not have written SUCH a volume of text completely by hand, and it would not have been even at all.
Today, when she finished writing, we started to create the book itself, not forgetting to print additional illustrations as well.
We needed iris threads, a large “gypsy” needle, an awl and scissors.
To begin with, we folded all three sheets in half, carefully ironing the folds.
After that, they took another blank sheet of paper, folded it in half, unfolded it, picked up a ruler and a pencil. They stepped back from both edges by 3 cm and every 2.5 put marks - a total of 7 marks.
After that, we sequentially put a leaflet with marks into each of the three sheets with text and pierced holes on the fold from the inside along the marks.
I inserted the needle only into the very first hole - then my daughter sewed herself, I controlled the process and suggested which hole the next needle was inserted into.
When we sewed all three “notebooks” (slang, “sheets folded together for stitching”), my daughter was very surprised and said “how is everything already ???”
Not without a second, terribly interfering "assistant"
As a result, after my request to smile, I had to take two dozen shots, of which one was more or less successful.
This is how the “block” looks like - the inside of the book after stitching.
Then I’ll show the remaining ponytails where we use it, but for now I’ll just show how the same sewn book looks from the inside.
It's inside the notebook.
And this is between the "notebooks" - there are gaps, they do not need to be put anywhere, they will not be visible later.
Since the block is stitched, let's start creating the cover. Well, and, accordingly, further will be a detailed MK .
Choose what the cover will be from. We had bumvinyl (such a special paper, you can google it), you can take thick paper, you can even take thick wallpaper, fabric - whatever your heart desires and what you have enough experience for - the easiest way to start is with ordinary thick paper (with a density of 180 g / m2 ).
We cut out 2 identical parts from cardboard, so that the cover is 1-2 mm larger than the inner block itself along the top, bottom and one of the sides (the density of the cardboard depends on your wishes, not less than 300 g / m2 exactly, if you need a straight hard cover - about 600-700 is needed, only if it is not beer cardboard - I don’t remember the numbers for it, but it comes in only one density).
The third part should be equal in height to the first two, and its width is the thickness of the innermost part plus 1-3 mm (depending on how thick the inner part is, if 5 mm, then the middle of the cover is 6 mm, if the thickness is 5 cm, then the middle of the cover and 5.5 cm will do).
We lay out the cardboard on the “fabric” (I remind you that I have bumvinyl, if you have a different material for the cover, just keep this in mind), cut off the excess part of the “fabric” so that there is 1-2 cm on each side for a hem. And do not forget to make 1-3 mm between the middle cardboard and the side ones.
First, we roughly lay out the cardboard so that the top and bottom have the same distance (a couple of mm will not play a role). We outline this for ourselves with dots, remove the cardboard and draw the GREEN line using a ruler. It is important that the green line is even, parallel to the top and bottom, otherwise everything will be skewed.
It is better to immediately glue the middle cardboard along this red line (if it is narrow, then by eye, if it is wide, we find its middle and combine the top and bottom points with the red line).
Next will be the most difficult thing, what you can get confused about, so I immediately recommend - put cardboard boxes - immediately mark them and on the very “fabric” on which they lay, put the corresponding numbers / letters / signs. Because if somewhere they made a mistake of at least 1 mm and they are not exactly the same, then confusing them in places when gluing is almost like death. Therefore, I wrote the number 1 on the cardboard, removed this cardboard, under it on the “fabric” I wrote the number 1, I did the same with the second cardboard.
Then we carefully combine the cardboard (first one, then repeat everything for the other) and the already existing green line. We retreat from the middle cardboard 1-2 mm and circle the side cardboard on two sides - in the picture it is BLUE lines .
We remove the cardboard again. And mark the cut lines. So that you don’t get confused and don’t turn the mouse back and forth, I duplicate the picture that was above.
PINK lines- just places of cuts between the side cartons and the middle one - so that everything is easily bent and there are no jams.
along the YELLOW lines cut out the corners, this is superfluous, we don’t need them (relative to the blue lines, no more than 45 degrees, the angle should be, optimally about 30, but I do it by eye).
After cutting out the corners, we sequentially glue the side cardboards, focusing on the green and blue lines (in the photo below they are black, too lazy to switch colors).
By the way, the choice of glue completely depends on what you use as a “fabric” - it is best to glue leather and paper of any kind on PVA (only take a construction one - it dries thicker and faster), and the same fabric, especially dense - on glue the moment is transparent (for example, silicone). Just don’t take any second glue - just ruin everything - you won’t even have time to apply it, but you also need to spread it evenly.
My daughter actively participated in all stages of making the book, therefore, on the same gluing of the middle cardboard, the jamb at the bottom is very visible, but oh well, but almost herself)))
Actually, the cardboard boxes themselves are glued first, then they are pasted over with a “fabric” by bending it (if it is any kind of paper, first you press and iron it without glue, it’s easier to glue it).
Moreover, the long sides are glued first - there can be the most jambs with them, and only then we try to hide these jambs by gluing the short sides.
Actually, MK can safely end here - it remains to put the cover under the press and leave to dry.
Well, my daughter and I, while our cover was resting under pressure, glued the inner block. This is done for several purposes:
- so the block becomes stronger, it will not be possible to tear out the pages by accident,
- “notebooks” stop moving up and down relative to each other (you can sew tighter, but then it turns out to be overstretched and not beautiful after gluing)
- Holes between "notebooks" are filled.
It is important to glue the block with the same glue that was used to glue the cover, so this time we have Moment Crystal glue.
Since we have a thin block, I simply pressed the ponytails to the block, when the block is thick (at least 1 cm or more) - be sure to first coat with glue, let it dry a little, coat it again a little, put gauze / bandage on top and coat with glue again - so block becomes one.
In this case, the main thing is not to overdo it - otherwise the glue may leak inside and partially glue the pages.
This is what the block looks like from the inside after sizing (I did not open it wide, yet it should dry for much longer than 15 minutes).
This is between the "notebooks" - where there was emptiness - now glue.
Well, inside the notebooks I’ll show you closer how my daughter sewed it.
We waited until the casing dries up, and proceeded to the final “finishing”.
This is what the book looks like with the inside block inside the cover.
Something is missing, my daughter told me. That's right - there is not enough flyleaf. And so we took two more thick sheets of paper, folded them in half and put them on the cover.
It is very important that the flyleaf recedes from the edge of the cover, that is, it completely coincides with that side of the side cardboard, which is closer to the middle. Glue one side of each endpaper to the cover.
That is, so that later the flyleaf opens, but one side hides all the fear and horror of the cover.
First, we outline the line beyond which the glue should not protrude. I wrote the dimensions of this space above. Since we have an A5 book size, I indented about 1.5 cm from the edge. On the other hand, the same thing.
Then we successively and very quickly apply glue to the already glued part of the block, to the middle cardboard of the cover and to the intended parts of the block (the same 1.5 cm from the edge). And we press the cover at the same time with the butt to the cover and the endpapers to the block on the sides.
Keep it like this from a minute to 5 minutes (depending on the type of glue), and then again your favorite press. Let the book dry under pressure. From half an hour to infinity - the longer - the better.
Well, my daughter and I remembered that the illustrations were left unused, so we had to urgently cut them out and stick them on a glue stick (I hope they won’t fall off tomorrow).
And here's what happened in the end:
closed book (the inscription will appear on the cover tomorrow)
This is how the endpaper and the cover are “pulled” by the glued inner block (this is how it should be for an “unread” book)
First page (which is glued to the flyleaf - the flyleaf is slightly smoothed by hand)
Pages 2-3
Pages 4-5 (formed by two different “notebooks”, this is almost imperceptible in the finished book)
Pages 6-7 (sorry, the whole picture did not fit, I only had to take a helicopter)
Pages 8-9 (pictures were requested here, but there was nowhere to put them, alas)
Pages 10-11
Page 12 ("imprint" and flyleaf)
Thank you all for watching)))
There will be questions - ask, I will try to answer them as far as possible.
P.S. I’m crazy happy with my daughter, she really did it herself under my strict guidance, I expected it to be in the spirit of “bring-give-idinafih-don’t interfere. It's nice to be so wrong in children))))
P.S.S. Inappropriate comments will simply be deleted - I have neither the strength, nor the time, nor the desire to listen to the nonsense of idiots.
Shibanova Irina
Master Class
Working on the creation of a baby book is a very exciting activity that has a complex effect on the development of the child:
Promotes the development of creativity of preschoolers;
Increases sensory sensitivity, that is, it contributes to a subtle perception of shape, texture, color;
Develops imagination, spatial thinking, general manual skill, fine motor skills;
Synchronizes the work of both hands;
Forms perseverance, the ability to plan work to implement the plan, anticipate the result and achieve it, if necessary, make adjustments to the original plan;
In the course of creative activity, children make many discoveries, achieve personal achievements. The result obtained is the first and very important stage of children's creativity.
Material: colored cardboard, sheets of A4 paper (you can use different colors, old coloring books or children's magazines, glue stick, scissors.
Description of the process of making a baby book:
1. First we make the pages. To do this, we take colored sheets of A4 paper, fold them in half (along) and cut along the fold line.


2. We coat the edge of the sheet with glue and glue it. Depending on the thickness of the book, there may be 2-3-4 such leaves.


3. We fold a long sheet of paper like an accordion.


5. We coat the edges of the cover with glue and paste the pre-prepared pages.


6. Now we proceed to the design of the book. We come up with a name and write or stick it on the cover.


8. The baby book is ready!

Other options for baby books in which the pages can be fastened with tape.


I wish you good luck and creative success!
Parents who teach children to books and reading in general are great fellows. They make an invaluable contribution to the development of the intelligence of their babies. Children's books are bright, attractive, interesting - but, unfortunately, they are not able to withstand the onslaught of tenacious little fingers. As long as the fool learns not only to love, but also to take care of books, he will tear no less paper than an office shredder! But dads and moms have other options for the development of events: such as making a baby book with their own hands and at the same time providing for the tests that she will have to endure. For the smallest children, you can make a baby book out of fabric, for those who are older, out of cardboard and / or colored paper.
Homemade baby books are also good because you can fill them with content of your choice. You can make a baby book that develops, showing colors, letters, fruits and berries, animals and plants. Another good idea is to make a baby book with photos of the child and / or the whole family, photo illustrations of a summer trip to the sea, a morning in kindergarten, a birthday celebration, etc. In a word, a do-it-yourself baby book is a great way to play, teach, entertain and delight a preschooler. The ability to make a baby book with your own hands will be useful to parents, older brothers and sisters, and educators, and teachers of children's clubs, and in general to everyone who is interested in developing children.
What does a baby book look like? Functions and ideas of baby books
A baby book is a conditional name that shows the addressee rather than the size of this product. A baby book can be small or large, the main thing is that the child should be comfortable holding it in his hands and want to look at it. In fact, this is a kind of hybrid of a book and a toy that develops thinking, memory, and motor skills of the little ones. Developing books can be not only of different sizes, but also of different content, which depends on the age and interests of a particular child, on the wishes of parents, etc. In a word, there are no restrictions on what kind of baby book to make, but it is important that it fulfills its main functions:  Thus, the baby book has a beneficial and comprehensive effect on the development of preschool children, and also becomes one of the favorite toys, because it is unique and made by oneself and / or by the hands of loving people. Not a single printed book, even the most expensive and beautiful, bought in a fashionable toy store, will deliver these sensations. So take the time and inspiration to make your own baby book.
How to make a do-it-yourself baby book out of fabric?
The younger the child, the more the developmental book should resemble a toy. Kids do not calculate strength and do not yet understand that paper books need to be protected. Do not expect miracles of accuracy from your child, and just make a baby book out of fabric. Moreover, it is textile materials that make it possible to fill an educational toy with interesting and useful details: 
- Use natural fabrics that are pleasant to the touch. As a rule, these are chintz, flannel, sewing, which can be bought at any fabric store. Do not rush to buy - there are probably shreds and scraps at home too, which will be useful for making a baby book.
- Pick up also ribbons, braid, laces, large beautiful buttons, beads, appliqués and anything that can decorate and enhance your creation. Avoid only small, fragile items that a child can tear off and swallow and/or injure them.
- Plan for which pages in the story you use certain details. Make a pattern and lay out the materials "in heaps." Cover elements can be made of cardboard covered with fabric to ensure density, and the rest of the “pages” can be filled with soft synthetic winterizer or left empty.
- Do not be lazy to cut out the details of the illustrations - the more beautiful and brighter they are, the more likely that the child will love the baby book. Carefully work the seams so that there are no protruding threads, shaggy edges, sharp corners or loose elements anywhere.
- Think over game moments: let the fairy tale character wear a vest with unbuttoned / fastened buttons. You can equip the heroes with baskets in which apples are placed, a kangaroo with a bag with a kangaroo, an apple with a hole with a worm, a house with opening doors, etc.
- The parts of the fabric baby book can be made double (with a fold in the middle) or separate so that new pages can be added. In any case, provide holes for the tape that holds the parts together. Pass the ribbon through and tie into a pretty strong bow.
How to make a baby book with your own hands out of paper?
Two-year-olds are quite able to look at developing books made of thick paper, especially under adult supervision. Paper baby books are easier and faster to make and can be made using ready-made pictures, postcards, photographs, and/or stickers. To facilitate the task, you can take stationery transparent files and place pages in them so that it is convenient to stitch, swap, replace and supplement. But it’s better to spend a little more time and make a good baby book: 
- Prepare colored cardboard and paper, felt-tip pens, markers, brighter pencils, stationery glue, scissors, ready-made colorful pictures and everything else that you may need in the creative process. Do not forget the satin ribbon - it will come in handy too.
- It is convenient to use sheets of standard A4 format, paper and cardboard. Take a sheet of cardboard and fold it in half across. Do the same with multi-colored paper pages. Insert the paper pieces into each other, and then into the cardboard cover.
- Drill two symmetrical holes in the fold and “sew” the future book with ribbon. Tie with a bow, cut off the excess ends. When the pages are stacked together, you can give them a shape: round the corners, cut out in the form of petals, or leave them rectangular.
- Ribbons for sewing baby books can be different, braided, intertwined, etc. The pages of the book are selected by shade, repeat the sequence of colors of the rainbow, correspond to the theme of the plot (colors of the seasons, plants, etc.) - show your imagination at each stage.
- Stick a photo, illustration, raised element on each page. If you know how, repeat the technology of volumetric images that rise when you open the page. Use your own pictures and magazine clippings.
- Pay special attention to the cover. It should be the brightest, arouse interest and clearly show what awaits inside the book. For the title, you can cut letters from postcards or use a stencil.
- There can be many plots for a baby book. For example, each separate season, favorite dishes, adventures of a fairy-tale character, a photo report about a morning performance in kindergarten, sea holidays, toys and walks.
- Include riddles, questions, and other interactive moments in the book that involve the child in the game. There may be a problem on the first page, and its solution at the end of the book. For younger children, sewn bells, tweeters, rustling details are suitable.
Do-it-yourself baby book for kindergarten from paper- an educational game for the little know-it-alls who so want to learn, but it's too early to read and write for them, but it's time to look at the pictures and learn a lot of new things. Every mom knows that creativity has a positive effect on the development of a small child, which is why kindergarten teachers work with kids, and parents work at home with the kids to create an application book.
Do-it-yourself baby book for kindergarten
An interesting book baby do-it-yourself for kindergarten- this is a developing material for a small pupil of a kindergarten, which mommy can create on her own. The main thing is to come up with an interesting topic for developing crafts, arrange a composition and choose material for execution. For a child of each age, you can choose an interesting topic for a book and suitable material, for example, for kids from the younger group, textile crafts are best suited, and for pupils of the older group, you can choose cardboard and paper.
The baby book for the little ones is aimed primarily at developing fine motor skills of the fingers, so they are made of fabric and felt, adding various three-dimensional elements - zippers, buttons, felt figures, large beads, etc. For children who are studying or have already learned read syllables, such a developing book can be a mini-primer with letters, syllables and pictures corresponding to the topic.

The simplest paper options are made in the manner of a transformer, where the sheets are folded and glued together, and then the pages can be expanded into a long strip with tasks and pictures. This is the easiest way to make a book, involving children in the creative process. This option is suitable if the teacher asked the children and parents to do joint. You can choose the simplest and most interesting topics for children - "Seasons", "Animals", "Favorite cartoons".
Moms who decide to make a developing book can sew the spine with threads, you can also make holes on each page with a hole punch, and then tie all the pages with a ribbon or connect them with rings, following the example of plastic office folders for documents. If you connect the book with rings, then at any time you can add another page. In addition, for such a book, you can choose not only cardboard, but also felt, fleece, which allows you to make an educational craft colorful and multifunctional.

An interesting book baby do-it-yourself for kindergarten
Do-it-yourself baby book for kindergarten for a child three years can be made of felt. And this material was not chosen by chance, but for practical reasons, because felt pages will last longer. A child can accidentally wet them, and the book will be preserved and its appearance will not suffer. The felt book can even be washed if necessary.
In order to promote the development of tactile sensations, it is desirable to use various textured materials when developing a booklet. In fact, it is not at all necessary that the child has reached kindergarten age; his first acquaintance with such a developmental book can take place already at the age of one year.

A book for young children should not contain small, easily detached parts that can be easily torn off and, according to tradition, put in their mouths. This may lead to undesirable consequences. It is best to use different textures of materials, different fabrics to the touch, and other materials, such as films and dense polyethylene.
On the pages of children's educational books, there must be applications, but for the smallest, you need to choose simple figures that are well known to them from a very early age. You can apply the sun and a tree, a house and a car, flowers and butterflies.
For girls, this application is perfect: kitchen furniture and attributes with opening cabinet doors, images of products and kitchen appliances. Felt-sewn plates and teapots can be made with Velcro to separate from the pages if desired. This book can also be used in games with dolls.
If you designed it yourself, then you probably still have felt figures, which can now be used to design a booklet.

Do-it-yourself baby book for kindergarten
Growing up, the child can not only play with the book, but also take part in its creation. Now the content of the pages can be movable, easy to separate. For a kid who studies in the middle and senior groups, you can add small and large buttons, braids made of thread, ribbons and laces to the pages. Now, in addition to plots and pictures, you can add letters and numbers.

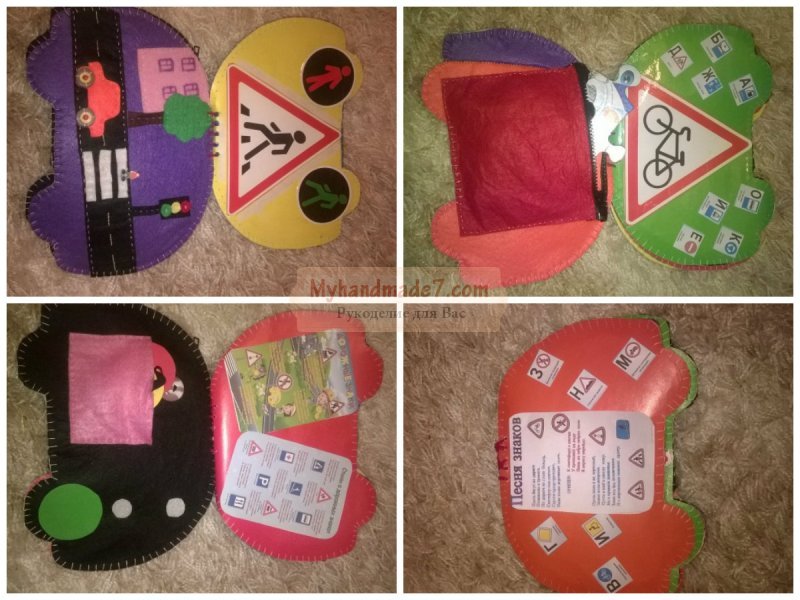
A moving picture can also become an element of the plot. Boys will like this theme, because you can beat the rules of the road with cars and traffic lights.
4 years is the time for a child to learn how to tie their own shoelaces, and the learning process will arouse great interest in the baby if done in a playful way. That is why one page can be made in the form of a shoe with lacing. For such a page, you will need iron rings larger than the laces so that the kids can get into them easily. In the same way and sometimes they make out functionally one wall: locks with keys, latches and hooks are attached.

The original ladybug, in which a small zipper will be located between two wings, can teach you how to fasten the zipper carefully. We know perfectly well the love of children for “adult activities”, they will show great interest in lightning and will fiddle with it for a long time. With a zipper, you can also make secret pockets, inside which prizes or other interesting tasks will be hidden. Do-it-yourself baby book for kindergarten with various tasks, the child will be interested in not a single day, and for several years he will be happy to play with her both in kindergarten and at home.

Girls love to play with dolls, but they are constantly lost, as well as their outfits and accessories, and you can put everything together in one book, where there will be doll applications on the pages, and dresses and outfits for them can be changed with Velcro. And you can make hair out of threads, and if you wish, you can do various hairstyles - make curls or braid braids.

Do-it-yourself baby book for kindergarten for a child of 3 years old
Do-it-yourself baby book for children development can be done in the simplest way - from paper, with stitched pages. Children can work on such crafts on their own, and parents will always come to their aid. The most interesting topics for children, of course, are cartoons and fairy tales, any cartoon characters.
With a child of 6 years old, you can start making a book together, for this it is enough to prepare sheets of colored paper and glue. When the blank is ready, a paper application can be glued to each page. In addition, the joint creativity of parents and children is an exciting and fun process, and educators often give a task for such a joint creative pastime.
Choose a topic that is interesting for children, and at the same time educational. If you read fairy tales to children at night, and they already know various fairy tale characters, then your little book can be called “Journey Through Fairy Tales”.
In advance, you need to prepare multi-colored sheets of cardboard, scissors and glue, as well as a thin ribbon to connect the pages. Double-sided tape can also come in handy in the process, which can be used instead of glue. It will be easier to stick paper applications on double-sided tape without worrying that the glue will protrude beyond the boundaries of the paper elements.
You will also need a color printer that will help you print the selected fabulous landscapes, pictures and scenes. If there is no printer, then children's magazines can be used. Sheets of cardboard must be bent in half and cut off the edges in a semicircle with curly scissors. Cutting out cardboard will fall on the shoulders of the parents, but cutting paper elements with curly scissors can be entrusted to children. They will be happy to do this simple task.

Along the fold line of all paper pages, approximately in the middle, two holes should be made into which you can thread a ribbon to connect all the pages. The ribbon on the outside must be tied into a bow.
When the blank for the book is ready, it can be decorated with fairy-tale motifs and landscapes, your child's favorite fairy-tale characters will be placed on the pages. Separately, you can print riddles based on fairy tales or excerpts from your favorite fairy tales that can be glued next to the pictures. Be sure to make a beautiful cover with an inscription.

Do-it-yourself baby book for kindergarten from paper
Do-it-yourself baby book for kindergarten for a child of 3 years old is a unique educational toy that combines many different functions. Here and education, and the development of fine motor skills, and the development of fantasy. In English, such a felt toy is called a quiet book (a quiet book), because while the baby is passionate about this educational game, the house is very quiet and calm, and mom has time to relax. But first, you need to do the independent creation of such an educational game, and for this you don’t even need sewing skills. Felt can be sewn with hand stitches, so it is not necessary to use a sewing machine.
First you need to think over the theme and arrangement of the elements on the pages, for the first time, you can take any of the proposed examples, and very soon you will be able to develop an independent design of a felt book.
For letters and figures, you should select templates in advance and print them on paper, only then transfer them to felt and cut them out. It is not at all necessary to sew all the additional elements of the felt appliqué tightly, they can be attached with fasteners and Velcro, fastened with ribbons and elastic bands.
It is not surprising that working with felt will captivate the craftswoman, and you will definitely want to make other crafts, toys and decorations. For example, for a matinee as an accessory to a fancy dress made of felt, you can make it.