If the time has not yet come for repairs, but you want to unusually diversify your home, you can easily do it yourself. Decorating an apartment or house with beautiful butterflies made of paper, cardboard and other materials is an interesting and stylish solution that does not require a lot of time and money.
The ceilings and walls in the apartment can be decorated using any material available at home, but the following can be considered the most popular:

To keep cute jewelry securely, you must use the following types of fasteners, which you can see in the table:
| Way | Characteristic |
|---|---|
Wallpaper glue or PVA glue  | The easiest option, suitable for placing jewelry on cabinets and other interior items |
pins  | Suitable for wallpaper, fabric and plastic panels |
Chains, thread or wire  | With these tools, you can pin butterflies to the ceiling or fixtures. |
Double sided tape  | Using adhesive tape, you can attach the workpiece to any place |
Important! Use templates of different sizes for decorations, then they will look more interesting and realistic.
Creating butterflies: a universal master class
This master class can be used when creating a composition using any stencils. To create jewelry you will need:
- cardboard and colored paper;
- stencil sheets;
- Printer;
- pencil, glue and scissors.
Step 1. Draw yourself or print several different stencils on the printer. After that, you need to cut them out of plain paper.

Step 2 Attach the cut stencils to the cardboard, carefully circle them and cut them out. If desired, draw the silhouettes directly or translate the template using carbon paper.

Step 3 Outline the patterns, but do it on the back of the paper. Make several copies, cut them.
Step 4 Bend the workpiece a little - this will create the effect of developing wings.

Step 5 Apply a little glue to the center of the fold and attach the butterfly to the desired surface, pressing with your finger for a few seconds.

Step 6 Use your imagination - place the butterflies in one or different directions, along the edges or in the middle of the wall. Try placing the butterflies next to each other or at a distance from each other - look for the option that you like the most.

Beautiful origami butterfly
If you like making different paper figures, you can make a butterfly in this way - such an unusual craft can cheer up guests and family. This is a simple scheme that you can easily make yourself.
Step 1. Take a square sheet of colored paper or cardboard. Fold it twice in the center, then unfold it again. Now the sheet is divided into four identical squares.

Step 2 Fold the paper diagonally so that four more lines appear on it. It turned out that the square is divided into eight triangles. Draw triangles on opposite sides to each other.

Step 3 Fold the top triangles in half, leave the bottom ones as they are.

Step 4 Turn the workpiece upside down, the small part should be on the bottom. Wrap the corner, act carefully - the edges should not tear.

Step 5 Tuck in the sharp edge. Turn the workpiece over so that the tucked corner is facing you.

Step 6 In the middle, make a fold with your fingers and fold the butterfly - if you skip this step, the wings will not be able to open. Origami decoration is ready.


Important! So that the butterflies do not merge with the interior, make them noticeable. Don't be afraid to use bright colors to make your craft stand out.
Stylish vinyl butterfly
If you have an unused vinyl record at home, you can create an unusual interior decoration. For this you will also need:
- sample;
- foil;
- baking sheet;
- colored markers and sharp scissors.
Step 1. Take the material and measure the middle of the stencil on it. Carefully trace the outline, draw with a white felt-tip pen on the plate, and use black on the sticker in the center.

Step 2 Lay the foil on a baking sheet, and place the vinyl on it. Preheat the oven to 400 degrees and place the baking sheet with the workpiece in the upper area. After 50 seconds, remove the plate - it should become soft and pliable.

Step 3 Use sharp scissors to cut out the pattern. This must be done before the vinyl dries. If it still dries up, place the plate in the oven again and repeat the action.

Step 4 Fold back the wings after cutting out the butterfly. The craft is ready.


Butterflies made of polymer clay
Polymer clay is a plastic material for modeling, which looks and feels like plasticine. You can make original blanks from it. You will need:
- butterfly baking molds;
- polymer clay (at the rate of 120 grams for five butterflies);
- a skein of white thread for hanging crafts;
- stationery buttons.
Step 1. Using a baking dish, cut out the blanks, make four small holes in the middle of the products.

Step 2 Fold back the wings and place the butterflies in a glass dish. Put in the oven and bake for 15-20 minutes at 110 degrees.

Step 3 Insert the thread into all holes with a cross and form a knot. Push a button into it.

Step 4 Attach the resulting decorations to the surface. If the edges of the product are not formed, sand them. Color the butterflies in different colors if you want to add some color.

Butterflies on walls and objects: ideas
Choose a winged insect color that matches your interior. For example, pink butterflies can be placed above a pink sofa.

Decorate the ceiling by placing butterflies around the chandelier. They will be beautifully illuminated, creating a good mood for all the inhabitants of the apartment.

Walls can be decorated with heart-shaped pink and black butterflies by gluing blanks in the living room or bedroom.

For the room in which the baby lives, you can cut out several templates of different shapes, and then transfer them to multi-colored paper and place them on the wall in the form of a swirl.

To diversify the interior, before placing the blanks on the wall, use a brush to apply luminescent paint to the butterflies. After it is completely dry, your butterflies will begin to glow in the dark.

Another original idea: butterflies can be placed in a spiral shape.

With imagination and a few hours of free time, you can create a real work of art. An unusual and difficult, but very beautiful version of a craft in the shape of a heart.

A stylish solution for the bedroom: butterflies can be placed in frames of different sizes and shapes.

Butterflies can also be attached to curtains. In this case, you can use corrugated paper - it will make the butterflies airy, light and voluminous.

Laconic version of the placement of butterflies made by hand. It doesn't take a lot of time, but it looks very nice.
Important! The philosophy of Feng Shui says: butterflies are a symbol of joy, love and happiness. This symbol plays a very important role in the ancient teachings.
Butterfly patterns: cut out yourself
There are many different templates that you can use to make stencils and transfer them to paper. You need to choose the size and shape yourself, it is only a matter of your imagination.
Classic butterfly for decorating walls and furniture.

Another version of the classic butterfly.

Large butterfly with outstretched wings.

Cute curly butterfly with round antennae.


Beautiful butterfly with unusual wings.


Funny pink butterfly for the nursery.


A beautiful butterfly with antennae.

Template for decorating walls and furniture: side view.


Gorgeous butterfly with patterns and sharp antennae.

Butterflies made by yourself are a great way to decorate, which will give the room a fresh and updated look. If you creatively approach the issue, put a little effort, imagination and effort, you can create a real masterpiece that will delight you and your family members for a long time.
Video - Paper butterfly patterns for interior decoration
Butterflies are, without a doubt, the most beautiful insect on planet Earth. Agree that butterflies have the most unusual colors (more precisely, some representatives of a large family of butterflies). Thanks to the magnificent color, images of butterflies are used both on fabrics (to reproduce unusual prints), and for the design of a children's room, and for decorating all kinds of accessories. You can make a beautiful insect from different materials. For example, from leather, fabric, even metal. But, probably, the most familiar material for butterfly crafts is paper. We offer you to make a butterfly yourself from plain paper using the Japanese origami method.
- So, for crafts, you can use plain white paper or colored paper.
You can choose the size for the craft yourself. We propose to make a butterfly out of A4 paper. Let's prepare the sheet.
To make a beautiful paper butterfly with your own hands, we need a square. You can get this figure in a simple way. It is enough to connect the edges of the paper so that a regular triangle is obtained. We cut off the excess piece of paper using scissors.

We have a square, one diagonal of which has a fold.

For further work, we need to bend the square along another diagonal. By the way, in order for the folds to be “clear” and even, you can walk along the place of the fold with a ruler.

Then fold the square in half again on each side. It should turn out as shown in the photo.

We fold the square so that we get a double triangle.

We turn the corners of one formed triangle and bend to the top.

Flip the triangle upside down. Then we bend the top of the triangle to the base so that the corner sticks out a little (this is the head of a butterfly).

Bend the butterfly in half in the center.

We bend the wings, holding the butterfly by the "torso".

That's all. Our paper butterfly is ready.

A butterfly made of paper can be left white (there is also such a type of butterfly) or painted as you wish. By changing the size of the side of the square, you can make small butterflies. You can use the resulting butterflies to decorate the interior of a children's room.

The final look of the craft. Photo 1.

The final look of the craft. Photo 2.

The final look of the craft. Photo 3.

The final look of the craft. Photo 4.
The appearance of the room is boring, but there is no money and energy for high-quality repairs. A fairly common problem for many people. But there is a way out of this problem - you can replace textiles and decor elements. This is a relatively quick and economical way to add variety to the familiar look of your home.
One of these elements can be butterflies for decoration. They will bring lightness to any interior.

Butterflies for decor can be created from various materials. Due to this, outwardly they can differ from each other and make a difference in the decorative design of the premises.
It is recommended to make a couple of trial decorative butterflies to get a better idea of how they will fit into the look of the home. Let us dwell in more detail on the materials that are used to create butterflies for decoration.

Material for creating butterflies for decoration
colored paper
The most popular option is paper. This is the cheapest material for creating butterflies and at the same time simple. There are several ways to make paper butterflies.

If you want to stick the product completely on the walls, then you only need to paint the front side of the butterfly.

When the butterflies are involved in a three-dimensional composition, then the paper should be used double-sided, where both sides have a certain color.

Indeed, if a butterfly has an unpainted, albeit wrong, side, then this significantly spoils the overall impression of the composition.
corrugated paper
In addition to colored paper, corrugated paper is often used. This creates a slightly different effect. Butterflies for decor are airy, light and translucent wings like real insects. With the help of corrugated paper, butterflies are very voluminous.

In addition, old magazines, pieces of wallpaper, special napkins and other printed materials can be used to create butterflies.

Indeed, a huge variety of butterflies can be created from paper. And if you also tint the paper, combine the use of several types of paper, then the place for fantasy is truly limitless.

Cardboard
The next type of material for decoration is cardboard. When creating butterflies, cardboard is used, which is not very dense. Distinguish between colored and double-sided cardboard. With the help of cardboard, a voluminous decor is created.

This is not surprising, since the butterflies for decor, which are made of cardboard, hold the created shape better. And in order to bend the wings of a cardboard butterfly, you do not need to use any special knowledge and abilities.
Cardboard is the main material for making template butterflies, which are typical for mass-produced products.

For this, a butterfly stencil is used. The result is a large number of decorative items that are similar in appearance and size.

At the same time, a minimum amount of time is spent on their creation. Of course, a stencil for cutting a butterfly is an outlet for many lovers to bring comfort to their homes.
Having a butterfly stencil on the wall, you can decorate your home with a fabric decor element. Unlike the previous options, the fabric gives the butterflies extra rigidity.


Butterfly production technology for decoration
You should start your acquaintance with butterflies for decor from the very basics - contour butterflies. To create them, you need colored paper. You can also use cardboard, old newspapers.

Initially, a blank is created for creating butterflies - a butterfly stencil for cutting out of paper. We come up with an image of a butterfly, which we then want to place at home. Then we transfer the created butterfly silhouette to thick paper, and then cut it out.


The use of butterflies for decor of various sizes seems to be advantageous. This gives the impression of a variability of the environment, where each butterfly is individual in its own way.

Butterflies can be attached both to ordinary glue and to double-sided. When placing butterflies for decoration on curtains, sewing pins will be used.


In general, we can say that you can create a wall composition from small butterflies for decoration, but larger butterflies can “take root” on curtains.

Butterfly stencil photo


At some point, every person, both an adult and a child, thinks about changing the place in which he lives. However, there are not always funds to fulfill such a desire, and sometimes you don’t want to completely change the interior. After all, it is long and rather painstaking.
The optimal and relatively inexpensive solution to this problem can be decorating the space of a separate room or a whole house with various applications. For example, if you need to bring lightness, airiness and pleasant memories of summer into the atmosphere of a room, you can decorate it with butterflies. How to cut these marvelous creatures from improvised materials is described in detail in the article.
How to prepare a template
Decor elements based on butterflies have long been used by designers to create beautiful interiors. In the current paragraph, we invite readers to explore an option, notable for the fact that it is very easy to implement it at home. Moreover, all family members, even the smallest ones, can be involved in the work. It will also be not only interesting and fun for them to cut out butterflies, but also useful. Indeed, in the process of creating original masterpieces, fine motor skills will develop, which, in turn, contributes to the development of the brain. Although by analogy, you can prepare any of the butterflies proposed in the article.
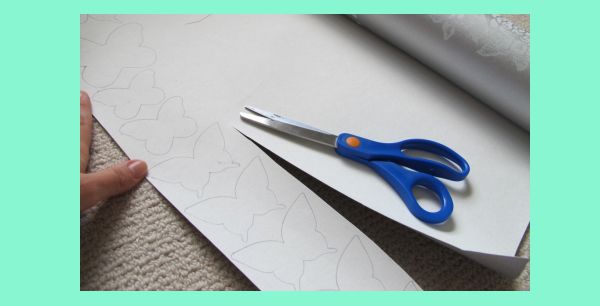
So, if the reader decides to try out the option presented above, he should first prepare a butterfly template for cutting out of paper. It is very easy to do this. You just need to print the proposed image on the printer or:
- open the picture on the full screen of the computer;
- attach a landscape sheet to it;
- redraw the contour with a pencil;
- then cut out the butterfly silhouette using scissors.
Moreover, it is important to consider that it is most convenient to do crafts if each family member has his own template. Then the work will go faster and more exciting.
Butterfly made of colored paper
The materials from which you can make various silhouettes for decorating the interior are countless. There are also quite exotic ones among them, we will definitely tell about them later, but for now we will tell the reader how to cut butterflies from colored paper. After all, this option is considered the simplest.
You can take the previous template as a basis, however, in this case it is better to arrange a large composition of many silhouettes. Under this, designers are advised to select an entire wall. For example, in this way you can decorate the area above the bed or another part of the house. It all depends on the wishes of the owners. Some craftsmen create the silhouette of a large one from small butterflies. And, I must admit, this craft looks very impressive.
There are no hard and fast rules about color. After all, this question also determines your own taste. However, designers still advise cutting out the silhouette of butterflies from a monochromatic material for colorful walls and, conversely, for monochrome ones, from a colored one.

If the reader wants to make one butterfly, but very original, he should use the openwork pattern as a basis.
How to make a carved butterfly
Many beginner needlewomen find it difficult to understand how to make an openwork silhouette. After all, any awkward movement can crush or tear a butterfly. However, there is really nothing to be afraid of. After all, you just need to use the right tool in the creative process. Of course, it is much easier to buy a carved butterfly silhouette you like in a store. But in this case, you may encounter another problem - the lack of the desired template. Because even a very extensive assortment presented on the shelves of the supermarket does not allow you to find the most necessary and suitable thing.
So, if the reader is interested in how to cut an openwork butterfly, then this process is illustrated in detail below. To make it clearer, just look at the following picture and carefully consider both the tool and the technology.

Corrugated Paper Butterfly
The studied creatures, which are made of cellulose-based canvas, which are folded, look very airy and light. At the same time, needlewomen have the opportunity to make amazing openwork butterflies using only scissors. The only caveat is that corrugated paper is very thin, and nail scissors are more suitable for working with it. After all, others can damage or completely ruin a fragile structure.
So, how to cut a beautiful butterfly from corrugated paper:
- Material should be prepared. This is not only folded paper, but also ordinary color paper. You will also need stationery and manicure scissors, a pencil and PVA glue.
- Then prepare the stencil. However, it is important to draw the reader's attention to the fact that the butterfly will consist of two parts: openwork and ordinary. And templates should be made for both options.
- Finally, we transfer the carved silhouette to the corrugated paper of the selected color, and the simple one to color.
- We cut out both parts and connect them together, lubricating with glue along the calf.

Butterfly from the newspaper
Bringing your next original idea to life will require one of the most readily available materials: scrap press. In the interior, such butterflies look, as they say, simply, but tastefully. Therefore, they are usually placed in the living room to give the room sophistication. How to cut a butterfly from a newspaper is described in detail below. In the meantime, consider a few design ideas.
So, designers note that with the help of paper silhouettes, you can highlight or beat a certain area. Therefore, you should carefully inspect your home. Does one of the walls get lost in the background of the rest, or does it look empty? That is what needs to be filled. But you should not be too zealous. The best option are compositions that do not exceed a meter in diameter. However, if the room has a staircase, then you can decorate it completely. It is best to make the butterflies monochromatic and certainly from a color that contrasts with the shade of the structure.
Well, now let's move on to instructions on how to cut a butterfly out of a newspaper. In fact, she is quite simple. It should be clarified that silhouettes of different sizes look most impressive. They can be made according to the stencil presented at the end of the current paragraph. Then we prepare the material, tools and template. We cut out butterflies and collect them in a marvelous composition.

Butterfly from magazine clippings
This method allows you to make brighter and more colorful creatures. Any glossy magazine will do for him. However, you can even take your own photos. And then it will be possible to arrange a whole gallery of pleasant memories on one of the walls of your room. However, to fulfill this idea, it is wiser to choose simple butterfly patterns for cutting out of paper or other material. Because openwork samples can be incorrectly transferred to the photo or distract attention from the image.
Butterfly made of cardboard
Another material that is most often used by designers. And all because it has a number of advantages. The main ones are the following:
- clarity of the pattern;
- no deformation;
- the ability to cut more complex ornaments.
On the Internet you can find an abundance of photos of the interior, decorated with dense black butterflies. Moreover, both single copies and entire compositions look impressive. Especially if they are interestingly beaten and fit perfectly into the rest of the ensemble of the room.
Designers consider the one by which openwork butterflies are illuminated with lanterns to be a great idea. To do this, you can use the usual New Year's garland, and cut the butterflies out of cardboard. How to do this has already been described above. Remember that it is best to give preference to the openwork butterfly stencil. This will allow the composition to overflow unusually. For example, consider the following pattern.

Butterfly from unnecessary wallpapers
Another original and fairly simple option is to make the studied creatures from old wallpapers. And you can even attach them to the wall, already decorated by them. This will add volume, liveliness, unusualness to it. Stencils are easy to choose according to your taste. After all, the wallpaper is quite rigid in order to keep the desired shape and demonstrate the beauty of openwork.
Butterflies for the children's room
It has already been noted earlier that the composition of the marvelous creatures studied in the article should be selected for the ensemble of a particular room. Accordingly, for the hall or bedroom, you can cut plain dark-colored butterflies. But for the room where the child lives, this option would be completely unacceptable. Because “live” colors and textures are more suitable for the baby’s interior. This should be remembered when choosing material.
In addition, according to many parents, who also at some point in their lives wondered what and how to cut butterflies from, it is much better to use appropriate stencils to decorate a children's room. For example, you can take the one that is proposed below.

Vinyl record butterflies
If you want to create something original and unbanal, you need to use an unusual material, an excellent solution is old vinyl records. However, we must prepare ourselves in advance for the fact that it will take quite a long time to tinker with the creation of even a single butterfly. After all, this process is very painstaking. But the product will turn out to be very extraordinary.
So, how to cut a butterfly from a vinyl record:
- The first step is to prepare a plate, plain foil, scissors, chalk or a contrasting marker. You will have to work with the oven, so it is wiser not to involve kids in work.
- Spread the foil over the surface of the baking sheet.
- Place a plate on top, on which you first outline the silhouette of the desired butterfly.
- Place the baking sheet in the oven and warm up slightly.
- Remove and immediately cut out the butterfly using regular scissors.
- Repeat the procedure until the marvelous creation is ready.
- Finally, place the plate fragment back into the oven. This is necessary so that it softens, then you can give the butterfly the desired shape.
Butterfly from plastic bottles
From what only craftsmen do not cut out butterflies! For example, you can use transparent or colored plastic bottles. In this case, it will be possible to get slightly curved butterflies, which from the side will look like they are alive. By the way, you can draw on plastic with markers. And this is the second reason that convinces designers to use this particular material to create an original decor. After all, the finished butterfly can be painted as your heart desires.
There are no strict recommendations on how to cut a butterfly from a plastic bottle. However, it is important to consider the density of the material. And, accordingly, choose not lace and openwork stencils, but ordinary ones. It will be much easier to cut them.
If the butterflies painted with markers seem too simple, boring and mundane, you can “arm yourself” with nail polish of different shades. For example, take the one with sparkles. And already they arrange butterflies according to their desire and taste.

Butterflies from tin cans
Surely everyone in the house has a few unnecessary iron vessels from carbonated drinks. Perhaps our reader will be surprised, but they can also be used to create original butterflies. However, when working, it is also necessary to take into account that the material is hard and it will be almost impossible to cut small patterns on it. Therefore, it is more reasonable, as in the previous version, to consider a simple butterfly pattern.
Fabric butterflies
This version of the material is notable for the fact that it has practically no restrictions for creativity. After all, it is quite easy to make a silhouette of a butterfly or a real appliqué out of fabric. Color, texture, density - all this will allow the imagination to really run wild.
It should be noted that cutting a fabric template is as easy as cutting a butterfly out of paper with your own hands. The only caveat is that the material can move when transferring the silhouette and when cutting it out. Therefore, it is better to prepare more hairpins with which you can fix the fabric.
Thus, making butterflies and decorating your room, clothes, stationery and many other things is very simple. You just need to have a desire, and this article will tell you how to beautifully cut a butterfly out of paper or other material. Although you can show your imagination and come up with your own unique butterfly.
Butterflies are a symbol of lightness. Butterflies are the most adorable creatures on the planet. No wonder they say: "flutters like a butterfly" or "light as a butterfly." And so I want to become a butterfly and flutter, take off. Or at least keep them as pets. But, unfortunately, the life of butterflies is short, and few people dare to keep a collection of dried butterflies, it's a pity for them. The ideal way out is do-it-yourself butterflies.
Learning how to make butterflies is simple, but there was a desire and creative inspiration. And the material is always at hand: fabric, paper, nylon, plastic bottles. So, let's start, perhaps. Let's figure out how to make a butterfly with your own hands from various improvised means.

For her, we need wire, scissors, colored paper or a page from a magazine. In this case, we will arm ourselves with a colorful magazine.
Cut out a square from a rectangular sheet. To do this, bend the sheet. Combining the two sides, cut off the excess. We do not throw away the cut piece, we still need it.
From the square we make a triangle and fold it with an accordion. The more additions, the more romantic the butterfly will turn out.


When the accordion is ready, unfold the sheet.

So we tie it diagonally with wire. Got big wings.
We take the part of the sheet that we cut off from the square. We make a square out of it, then a triangle. We also fold it with an accordion, straighten it and tie it with wire.
We connect large and small wings with wire, wind them several times, form the body itself. For volume, you can insert plasticine or the rest of the paper into it (after crumpling it). From the remnants of the wire we make antennae.
A few sheets of a magazine, a lot of fun and do-it-yourself paper butterflies are ready!
 Butterfly can be not only attached to a mirror, picture, wall or lamp. She can flutter in the breeze. To do this, you need to make a butterfly with movable wings.
Materials:
- colored paper for copier;
- scissors, glue, pencil;
- pliers, wire cutters;
- wire;
- stationery black rubber bands;
- markers, tape, brush.


Depending on the color of the paper, you can make any butterfly. We will make a butterfly-swallowtail.
You can check if you did everything right by shaking the butterfly. If the wings flutter - you did it, you did it.
Handmade fabric butterflies are incredibly beautiful. We need a small piece of felt, beautiful beads or buttons, sequins, sequins, a piece of tulle, glue, a beautiful ribbon.
Draw a butterfly stencil on paper, cut it out and transfer it to felt.
Cut out 8 petals from tulle.
Everything else is decoration and depends on your imagination. We fix all the decorative prettiness with glue. Glue sequins along the edge. You can use acrylic rhinestones. On the upper wings we glue two petals from the grid. For the lower wings, fold the petals in half and glue.
To hang the butterfly, we glue the tape.
We continue to decorate it with beads, sequins, rhinestones, small buttons.

To make the butterfly shine, sprinkle it with ordinary hairspray, sprinkle with dry sparkles and fix it again with varnish.
Our butterfly is ready.
 Necessary materials:
- organza;
- paint-contour on fabric.
- "web";
- colour pencils;
- wool, scissors, glue, stencil, pencil.
To begin with, we glue two pieces of organza to each other with the help of a “cobweb” - we iron them.
Organza is transparent, so we put the butterfly stencil under the fabric. Outline on top. We draw not only the contour of the butterfly, but also all the veins. But we don't color it. After a few hours, when it dries (see the instructions for the paint), we fix the pattern with an iron.
We paint over the butterfly with colored pencils, referring to the stencil or picture. Carefully cut out the wings. You should get four parts. From wool we roll a shaggy body. Attach wings to it with glue. We make antennae from fishing line, attach them to the body.
The beautiful butterfly is ready!
 It would seem that what can be done with PET containers? Just throw away. An no. Plastic makes beautiful crafts and not only decorative, for example, or flowers, but also practical, for example, a fence or. Now let's make a butterfly.
We will need: 
- plastic bottle;
- glue, scissors, marker;
- nail polish, dry glitter;
- butterfly stencil;
- wire, wire cutters;
- beads, rhinestones.
Cut off part of the bottle. Attach the stencil from the inside. Circle it along the contour, draw veins. It is better to take a waterproof marker so that it does not wash off.


Cut out the butterfly, bend it slightly. From the inside out with nail polish, paint the butterfly. Make and attach wire antennae to the butterfly. Without cutting the wire, string beads on it - this will be the body of a butterfly.


Attach the body with the antennae to the butterfly. You can glue, you can make holes in the base and attach through them. Walk along the contours drawn with a marker with glue, sprinkle with sparkles. Rhinestones can be added if desired. Let dry.

Butterfly is ready!
 Materials:
- wire, wire cutters;
- glue, paint (gouache);
- glitter glue or dry glitter;
- light-colored nylon socks or tights;
- brushes, scissors.
Cut off two identical pieces of wire and connect them to each other. Give the frame the shape of wings. Cut out a square or rectangle from a nylon, fold in half. Put the frame inside. Pull the capron onto the wire. Fasten the ends. Take a hair clip and attach to the wings like a body. Decorate the wings with paints, sparkles, beads, sequins, rhinestones. Plant the entire decor on glue or sew with monofilament.


You can make a two-sided butterfly.
You can attach such a butterfly on your hair, on clothes, on.